Creating a Rustic Painterly Effect Using Photoshop Elements.
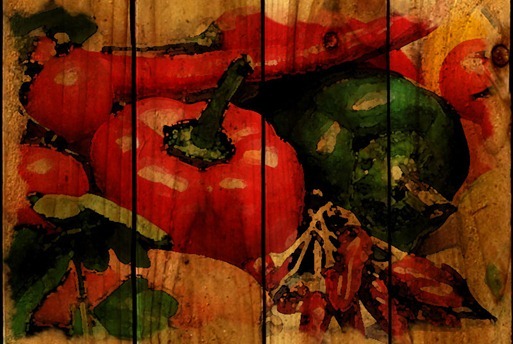
This technique will work with almost any image and because the results can be quite subtle, it works really well for making backgrounds for scrapbooking projects, calendars and even book covers. I decided on a photo of some vegetables as it lends itself nicely to the effect!
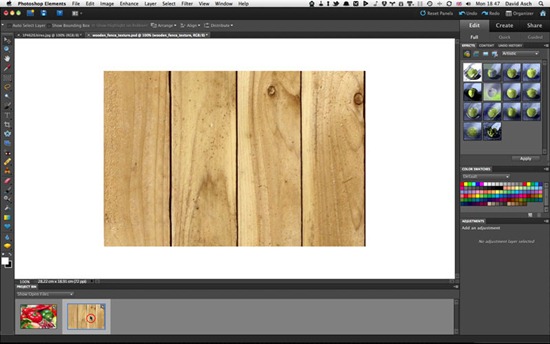
1. First things first, we’ll open the images in the Editor workspace. This can be done either from the Organizer or directly within the Editor via the File menu. Once opened, both photos will appear in the Project bin at the bottom of the workspace. If it’s not visible, you can show the Project bin by clicking its entry in the Window menu. We’ll make the wood texture our live image by double-clicking its thumbnail.
2. The tone of the wood is a little light at the moment. We want a slightly rougher, weathered appearance. We can do this easily using the Levels command. Go to Enhance > Adjust Lighting > Levels or keyboard shortcut: Cmd+L (Mac) / Ctrl+L (PC). Drag the Shadows slider to the right; this will enhance the darker areas. Then drag the Mid-tone slider to the right to give the wood a richer tone.
3. Now to bring in our photo of the vegetables: click and drag its thumbnail from the Project bin onto the main wood texture image. The main image will change as will the thumbnail in the Project bin. Don’t worry, it hasn’t been replaced, it is on a separate layer above the wood, as we can see in the Layers panel. If we turn the layer off temporarily by clicking the eyeball next to its entry in the Layers panel, it will revert to showing the original image.
4. With both images in place, we can now begin to work on the effect. Firstly we’ll apply a filter to give the photo the appearance of being painted. From the Filters menu select Artistic > Watercolor. The first control is the Brush Detail; the higher the value, the more refined the image becomes. We want a fairly blotchy effect so a value of around 5 works well; although on larger images, you may need to lower this a little more. The Shadow Intensity adds darker areas; we don’t want to add too much so we’ll leave it at 1. Finally we have Texture. We’ll leave this as low as possible, as we don’t need it. Click OK to apply the effect.
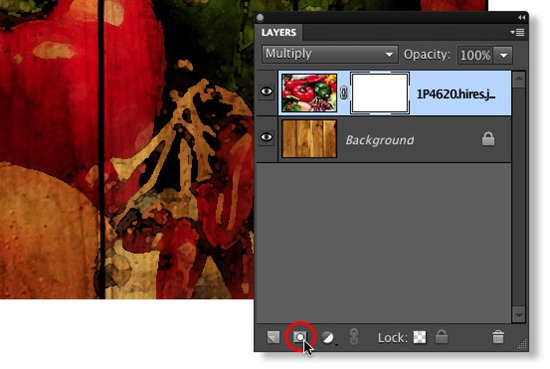
5. We have our painterly effect; now we need to blend the two images together, and this is precisely what layer blend modes are designed to do! Other than Normal, there are now 24 blend modes in Elements, some have very limited use, a couple of them have no discernable use at all. From the top of the Layers panel, select Multiply from the list – this is one of the most commonly used. Without going too heavily into detail, Multiply takes the pixels of the layer and mixes them with the one below, at the same time making them darker; a little like taking two identical projector slides and placing one in front of the other. The result speaks for itself, of course.
6. We could happily stop here but we’ll add one last effect. We’ll erase parts of the image around the edge to give it a more old and worn appearance. First, click the New Layer Mask icon at the bottom of the Layers panel. A new totally white thumbnail will appear next to the image’s thumbnail; this is the layer mask.
7. Select the Brush tool from the toolbox (keyboard shortcut: B). Open the brush picker from the Options bar. We want one of the special effects brushes, something with an uneven edge; the Oil Medium Wet Flow will do nicely. Staying on the Options bar, set the brush Opacity to 50%. Before we continue, make sure the default colour palette is set by pressing the D key on the keyboard. The foreground colour should be black.
8. Click the layer mask thumbnail, just to be certain it’s active; it will be messy if it’s not! Now start painting over areas around the edge of the image. As you do so, you’ll see them start to fade out. This is because painting in black on a mask hides that area. It’s not completely erased, however, as we set the opacity to 50%, if we paint over the same area again it will erase it completely. If you have erased too much you can switch the foreground colour to white (by pressing the X key) and paint it back in again. You can increase or decrease the brush size by pressing the left or right square brackets (next to the P key on the keyboard).
And we’re done! You don’t need to stick to a wood texture, of course. This technique will work with almost any texture and photo. Paper textures work particularly well, for example. Experimentation is the key. Try it with your own images and see what you can create!
——
Creating a layer mask in earlier versions of Elements:
Although earlier versions of Elements don’t have built in layer masks, it’s still possible to simulate them. Start by highlighting the Background layer in the Layers panel. From the Layer menu select New Adjustment Layer > Levels. Don’t make any adjustments, though. Now highlight the layer with your photo. Go back to the Layer menu and choose Create Clipping Mask. Now follow the steps 7 and onwards using the adjustment layer’s mask. Everything you do is reflected on the photo layer because its pixels are only visible where the layer mask is visible.


Is there somewhere I could download the Wood Panel and Fruits in this tutorial so I could follow along?