Making a Photoshop Brush Part 2
Last month we looked at how to make a simple brush in Photoshop. This tutorial taught us how to turn a shape into a brush – if you haven’t read that tutorial then please do so.
Step 1.
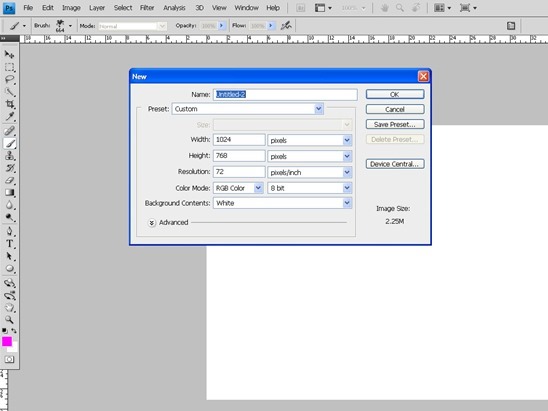
Start a new Photoshop document 1024×768 ppi can be left as 72 unless you wish to print your work then set it at 300ppi.
Step 2.
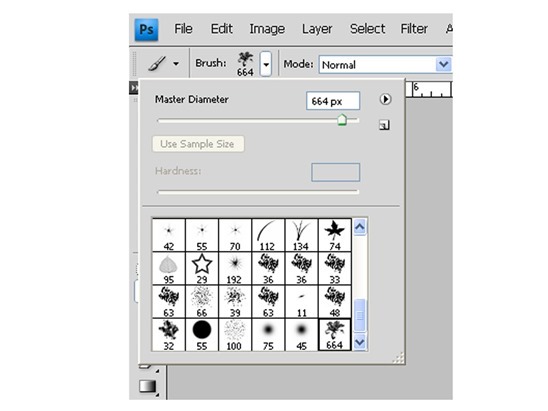
From the Tool bar select the Brush Tool, we now want to select the brush we created in the last tutorial, this should be a flower brush – if you made a different brush use that one instead. We do this by clicking the brush picker in the Options bar and navigating to the brush we want.
Step 3
We now want to open the Brush Panel by going to Window>Brushes or by pressing the F5 key on your keyboard. This will give us ways we can change our brush.
Step 4.
First select Brush Tip Shapes option and reduce the size of the brush to 50 pixels. You can choose whatever size you want – its not set in stone.
Step 5.
If we click and drag the brush we will have a continual pattern that is unbroken. We can change this by increasing the Spacing. On the Tip Shape Option increase the spacing to 140%.
Step 6.
We can now look at the Shape Dynamics option, this allows us to change the size, look and angle of the brush.
First increase the Size Jitter to 60% – this will give us a “random” size to our brushes. This is great if we want to have a bit of randomness in our work.
Second – change the Angle Jitter to 100%. This will change the direction of the brush randomly.
Step 7.
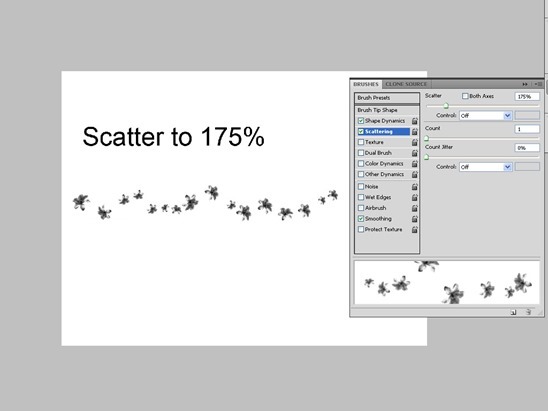
We now want to look at the Scattering option, by increasing this vertical spacing of the brush. Try changing scatter to 175%.
Step 8.
We now want to look at the Colour Dynamics. These give you a way of giving a random colour to your brush. Set your foreground swatch colour to #ff0000 and your background colour to #448ccb, now go back to your Brush Panel and change the Colour Dynamics Foreground / Background Jitter to 100%. This will now give a random colour between the foreground and background colour we set.
Step 9.
We now want to Save our brush, we can do this by by opening the Brush Dialogue or the Brush Panel and click the small Down pointing arrow. We then select the New Brush Preset option. This will give us the option of naming our new Brush – I called mine Flower Brush Random.
We have really only just scratched the surface with what we can do with Brushes – have some fun and play with the brush panel – see what you can come up with.
It is important to remember that you can also effect brushes by using a Tablet and setting the Control options. These allow us to control the size, angle and shape of the brush by pressing harder / lighter on the tablet or tilting the pen.
Please feel free to contact me at simonrudd@gmail.com if you have any questions.
😀


Leave a comment