
Creating Torn Edges in Photoshop and Photoshop Elements
 Hello everyone.
This month I’m donning my top hat and tuxedo to perform a spectacular card trick for you. First, I’ll tear the card in half and then, without so much as a wave of a magic wand, I’ll seamlessly mend it right in front of your very eyes!
Seriously, though, if you’ve ever gone delving into the many filters available in Photoshop and Photoshop Elements, you will no doubt have come across the Torn Edges filter. As the name suggests, it will give you a super torn edge effect on your image. Well, no, actually it won’t, not if it’s applied directly to the image, that is; all you’ll end up creating is a fuzzy monochrome graphic element.
In this tutorial, that can be used with both Photoshop and Photoshop Elements, I’ll be showing you how to create a realistic torn edge using the Torn Edge filter but done in a different way. Rather than applying the filter to the image, it will be applied to a layer mask. As we’ll see, working in this way produces very different results; the effect does exactly what it’s supposed to. We’ll also see how filters can be layered within the Filter Gallery to create composited effects. This is a great way of creating the effect and it can be applied in many different situations. It also gives you much more control over the result than you would when using custom brushes or scanned elements.
The layered psd file is available from the media locker at the end of this post. All we ask of you is a little social sharing to help spread the word about this site. The rest you get for free!
So let’s begin.

1. Make sure the card’s layer is active by clicking its thumbnail in the layers panel. Grab the Freehand Lasso tool (shortcut L). Now, starting a little way outside the card’s edge, draw a jagged line across the middle. Try not to make it too erratic as that will make the effect less realistic. leave plenty of space on the far edge. Now complete the selection by drawing wide around the card and back to the starting point.

2. Click on the New Layer mask icon at the bottom of the Layers panel. Half the card disappears, leaving the jagged selection edge. It’s not looking torn at the moment, however, more snapped off. Now for the science bit.
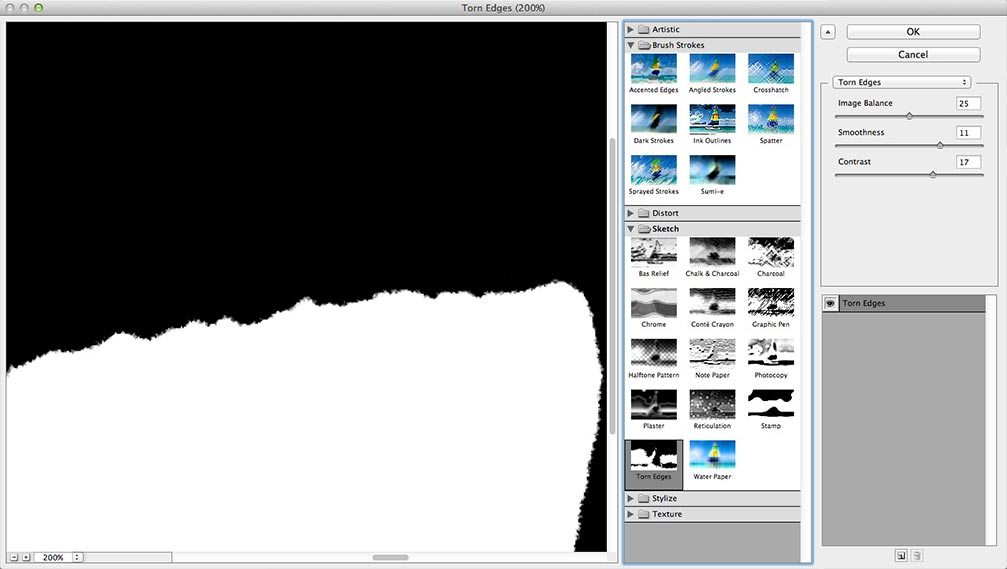
3. Clicking the layer mask’s thumbnail in the Layers panel to ensure it’s active. Go to the Filter menu. Select Filter Gallery. We’ll start by going to the Sketch section. Click on Torn Edges, as this is what we’re doing. It’s a little difficult to see, so we can zoom in by clicking the plus and minus buttons in the bottom left corner of the dialog.

4. The default setting for the filter is not really working here. We’ll start by adjusting the contrast. This determines how the light and dark pixels blend. Paper generally tears with a soft, fibrous edge. Around 8 pixels looks good on this image. Next, we’ll alter the smoothness. Again, we want it soft, so 6 seems to be a good setting. Lastly, we’ll adjust the image balance. This controls the bias of the colours, black and white in this case. The effect is quite subtle, 29 looks good. Don’t click OK to apply the filter yet.

5. At the bottom of the filter settings panel are two icons. Click the left-hand icon. We now have two instances of the Torn Edges filter. This is like having layers of filters. Go to the Brush Strokes section. Click the Spatter thumbnail. This is now adding the effect of the new filter to the Torn Edges filter. This adds a little more randomness to the effect. Set the Spray Radius to 8, this enhances the edge without too many orphaned pixels. Set the Smoothness to 7. This tames the effect, keeping the softer edge that we need. Click OK to apply the filters.
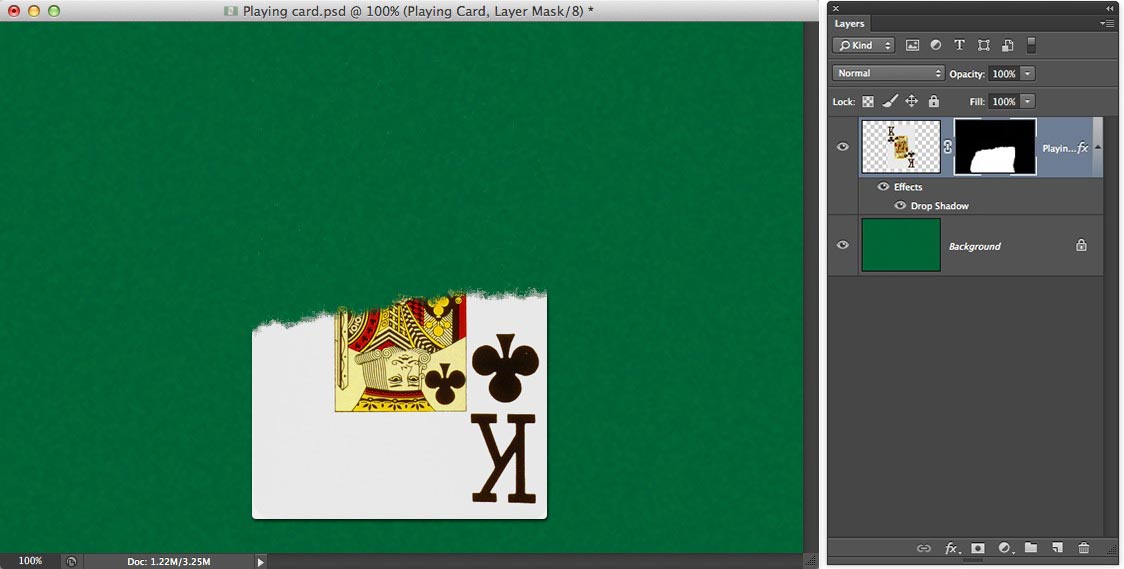
6. Although it appeared that the filters would affect the whole card section, it’s only the top edge that has the effect. This is why we made the much wider selection to begin with. It’s looking much more like torn paper now.
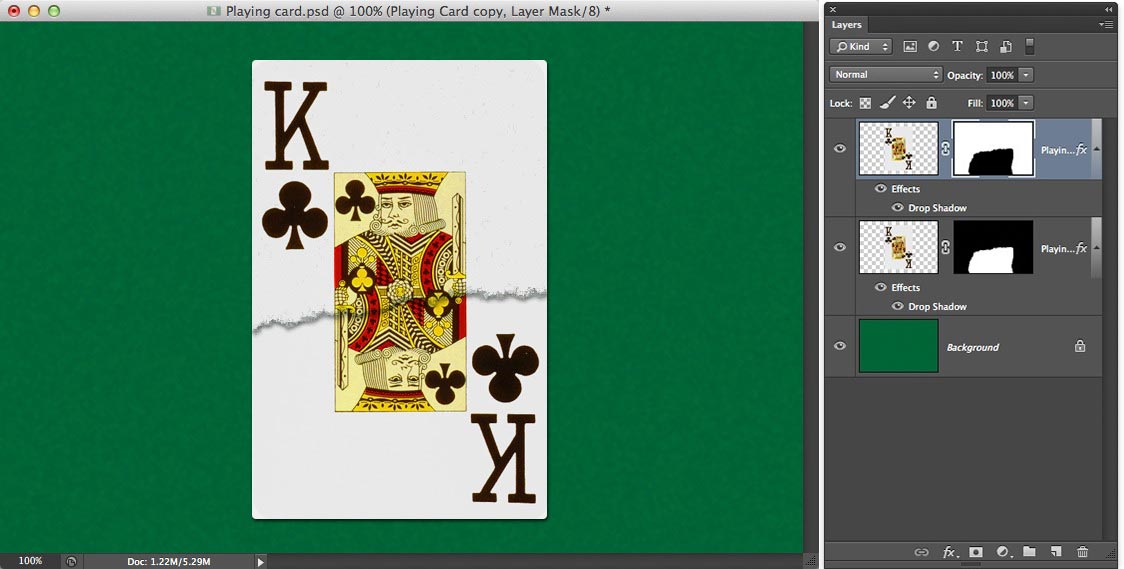
7. We only have one half of the card; the other half has been masked out. Go to the Layer menu. Select New > Layer via copy, or press Cmd+J (Mac) / Ctrl+J (PC) to duplicate the layer. There’s no visible difference, of course. Click the copied layer’s mask thumbnail in the Layers panel. Go to the Image menu. Click Adjustments > Invert. This swaps the black for white, reversing the masked area. We now have the second part of the card with a perfectly matched tear.
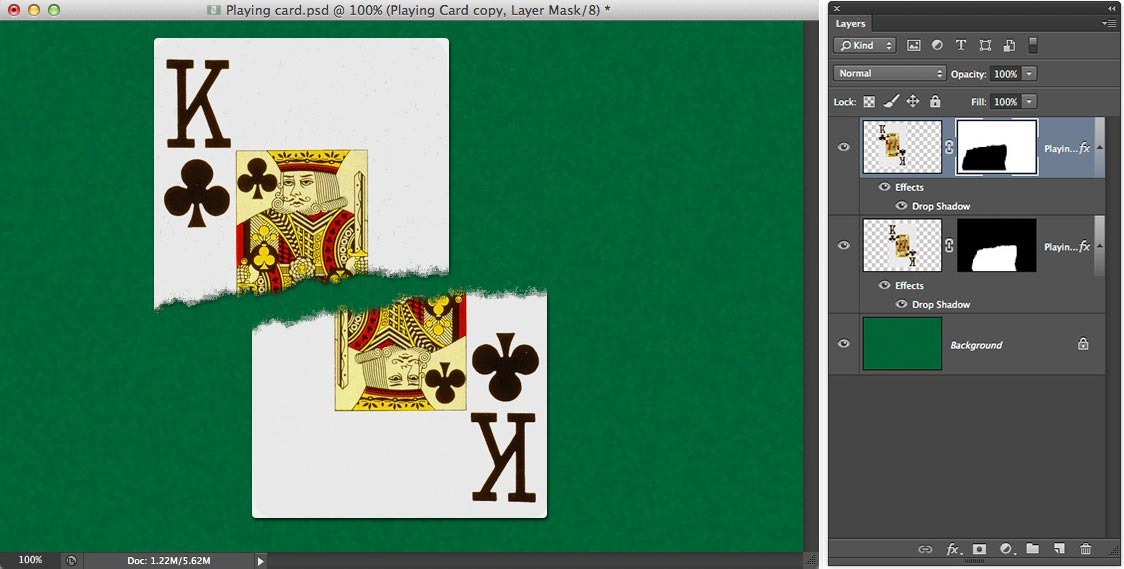
8. Grab the Move tool (shortcut V). We can drag the layers apart to make the effect look better; the mask moves with the card, keeping the tear in place. Notice how the drop shadow layer style has duplicated with the layer, giving us a much more realistic effect.

9. Like any good illusion, the card was never really torn. Click the top layer’s visibility (eyeball) icon to hide the layer. Now hold down the Shift key and click the first card layer’s mask thumbnail. This disables the mask, giving us the card back in one piece. Now that’s magic; to quote a famous British illusionist.
Click HERE to get your free psd playing card. Thank you for your support.
[/sociallocker]


Got it pinned! Thank you Eric for all this cool stuff! Now I need to start making myself do these tutorials. My job really gets in the way of things!
I’d love to take all the plaudits but I merely beg and blackmail others for the good stuff. Credit here to David Asche.
Thanks! This is just what I was looking for.