Creating a Chiseled Text Effect in Photoshop and Photoshop Elements
Hello everyone.
Last month I wrote an article on creating a marble texture in Photoshop and Photoshop Elements. The article’s main image was a banner with the site name chiseled into the the marble. I had a comment on the post asking how the chiseling effect was done, so I have taken the opportunity to write the technique as a follow-up.
We’ll be using layer styles to achieve the effect as well as the somewhat obscure Type Mask tool. If you’re not familiar with this tool, it’s a little like a cross between the Type tool and Quick Mask; we can type our text as usual but when it’s committed, instead of creating a layer with the text it creates a selection; this is perfect for the technique as we do not need to work on the text directly. You can follow the original tutorial using the link above but change the dimensions to 1000×200 pixels to create the correct document size. If you don’t want to start the image from scratch, it can be downloaded here.
Although the technique for both Photoshop and Photoshop Elements is the same, the methods differ slightly between the two. I have written an Elements specific version which can be downloaded in PDF format here.

First, we’ll create our text. Select the Horizontal Type Mask tool from the Toolbox. We can do this is several ways: click and hold the cursor on the Type icon and choose it from the fly out menu. We can also press Shift+T to cycle through the options.

Go to the Options bar. The typeface TipSquirrel uses is Trajan Pro. If you don’t have that, most serif fonts will give the same effect; that old stalwart Times New Roman will suffice. For this image a size of 90pt fits perfectly. Set the weight to bold. The colour is irrelevant so we don’t need to change it.

Click the cursor on the far left of the document; we don’t need to be precise as we can move the text after we’ve typed it. Type out the text. As we can see, it’s identical to using the regular Type tool except the text appears as a red overlay, rather than a solid colour.

To position the text we just need to move the cursor away from the text until it becomes the Move tool. Now we can click and drag it around the document to place it correctly.

Once we’re happy with the placement we can commit the text; this can be done by clicking the tick in the Options bar or by pressing Cmd+Enter (Mac) or Ctrl+Enter (PC). Instead of seeing our text as a solid layer, we now have a selection.

Go to Layer > New > Layer via copy. We can also press Cmd+J or Ctrl+J on the keyboard. It won’t appear to do anything, other than remove the selection. If we look at the layers panel, however, we can see a new layer has been created. This contains the text cut out of the marble texture (shown here with the background layer turned off).

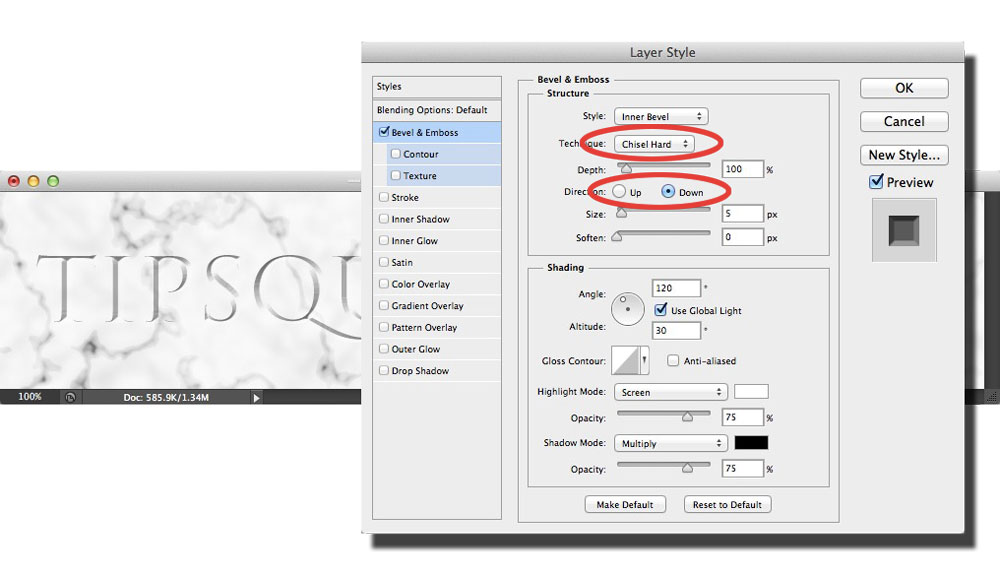
Now to create the chisel effect. This is done using Layer Styles. Click the fx icon at the bottom of the Layers panel. Select Bevel and Emboss from the menu. The default setting is a smooth inner bevel. We can now see the text is rounded and raised up. This isn’t what we want, of course; we need to tweak the settings.

First off, change the Technique from Smooth to Chisel Hard. This gives us a sharp edge. Now change the Direction from up to down. The text now appears to recess into the marble. Click OK to set the changes. We can leave the bevel size at its default; if you’re working on different image sizes, it might be necessary to adjust this as well.

Finally, we can make the area inside the text a little darker by changing the layer’s blend mode to Multiply.

To create the raised edge around the background we must first convert the background layer to a regular layer. To do this, make sure the background layer is active then go to Layer > New > Layer from Background. You can also do this by double-clicking the background layer in the Layers panel.

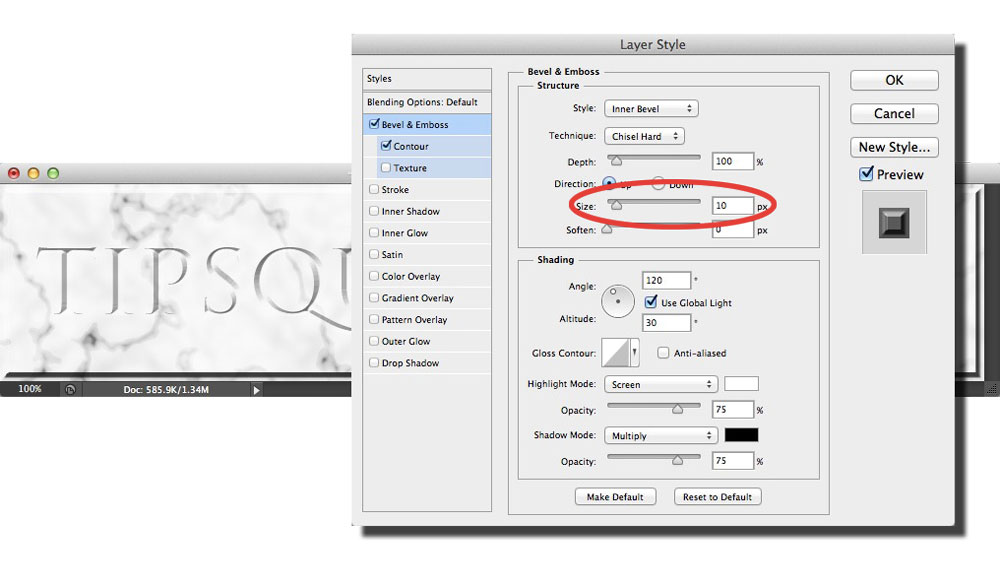
Click the fx icon and select Bevel and Emboss again. Change the Technique to Chisel Hard as before but leave the rest of the settings as they are. Go to the Contour settings on the left. Click the Contour preset window to open the picker. For this image we’ll use the Deep Cove preset. This gives us a recessed area around the background.

We can make the recess more pronounced by going back to the main bevel settings and increasing the size. In this example it’s been set to 10 pixels.
And that’s the image completed. I hope you’ve found it useful.
All the best; see you back here next month!
David


Thanks for the prompt response to my query.
What a super realistic effect – worked perfectly for me.
Looking forwards to your next “Blog”
Thank you once again.
Wilmar Smiley
Super Merci beaucoup;Bonne journée
Dan.
Thank you for being clear and concise. I found this tutorial quite useful and plan to reference again in the future. Thank you again.