Advanced Compositing With The PixelSquid 3D Photoshop Extension

Hello everyone.
Last month I demonstrated how to add a 3D composite model into an image using the fantastic PixelSquid 360 plugin. We left off with the object, James Bond’s iconic Aston Martin DB5, in position but it didn’t really gel with the scene, as the lighting and tones of the rendered model don’t really match the background to begin with.
In this tutorial we’ll look at the advanced features of the plugin, where we can import a high-resolution layered Photoshop PSD file that replaces the low-resolution preview. As well as being highly detailed, the PSD version gives us the ability to blend the 3D object into the scene using specially created layers that allow us to easily control the colour and tone as well as being able to quickly select and adjust the different components of the object.
Lets get started.
The first thing we need to do is convert the low-resolution car model to a layered PSD version. To do this, click the PSD icon below the image thumbnail in the PixelSquid 360 plugin panel. We have two options here: Open as new document and Replace with layers. We want the latter, which will import and replace the image with the hi-res layered version in exactly the same position.

Convert the model to a PSD file
The file is downloaded from the PixelSquid server in the same way as the original spinnable object. The time it takes to do this depends on the speed of your Internet connection but shouldn’t take too long. When it’s finished, you will see a group and sub-groups in place of the original object. The groups contain different versions of the object that allow us to select and adjust the image in greater detail.

The layered version of the car model
If we open up the Subject [layers] group we have a Curves adjustment and four layers labeled Shine, Reflection, Lighting and Base. Combined, they create the single car layer we see below labeled Subject [flat]. Initially, the separate layers’ visibility is off.
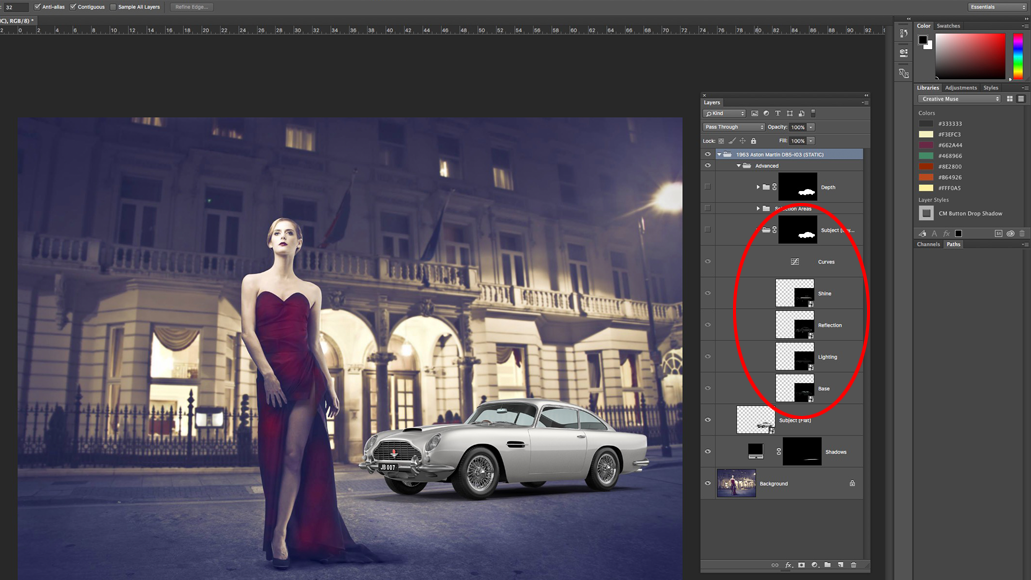
The component layers of the car’s appearance
The 3D models on PixelSquid are all rendered against a white background and this affects how the object appears, particularly those with shiny surfaces, like our car. This needs to be adjusted for our scene, which is dark and has different colours. The first thing we’ll do is make the layer group visible by clicking its eyeball icon. Now click the Base layer’s thumbnail to make it the active layer.
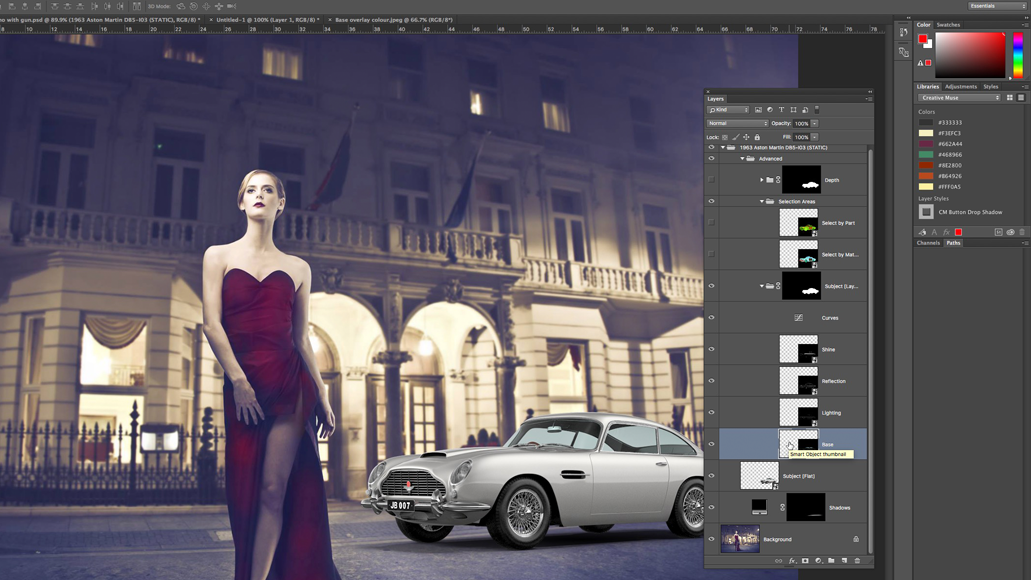
Make the Base layer active
We’ll begin adjusting the appearance of the car by adding a solid colour layer above the base. Go to Layer > New Fill Layer > Solid Color. Click OK to accept the defaults. Select black for the colour. Click OK to create the layer. This has the effect of darkening the car body, particularly the underside, where it should be in shadow. You’ll notice this has also affected the windows and the lights. We’ll fix this later.
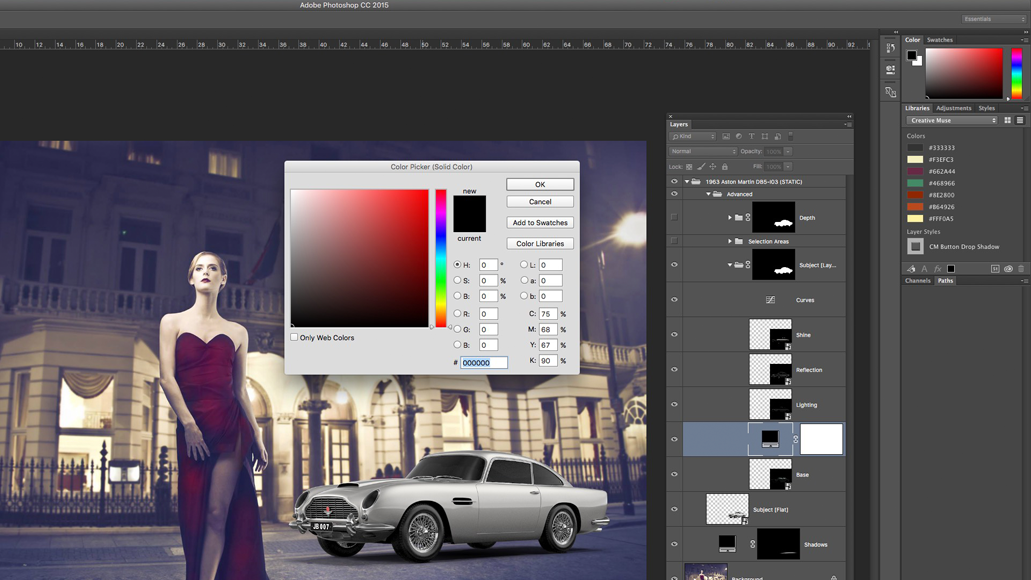
Create a solid colour overlay
Now that we have adjusted the base layer of the car, we can start altering the component layers. The first is the Lighting layer. This is the layer that provides the overall flat shading of the object, defining its form. Clicking the layer thumbnail makes it active. We’ll create a new Hue/Saturation adjustment (Layer > New Adjustment Layer > Hue/Saturation). Click Colorize to apply an all-over colour change. We can see a subtle difference here where a hint of red has been introduced.

We’ll drag the Hue slider over to the right and into the blue/purple section of the colour spectrum. This is where we’ll be matching the darker tones of the background image. Increasing the Saturation to around 50 brings in the tones to the darker areas of the car. This looks too strong but we’ll be adjusting it out.
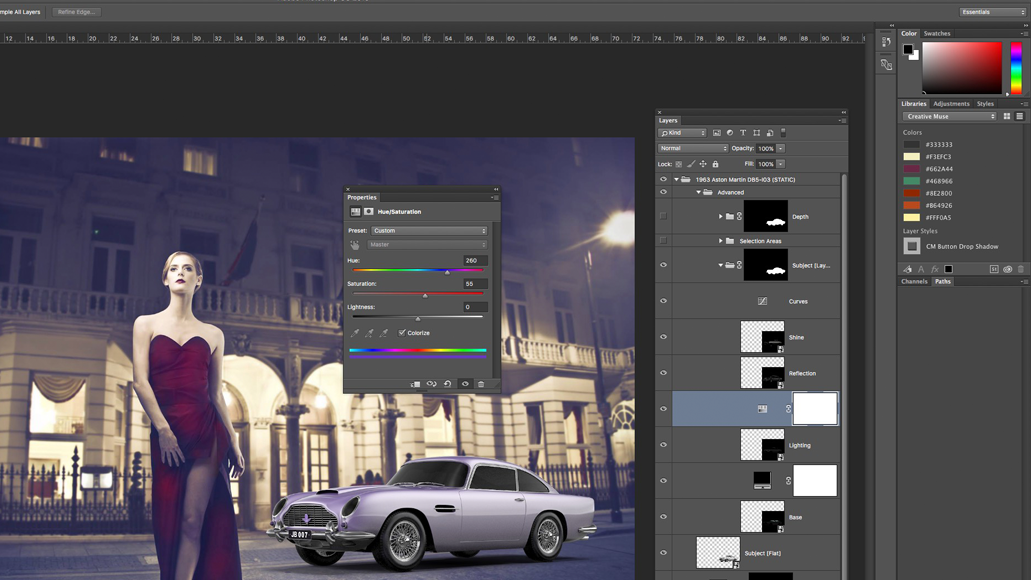
We can adjust the intensity of the colour using the Opacity slider in the Layers Panel. Dragging the slider to the left decreases the effect. We’ll set it to 60% here. This leaves a more subtle hint of the purple tone on the car.
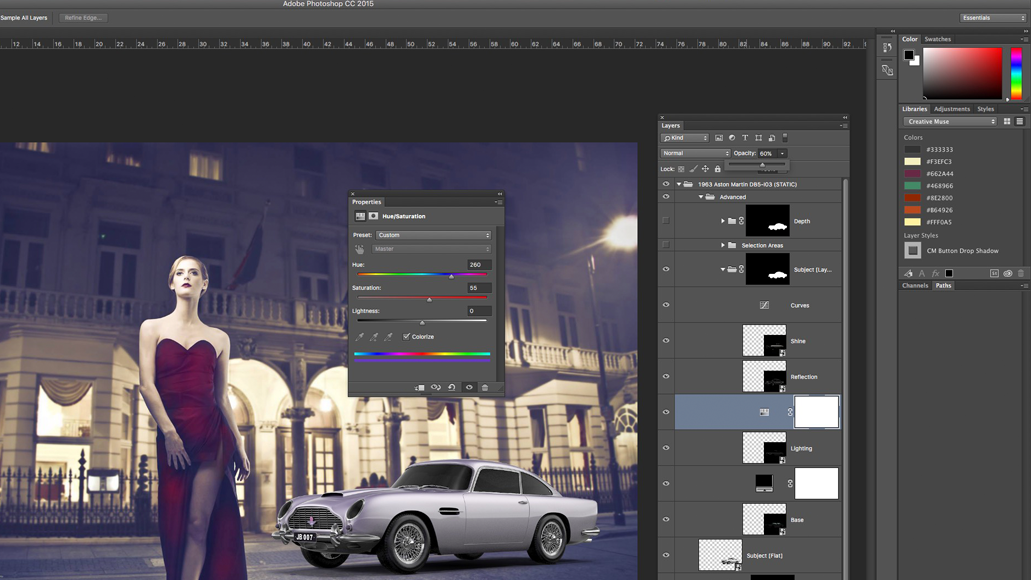
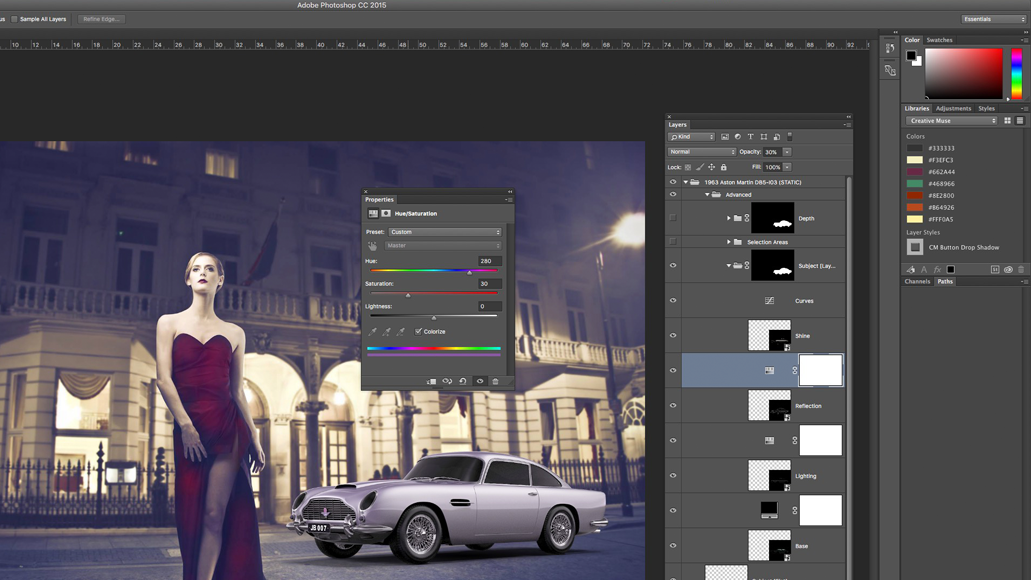
Next, we’ll adjust the Reflection layer in the same way. Clicking its thumbnail makes it active. Now we can create another Hue/Saturation adjustment as we did before. We’ll set the colour the same as the Lighting layer (260). This time we’ll set the Saturation to something a little less intense, a value of 30 works well here.

As before, the effect is too strong. We’ve lowered the Opacity to adjust it as we did with the Lighting layer. This time we’ve lowered it to 30% to make it more subtle.
The final colour correction we’ll make is the Shine layer. We’ll add a new Hue/Saturation adjustment layer, this time, we’re going to match the colour of the streetlight, as this is also a contributing factor to the appearance of the car. Starting with the the Hue slider, dragging it into the yellows. Check this against the brightest parts of the car body for reference: around the 41 mark is good. Now we’ll adjust the Saturation. A setting of 38 works well here.

Now we can fine-tune the colour of the shine. We want this to be a fairly dominant colour, as it is being cast by several light sources. First, we’ll set the layer Blend Mode to Color. This lets the colour blend with the rest of the tones of the car without overpowering them. Now we can lower the effect by reducing the Opacity. Around 40 is OK.

The colour correction is complete. Now we can go on to fix the headlights. These have gone black because we added the colour layer above the base layer, which contains the glass areas of the car. Fortunately, we have an easy way of selecting the different components of the object. Opening up the Selection Areas group, we see two layers: Select by Part and Select by Material. These are colour-coded versions of the car that can be quickly selected with the Magic Wand tool.

We’ll use the Select by Material layer here. Clicking its eyeball icon makes it visible, displaying an overlay on top of our car. Clicking the layer’s thumbnail makes it the active layer. We can use the Magic Wand tool to quickly select the headlights, clicking once to select the left light, then holding the Shift key and clicking the right hand light to select them both.
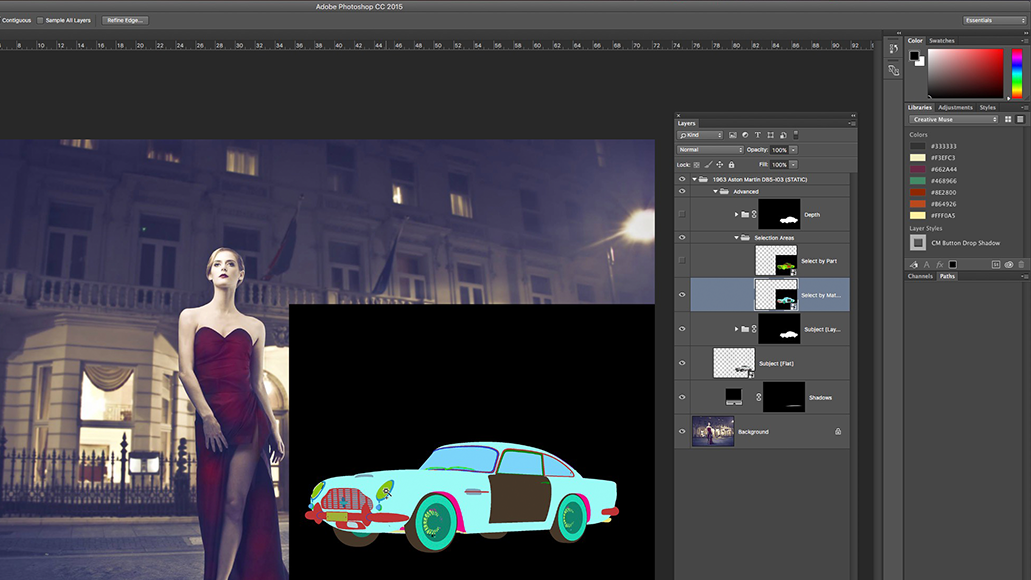
With our selection made, we can hide the Selection layer. We’ll go back to the black colour overlay layer inside the Subject [layers] group. Clicking the layer’s mask thumbnail makes it active. Selecting Edit > Fill opens the Fill dialog. We’ll select Black for the contents and click OK. This hides the colour, letting the lights show through from the Base layer beneath.

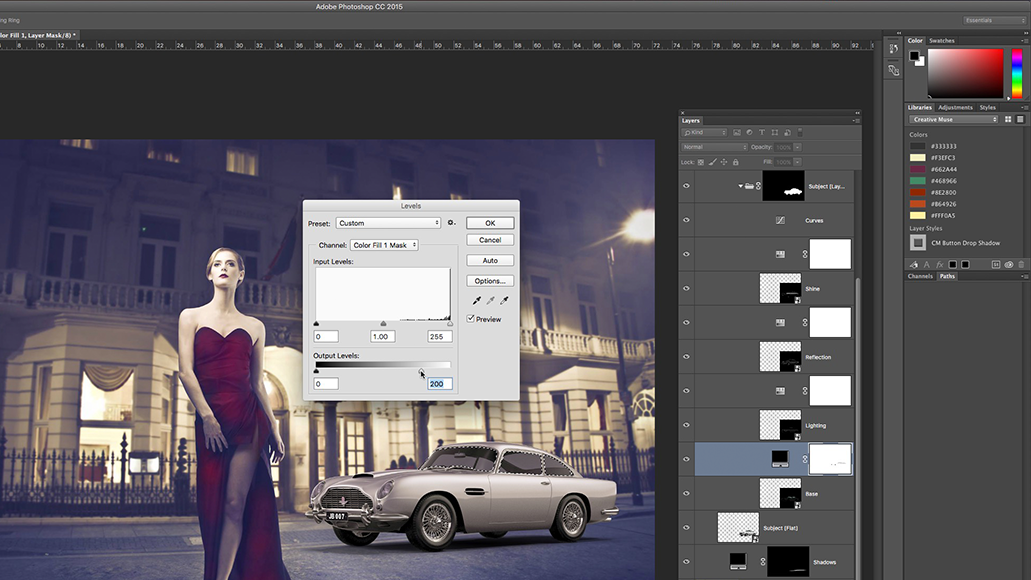
Masking out the car windows is a little more tricky, since we need to make them semi-opaque to show the background through them and still keep the appearance of them being glass. We’ve made the Select by Material layer visible and active again. Now we can use the Magic Wand along with the Shift key to select all three windows.
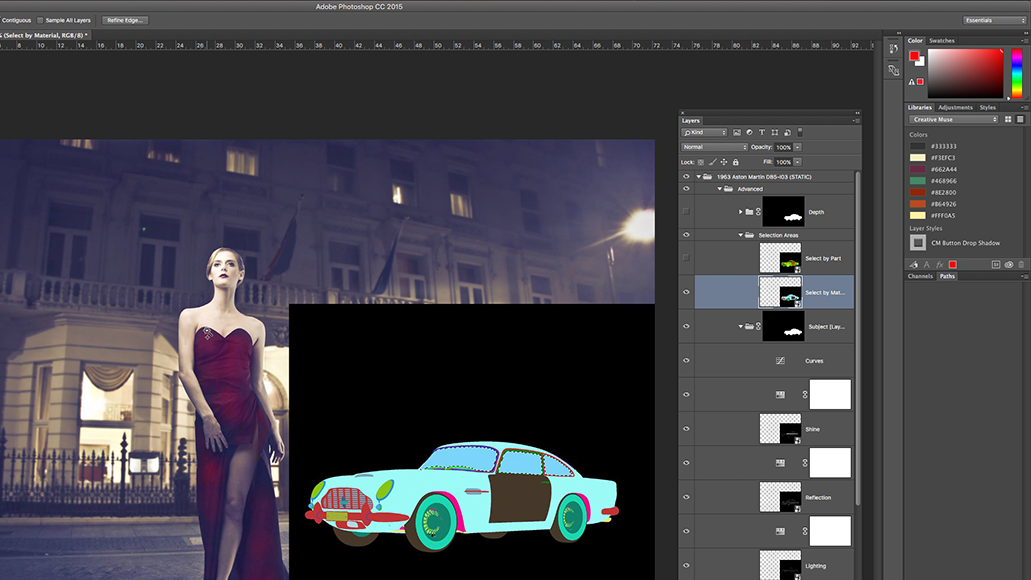
We can hide the overlay layer again and go back to the black fill layer’s mask. This time, instead of filling the selection, we’ll use Levels to adjust the brightness of the mask. This will have the effect of adjusting the opacity of the layer. We’ve opened the Levels dialog (Image > Adjustments > Levels). Now we can drag the right-hand Output Levels slider to the left to change the white to grey, making the area slightly transparent. A value of around 200 gives a good effect.
We still have a problem here. The windows on the far side of the car are still solid and we should be able to see the background behind. We’ll fix this in a moment. First, we need to convert the car to a Smart Object. We need to click the topmost group folder (1963 Aston Martin DB5-I03 (STATIC)) to make it active. Selecting Layer > Smart Objects > Convert to Smart Object combines the car layers into the Smart Object.
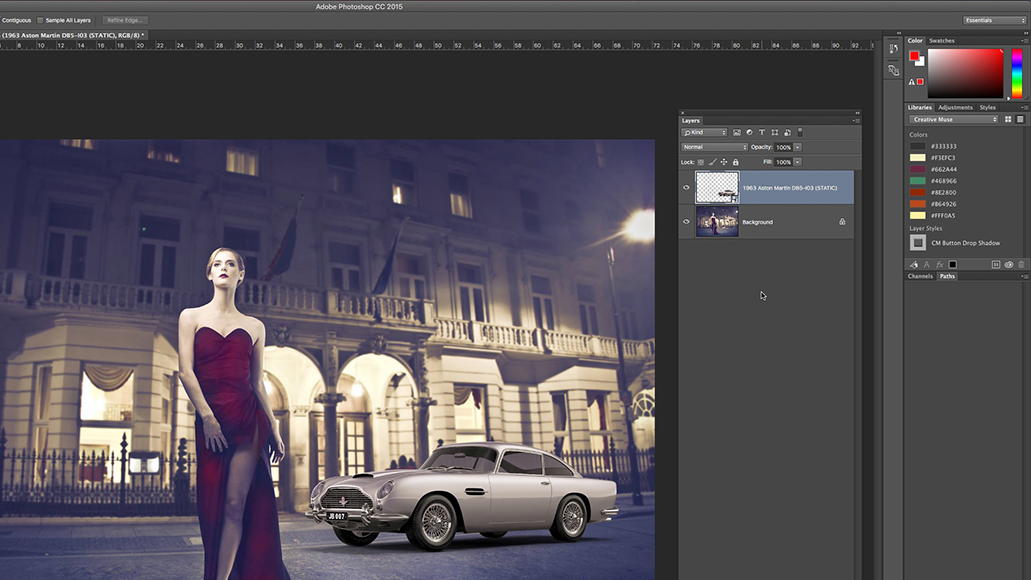
We’ll create a layer mask for the smart object layer by clicking the New Layer Mask icon at the bottom of the Layers Panel. Now we’ll use the Magic Wand combined with the Shift key to select the five window sections on the other side of the car. It helps to lower the Tolerance setting of the Magic Wand tool to around 6 here. It will take a few more clicks to make the selections but it prevents any other parts of the car being selected.

We’ll use the Levels command again to lower the opacity of the mask inside the selection, which allows the background to show through. As before, a value of 200 is good.

We’re almost done. The car looks a little sharp, however, compared to the rest of the scene. First, we’ll release the active selection (Select > Deselect). We’ll make sure the car layer is active by clicking its thumbnail. Now we’ll open the Field Blur filter from Filter > Blur Gallery. We only need a small amount, around 2px. This is just enough to soften it so it fits into the scene. We can also add a small amount of noise by selecting the Noise panel at the bottom-right of the main panel on the right of the dialog. Set the grain type to Gaussian and the amount to around 0.70%. This helps to make the car look more realistic, as the rendered version can appear too clean.

That’s the colour adjustment and masking complete. These adjustments really help the car object to appear more convincing against the background.

The finished image


Leave a comment