Orton Effect with Photoshop Smart Filters
The Orton Effect is a photo processing technique developed by Michael Orton in the 1980s, and coined as “Orton Imagery” by Photo Life magazine. It involves creating a soft and gauzy look, almost a glow, to your images, by creating a “sandwich” of different treatments of the same image. It was originally created with multiple slides with different exposures, in a complicated process, but Photoshop gives us the ability to create this effect on the fly with a single image. With a few clicks, you can give your own images a dreamy, painterly effect.
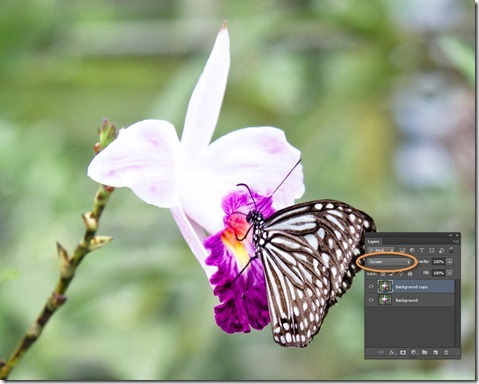
The key feature of the Orton effect is an overexposed image containing the detail, in good focus, sandwiched together with a second overexposed copy containing the color information, out of focus. With slides, the out of focus layer would also be overexposed, but combining the two slides (or three) has a darkening effect that counteracts the overexposed look of the individual slides. Here’s how we can achieve it in Photoshop easily. We’ll start with this colorful image:
Make a copy of the background layer, and set the copy to screen blend mode:
Make another copy of the background layer, at the top of the stack. Blur it using Gaussian blur and set to multiply blend mode.
There it is. Easy enough, but somewhat hard-wired. We can experiment with the opacity of the layers, but the Gaussian blur is baked in and unchangeable. If you’ve read my tutorials before… you know that I like full control, and want to be able to modify and tweak the results. And so we can, with a slight update to the technique.
We’ll start with a new document. Before making any changes, we will convert the background layer into a Smart Object. This packages the contents of the layer, and also allows us to use Smart Filters (filters that can be re-adjusted later). If you’re interested in learning more about Smart Filters, see my tutorial, Smart Objects – Smarter Filters.
Once we’ve converted the background layer to a Smart Object, we can start to make the changes to replicate the Orton Effect. We’ll start by selecting Filter > Blur > Gaussian Blur, and setting the value as low as possible (0.1).
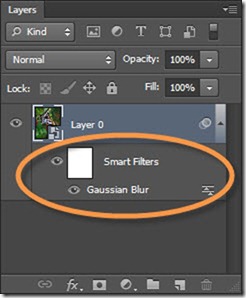
Click OK, and the filter appears as a Smart Filter in the Layers panel.
Next, double click the little icon that looks like sliders next to the Gaussian Blur Smart Filter. This opens the blend options dialog box. Change the blend mode to Screen, and click OK. The image is considerably brighter, as if we had added a new layer with Screen blend mode.
Next, we’ll select Filter > Blur > Gaussian Blur again (yes, you can add multiple instances of the same filter to a Smart Object). This time, we’ll set the filter much higher – in this case, we’ll try 12. Notice the filter appears as a second Smart Filter in the Layers panel.
Now we double click the sliders icon next to the second Gaussian Blur filter (the one at the top of the stack), and this time in the blend modes dialog box, we change the blend mode to Multiply. We get a nice look to the image, with a bit of a dreamy glow.
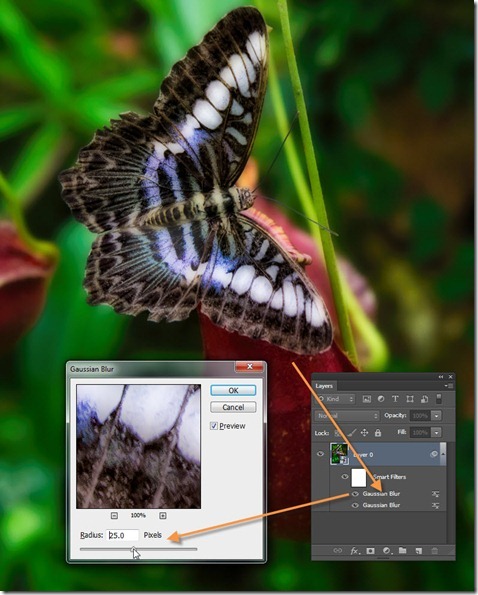
But, here’s where the Smart Filters come in. What if I wanted to try a more aggressive blur? Double click the top Gaussian Blur, and you can change the values! Plus, with Preview enabled, you can see the results as you adjust the dial. How cool is that?
In this case, I’ve chosen a value of 25:
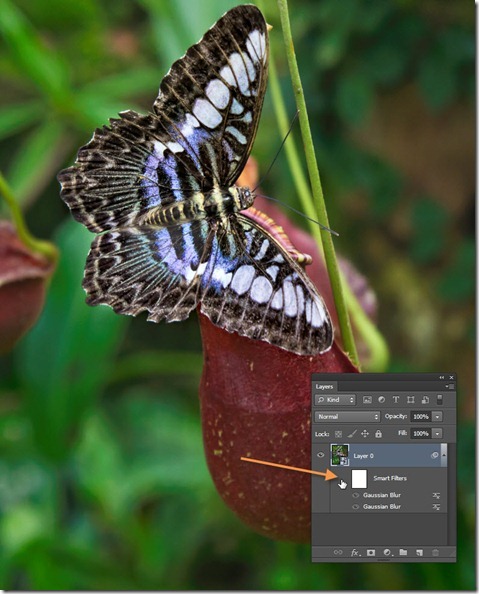
If you want to compare the before and after, just click the eyeball icon next to the Smart Filters in the Layers panel:
Smart Filters have an added bonus as well: a built in mask. If you decide you want to protect some of the detailed areas from your Orton effect, just paint in black on the layer mask, and the unfiltered original image shows through. This is especially helpful in bringing back blown out highlights (the Orton Effect will do that) and for bringing back detail where the soft glow is too intense:
If you are working with Raw images from your camera, you can open your raw images directly as Smart Objects from Lightroom or from Adobe Camera Raw, saving a step. For more information about opening Raw files directly as Smart Objects, see my tutorial Smart Objects, Raw Flexibility.
You can create a variety of effects with a little experimentation, as well. Try substituting some of the following:
- Lower the Opacity of the Screened filter to darken up the image if it is too blown out.
- Use Surface Blur instead of Gaussian Blur to maintain more detail.
- Change the blend mode of the highly blurred filter to Color Burn or Linear Burn for a more intense effect.
- Change the blend mode of the highly blurred filter to Divide to create a sketch effect. The amount of blur determines the thickness of the lines.
Experiment, and you’ll find an unending playground of effects to be achieved. Have fun with this!


Great article, but it needs a side by side before and after shot to make it even better.
Michael, This is the best article on explaining the Orton Effect, and providing a better “mousetrap” to control much of the effects, easily and “smartly.” I appreciate your clarity, organization, and examples.