Easily Manage the Size of Your Panorama with Photoshop CC
 When you’re putting together a panorama you might find that the final image is way bigger than you’d have hoped for. Adobe Camera RAW has always allowed you to reduce the size of your images before importing but with the new Photoshop CC we’re given even more control.
 In this example I’m going to put together five images, all of which have the dimensions of 3744 by 5616 pixels. Laid side to side this would give me a panorama of 18,720 pixels! Of course, I’ve over lapped them somewhat so thats the most it could be, but even so, it’s still way too big.
Open The Images To Adobe Camera Raw
So, with all the files selected in bridge I click open them in Adobe Camera Raw (ACR) and click the Select All button in the top left.
 At the bottom of the screen I have some information about the camera and the filename and, to the left, a magnification amount. Currently, to fit the image on screen it’s being reduced to just 16.2%.
Change The Dimensions Of All The Images
Under that there’s a link in blue that tells us about the colour space of the image and it’s size in Mega Pixels. Like I say, this is a link so I’ll click it.
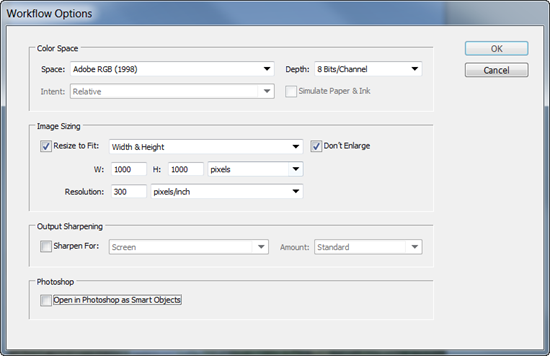
From the drop down menu, you can see that I can choose to resize the image in all manner of ways, that will depend on your workflow of course, but for me here I’ll choose Width and Height.
I’ve chosen 1000 pixels as the maximum width and height.
Choose Not to Be Smart… This Time
At the bottom I’ve chosen to NOT open the images as Smart Objects.
This isn’t my usual setting, I like my images to open as smart objects but doing so in this case adds another step to the process, and I’m all for fewer steps. I’ll click OK here.
Things may not look any different but a quick indicator that they have lies in that magnification box, I’m now at 25%
Making sure I still have all the files selected I’ll click Open Images.
Merge Your Images
Once in Photoshop I’ll go to File > Automate > Photomerge on a PC or Photohshop > Automate > Photomerge on a mac.
If I’d opened the images as Smart Objects, Photoshop would now be asking me to save them all before proceeding. OK for this 5 image pano but it could be very time consuming for larger images.
In the dialogue that appears I’m going to click Add Open Files and click OK, the rest of the settings I’m happy to leave at their defaults.
And Off Photoshop goes, aligning, merging and blending its little heart out.. Once the Panorama’s complete and cropped here’s my image size;
 Still pretty hefty, but far more manageable.
What About Your Processing In ACR?
Well, now that Photoshop allows us to use ACR as a filter, I’ll bundle my layers into a Smart Object and do it now. Easy.


Bonjour;Merci pour votre tutoriel;Car je ne ses pas comment crée un Panorama et votre poste va bien m’aidé pour de futures projet.
Je vous souhaite une bonne journée à vous et vos collaborateur.
Dan