
Using The Lens Flare Filter in Photoshop
The Lens Flare has been a part of Photoshop for some time and is a quick and easy way to add a little ‘something’ to your image. A word of caution however, because of its ease of use its often over used and detracts rather than adds to an image. Like so much with Photoshop, subtlety is the key.
Image courtesy of our friends at Fotolia


Make It Smart
Smart Objects allow for you to add Filters as Smart Filters, meaning you can go back and change them later. Make the layer a Smart Object by right clicking on the layer in the Layers panel and choosing Convert to a Smart Object in the menu;

Extra Credit : If you have a Selection Tool active you can right click the image and choose the Convert to Smart Object option there too
Adding the Filter
To add a Lens Flare go to Filter > Render > Lens Flare

There are three settings here;

- Clicking on the preview will move the origin of the flare to the point of the click. Clicking and holding will move the flare origin and any artefacts.
- This slider, and input field, allows you to control the intensity of the origin.
- Different lenses will give different artefact results. Change the lens type here to get the effect you’re after.

In this example I’ve chosen the 50-300mm Lens, this gives nice rounded artefacts, or lozenges. By moving the point of origin to the trees as if the sun if behind them the artefacts show nicely on the little girl’s coat as well as a large one at the point of origin.

Its Not Just For Lens Flares…
So the Lens Flare works great, but take a look at the Smart Filter, there’s a couple of settings here that you can use to tweak your filter;

Double click on the name of the filter (1) and you can go back to the Lens Flare dialogue box. Double click on the slider icon and a new dialogue box appears;
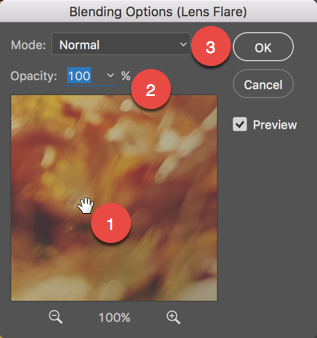
- Inside the preview you can click and drag the preview around. Not really necessary as any changes you make here will be made in the main image if you have the Preview checkbox selected.
- Because this is a Smart Filter there’s no direct access to the opacity of the filter in the Layers panel, you can alter it here though if its a little strong.
- Here’s the real power in this dialogue box. Here you can change the Blending Mode of the Filter.

Here you can see I’ve got four very different looks from one filter. I like the Screen version, I’ll click OK to accept this.
Finishing Touches
Screen blending mode allowed for a nice washed out look I’ve lost a lot of the autumn colour. The Blending Mode of Multiply kept the colour but not the Lens Flare itself. As I’m running this as a Smart Object and Smart Filters I can add more than one filter to the image, including multiple versions of the same one.
From the menu choose Filter > Lens Flare;

Photoshop displays the last filter at the top of the Filter menu and actions it with the same settings as the last time it was used in the dialogue box.
You can see that Photoshop has added it as a Smart Filter;

This means you can change the Blending Mode of the second instance;

Now I have the best of both, a flare and deeper colour, and remember, if one is too strong just reduce it’s Opacity.


Leave a comment