
Quick Mask-Style Selections in Photoshop Elements
Hello everyone.
I recently wrote an article here on TipSquirrel about using Photoshop’s Pencil tool to make complicated selections. A comment was posted asking if the same thing was possible using Photoshop Elements. The answer to that is yes, but, as with a few things in Elements, we have to use a couple of workarounds. The original tutorial used Photoshop’s Quick Mask feature. This allows us to create selections by painting them with the Brush tool (or any other of the drawing tools); the selected areas show up as a coloured overlay. Elements doesn’t have this feature, sadly, so we’ll be using an adjustment layer and its mask to achieve the same result.
This is essentially the same tutorial as before with the relevant changes added to enable it to be done in Elements. As before, if you want to follow along, you can download the psd file here.
Let’s get started.
 First we need to create our quick mask layer. Go to the Layer menu. Select New Fill Layer > Solid Color. A dialog appears. We’ll name the layer Quick Mask. We need to be able to see through the layer, so we’ll also change the layer opacity to 50%. Click OK to set the changes.
 Next we can choose the colour for the overlay; the default colour for the fill layer is taken from the current foreground colour. Traditionally, Quick Mask’s base colour in Photoshop is red so we’ll go with that. Click in the top right corner of the colour picker to select the brightest red. Click OK to apply the change.

Currently the overlay is covering the whole image. We need it to only show up where we paint, so go to Image > Adjustments > Invert or use the keyboard shortcut Cmd+I (Mac)/Ctrl+I (PC). This changes the mask from white to black, which hides all the colour for now.
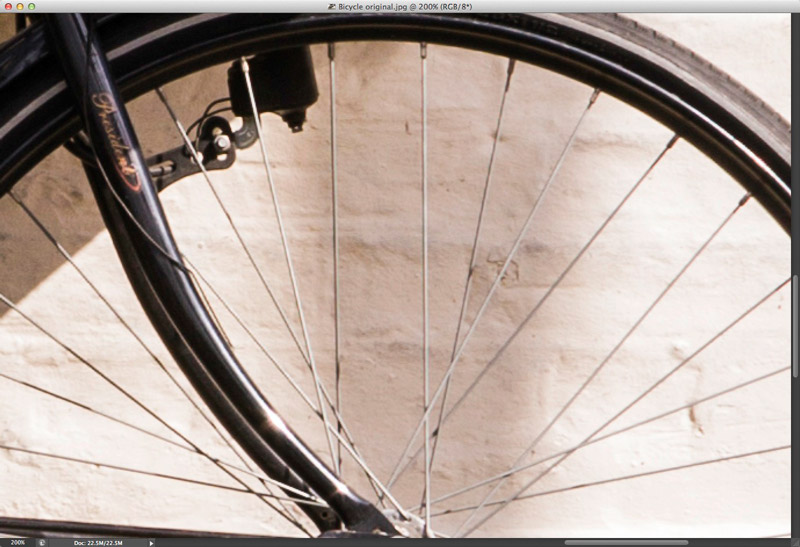 Grab the Zoom tool (keyboard shortcut Z). Zoom in to a section of the front wheel. We need to be able to see both ends of the spokes at all times for the technique to work.
 Now we can start to mark out the selection. Grab the Pencil tool by clicking its icon in the Toolbox, or by pressing N on the keyboard. Go to the Tool Options panel. Open the preset picker and choose the Hard Round 3 pixels preset. This won’t necessarily be the right size but it ensures we have a hard edge.
 We’ll start by setting the brush size. Hover the cursor over one of the spokes. Use the square bracket keys [ and ] to alter the width so it matches that of the spoke. It may not be a perfect fit but we can adjust it out later.
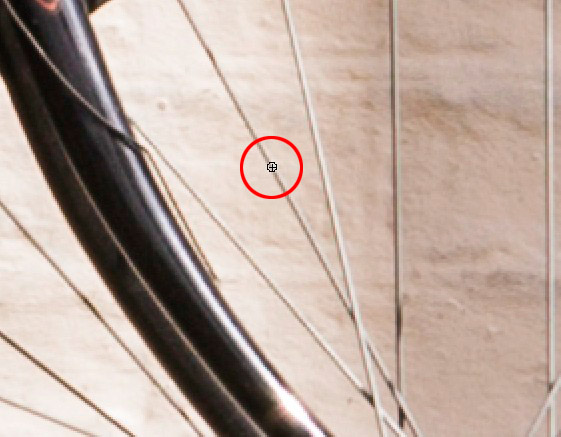
 Now to make our first stroke. Set the foreground colour to white. Choose the first spoke to work on. Click once at the very end where it meets the wheel rim. We see a small red dot appear. Now follow the spoke to the other end where it’s attached to the central hub. Hold Shift and click once more. The two points will be joined up in red.
 Move on to the next spoke and do the same. Continue until all the spokes in the current section are complete. Hold down the Space bar to temporarily switch to the Hand tool. Now pan the image over to the next section. Release the Space bar and continue highlighting the spokes until they’re all complete.
 When the front wheel is complete, move over to the rear wheel and continue adding in the spokes. Don’t worry if the lines overlap the other areas of the bicycle, they’ll be merged into the final selection.
 Once all the spokes are complete we can create our selection. Hold down Cmd (Mac) or Ctrl (PC). Now click the Quick Mask layer’s mask thumbnail. This creates a selection from the painted areas of the mask.
 We no longer need the Quick Mask layer. Rather than deleting it, we’ll hide it by clicking its eyeball icon in the Layers panel, just in case we need to make any adjustments. Click the bicycle layer’s thumbnail to make it the active layer. This is important as otherwise the technique won’t work properly.
 Open the Refine Edge dialog from the Select menu. Make sure all the values are at all set to zero, in case they have been brought over from a previous session. The best view mode for the image is Black. We can choose this from the drop-down list, or by pressing B on the keyboard.
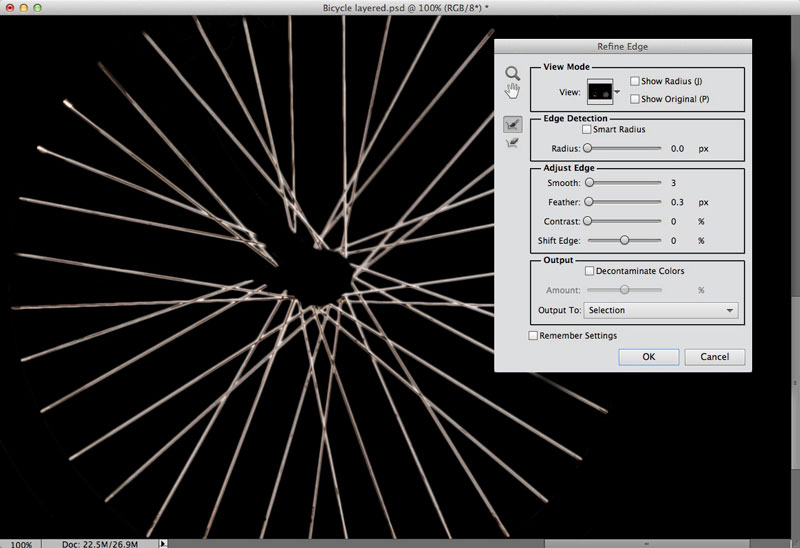 Double-click the dialog’s Zoom tool to bring the view up to 1:1. Now use the Hand tool to bring one set of spokes into view. We can clearly see the jagged edges. Start by adjusting the the Smoothness, it doesn’t need much, around 2-3 works well. We’ll add a slight feather, again, a very small amount; around 0.3px. This has given us a much cleaner selection.
 If the brush size was larger than the width of the spokes, we could use the Shift Edge slider to adjust it out but it seems OK here. Click the Output To menu and set it to Selection. Now click OK. We don’t see any difference in the selection as the marching ants don’t reflect such minor adjustments.
 Go to the Select menu. Click Load Selection. Open the Selection menu. Choose Frame. Go down to the Operation settings. Choose Add to Selection. Click OK. This merges the two selections and we now have the whole bicycle selected, including the spokes.
 At this point it’s worth saving the selection; we wouldn’t want to lose the work we’ve just done. Go to Select > Save Selection. Make sure the Selection option is set to New. Give it a name. Now click OK. We can save the image as a Photoshop or TIFF file to ensure the selection is saved with the file.
 Now we can use the completed selection to extract the bike from its background and place it somewhere new.


Leave a comment