
Selective Smart Sharpening in Adobe Photoshop
One of the wonderful (and often confusing) things about Photoshop is that there are many ways to do just about anything. Sharpening is no exception and almost everyone will have their favourite method.. This is my current favourite for its flexibility and the results it achieves.

This method is both easy and effective and perfect for saving as an action to be applied to any image at the click of a button. One of the benefits of this method is that the amount of sharpening and even where is sharpened is all adjustable after application.
If you have a single layered image, duplicate the layer with Cmd (or Ctrl on PC) J.
or if you have a multi layered image, create a new layer merged from all the visible layers by doing the ‘claw’.. Shift, Alt, Cmd E (or Shift, Alt, Ctrl E on a PC)
in the example above there is only a single layer so a simple Cmd J to duplicate the layer is required.
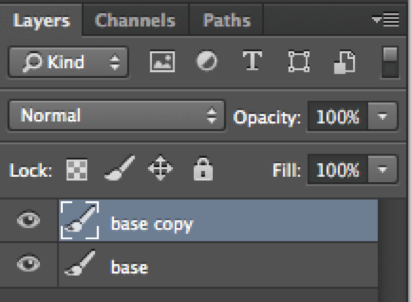
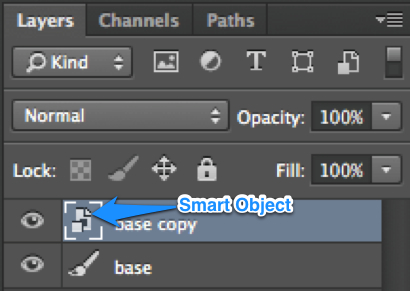
With this new layer selected, we need to change it to a smart object.. So right click on the new layer to bring up the context sensitive menu and select ‘Convert to Smart Object’

This will be displayed with a different icon to indicate we are now working with a smart object.
Now we apply the high pass filter to this smart object, but going the the Filter menu and choosing Other and then High Pass

This will bring up the High Pass dialog box, move the Radius slider to get a rough idea how much sharpening to apply
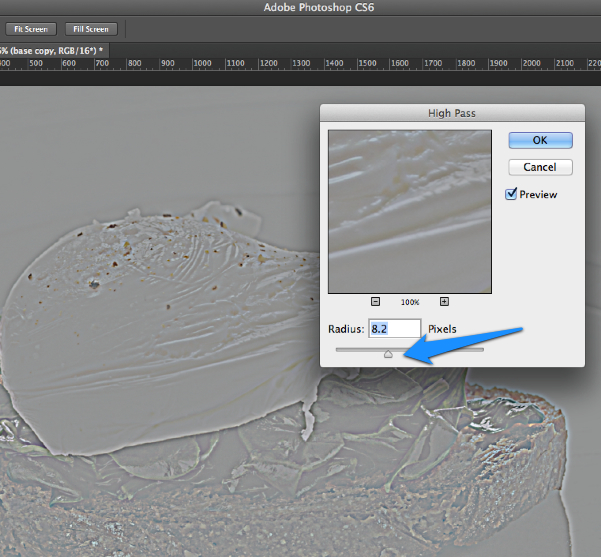
Don’t worry too much about how much sharpening to apply as we can change it later because we are using a smart object.
As you can see below, the High Pass has been applied as a Smart Filter.

So far, the image is going from bad to worse.. but they are about to get clearer
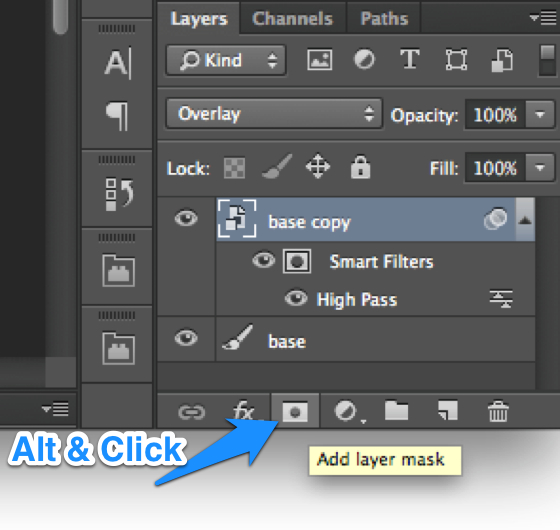
Change the blend mode of the Smart Object layer to Overlay

The image is looking more normal again and the high pass sharpening has been applied to everything equally.
Applying the sharpening to everything is not desirable as we do not wish to sharpen the blurred background.. So all we need to do is apply a layer mask by ALT & Click on the Layer icon shown below. Using ALT will fill the layer mask with black so that none of the sharpening will be applied until we paint on the layer.
now all we need to do is choose a white paintbrush and make sure the layer mask is selected

and with a soft edged brush and a low brush opacity (I usually go for 30%) paint the sharpening onto the image.

So what happens if you are not happy with the amount of sharpening or sharpened something you didn’t mean to..
Paint black onto the layer mask to remove the sharpening and double click the High Pass Smart Filter to adjust the amount of sharpening being applied as below

Also, remember that as this is on its own layer you can adjust the opacity of the layer to tone down the sharpening a little more.
I hope you have found this useful and as always, please leave comments and questions below.
Don’t forget, save this as an action and you can add smart sharpening to your tool set.

Merci beaucoup pour tous ses conseil précieux!
bonne journée
Dan
Interesting technique. I now have to learn how to record an action that can differentiate between single and multi layer images
Thanks Scot. I had forgotten how to go about sharpening non destructively, and I was very pleased/relieved to come across your tutorial!!
Cheers
Alan
Awesome! It would be helpful if you showed a before and after image at the end of this post. Thanks!
Interesting technique, thanks!
thank you for the informative and illustrative demonstration
Terrific quick tutorial using a filter I don’t typically use.