Did you see...

Articles by Michael Hoffman

About Michael Hoffman (224 Articles)
Mike has been a photographer, artist, educator, and technophile for most of his life. Early in his career, he created technical illustrations and photographs for electronic equipment manufacturers, and taught classes in computer aided drafting and 3D modeling software. When digital cameras became widely available in the late 1990s, the move was a natural one, and has led to a happy combination of technology, software, photography and art. Mike is an Adobe Certified Expert in Photoshop and Acrobat, and is well versed in Lightroom and Photoshop Elements, as well as Illustrator and InDesign. He has also contributed his time and efforts to the excellent work being done by Operation Photo Rescue, in restoring photographs damaged by natural disasters. As an active member of the National Association of Photoshop Professionals, he continues his quest for excellence in art, excellence in design, and excellence in education.

Lightroom Adjustment Brush Presets

20/05/2014

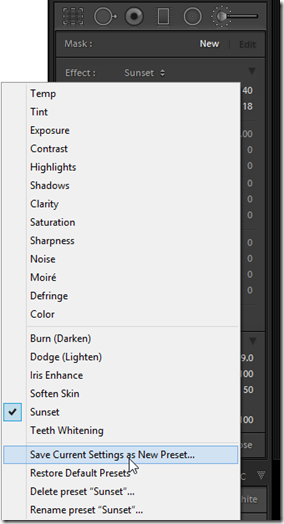
The introduction of the Local Adjustment Brush back in Lightroom 2 was the first step in transforming Lightroom from a global editor to a fully parametric, flexible content enhancement editor. The adjustment brush capabilities have improved with every release of Lightroom since then, but you may not have been aware of the existence of Adjustment Brush Presets. [More]

Photoshop Retouching Tips – Nondestructive Healing

13/05/2014

The cloning and healing tools in Photoshop continue to improve all the time, and now most of the retouching tools offer Adobe’s amazing “content-aware” technology. However, in order to get the most from the Healing Brush, Patch Tool, Clone Stamp, and all the others, you’ll want to explore ways to accomplish nondestructive healing during your retouching sessions. [More]

How to post to Facebook with Lightroom

29/04/2014

Did you know you can post to Facebook from Lightroom, directly and automatically? Back in version 3, Adobe introduced Publish Services to Lightroom, and this continues to be the best way to manage your photos when you’re posting to social media. [More]

Lightroom Workflow : Good to Great

22/04/2014

I get questions all the time about my workflow, and in this tutorial I’m answering some specific questions I got related to some recent bird photos I posted on my Flickr photostream. Some other photographers had been with me and struggled to capture images in the same location and time. In addition to the workflow I present in this video, I’ll add some additional tips [More]

Lightroom 5 – Keyboard Shortcuts

15/04/2014

Everybody loves keyboard shortcuts, and today on TipSquirrel, we have Lightroom 5 Keyboard Shortcuts for you! Learning keyboard shortcuts can help boost your productivity and can be the key to a smooth and consistent workflow. In addition, you’re taking some of the work away from your mouse, and that can be a benefit if you tend to suffer from repetitive motion stress. There are a few Lightroom 5 keyboard shortcuts everyone should know – for example, the big three in my mind are “G, E, D” (for grid view, loupe view, and develop module view). And there’s “R” for the crop tool. But there are oh, so many more Lightroom 5 keyboard shortcuts. [More]

Lightroom Mobile Quick Setup Guide

08/04/2014

As you may have noticed, Adobe has just released Lightroom 5.4, along with the new Lightroom Mobile for iPad. Lightroom mobile extends your workflow beyond the desktop, and onto your iPad, where you can review, rate and even edit your images, and have the changes synchronized automatically back to your main catalog. Lightroom uses the Creative Cloud storage services as the hub for this synchronization, and as a result, you must be a member of one of the subscription services for this to work, including any of the Creative Cloud plans, or the Photoshop Photography Program. The iPad app is completely free, so this is just another benefit of the Creative Cloud subscription. [More]

Abstract Photoshop Technique

03/04/2014

There are endless ways to create abstract images, but here’s one that’s just fun. This abstract Photoshop technique has you interacting with the image, pushing pixels around, and it can be as much fun as finger painting, but without all the mess. The way this works is to start with an image that has vibrant colors and a bit of contrast and texture, then warp and manipulate layers, blending the results together using the Photoshop layer blend modes. You’ll never know where you’ll end up when you start, but the exploration is half the fun. This abstract Photoshop technique is flexible and extensible, and you can add on to your heart’s content. In this video, I even go so far as to take a copy of the image and wrap it onto a 3D sphere to add some additional geometric surrealism. [More]

A Portable Lightroom Catalog

25/03/2014

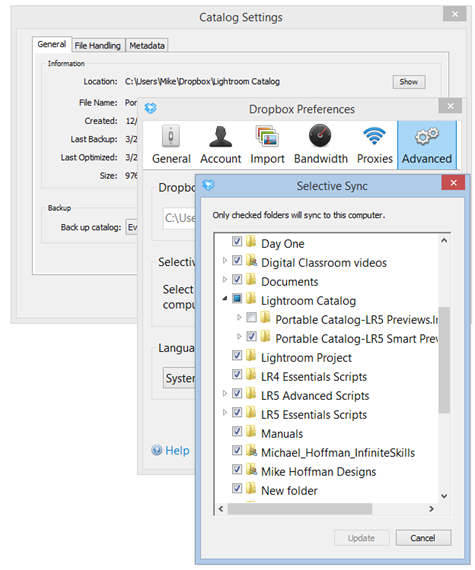
Lightroom 5 brings with it a great new feature in Smart Previews. Combine the capabilities of Smart Previews (the ability to develop and export your images based on the relatively small file size of the Smart Preview) together with the convenience and decreasing cost of cloud storage systems (such as DropBox or Google Drive) and you have some interesting ways of creating a portable, no-hassle catalog solution. [More]

Pen Tool in Photoshop–Putting it all Together

18/03/2014

In this video, we step through the process of extracting an object from a busy background – one that doesn’t work well at all with the quick selection too, nor any of the pixel based selection tools. The Pen Tool is the right tool for this job, and we’ll step through the practical use of the Pen Tool for this [More]

Using Lightroom on Two Computers

12/03/2014

My main Lightroom catalog is on a desktop Windows machine in my home studio, but I travel with a MacBook Pro, and use the laptop computer for working with Lightroom on the road. In this video, I'll discuss the way I merge photos from my remote shoots back into my main Lightroom catalog. In order to do this, I use Lightroom's "Export as Catalog" and "Import from another Catalog" features to transfer and merge my two separate catalogs into one. Keep in mind that this is one of a number of possible strategies, but it is the one that works for me. [More]

Pen Tool in Photoshop – Converting Points

04/03/2014

We continue to progress through the tricks and details of using the Pen Tool in Photoshop, and today we look at ways of converting anchor points from corners, to smooth curves, to cusp points and back. This final skill, combined with what we’ve learned in the previous videos, will give you everything you need to manage creating and editing of virtually any complex path in any image. [More]

Pen Tool in Photoshop–Cusp Points

25/02/2014

In this, our 5th instalment of our series on using the Pen Tool in Photoshop, we explore the problem of cusp points. Cusps are formed when two curves meet, but not in a smooth point – rather in a corner or sharp angle, as you might see on a heart, or perhaps on the fin of a fish. The technique for drawing this type of shape in Photoshop is not obvious, but it is easy once you know how. [More]

Pen Tool in Photoshop – Smooth Curves

18/02/2014

We’ve been chipping away at the Pen Tool in Photoshop, and in this part 4 of our series, we finally begin to draw curved paths, freeform, with the Pen Tool. Learning to use control points and control handles requires some practice and some experience, but with the knowledge base from the first three segments in this series, we’re ready to tackle curved paths. [More]

Pen Tool in Photoshop–Straight Paths

03/02/2014

In part 2 of my series on using the Pen Tool within Photoshop, we finally do break out the Pen Tool, and start drawing straight line paths. Learn how to place and modify corner anchor points, and how to close a path. With the closed path, we'll learn how to save the path, load the path as a selection and use it as a layer mask. [More]
1 2 3 4 15