
Vector Masks in Photoshop
In last week’s post on TipSquirrel, we started looking at drawing with shapes and paths in Photoshop. In the interest of getting our toes wet, so to speak, we looked at the shape tools, and saw that they could be used to create shape layers, paths, or pixel-filled objects. Today, we’ll take a step further and look at ways of combining paths and shapes to create interesting effects. Understanding the principles in today’s tip will allow you to better understand the advanced topics we’ll cover in future tips.
First, a quick review of the key points from last week’s tip. We saw that, when any of the shape tools or even the pen tools are used in Photoshop, we have a Tool Option bar filled with, well, options! That’s why they call it that, you know. If we choose a shape tool, the Option bar looks something like this:

I’ve broken up the sections into groupings to help keep things organized. We have:
- 1. The tool currently in use, with a pull-down for tool presets.
The next three icons dictate the drawing mode for creating objects using the tool. Refer to last week’s tip for more detail:
- 2. Create shape layer
- 3. Create work path
- 4. Fill Pixels
The next set of icons are all the shape/path tools laid our for easy access:
- 5. Pen tool
- 6. Freeform pen tool
- 7. Rectangle tool
- 8. Rounded rectangle tool
- 9. Ellipse tool
- 10. Polygon tool
- 11. Line tool
- 12. Custom shape tool
Next, by itself, is the
- 13. Custom shape preset. This is a pull-down list with access to all the currently loaded custom shapes.
The last 4 icons in the Tool Option bar are the interaction modes. Last week, we used only the first mode; this week we will get more adventurous and use the others!
- 14. Add to path/shape area
- 15. Subtract from path/shape area
- 16. Intersect path/shape area
- 17. Exclude overlapping path/shape areas
In order to illustrate the interaction modes, that define how multiple shapes affect each other, we will start with a simple foundation. In this file, we have a background texture layer of rusty metal (courtesy of stock.xchg) and a Hue/Saturation adjustment layer set to colorize it:

To this, we will add a second contrasting texture layer (more rust):

In order to work with shapes and paths, we will mask this layer with a vector mask. From the menu, choose Layer > Vector Mask > Hide All:

As soon as you click this, the layer is hidden by a mask. This is a vector mask, however, not a regular pixel-based layer mask. Similar, but different in some important ways. For example, you may recall the rule of masks, “black conceals, white reveals.” Similar with vector masks, but grey is the color indicating concealment. In this case, since we chose “Hide All.” the mask is grey:

Next, we will add some shapes to the layer mask, revealing what is underneath. We’ll need to choose a custom shape, make sure the drawing mode is set to “Create work path,” and the interaction mode is set to “Add to path area:”

Next, make sure the vector mask is selected (click on it) and draw out a couple of shapes, and notice that (1) the shape is shown in white on the vector mask (white reveals), and (2) wherever the shape is located on the mask, the rust layer is revealed.

Notice what happens if the shapes overlap each other. Because the interaction mode is set to “Add to path area,” the overlapping areas are revealed as one homogeneous blob. In the vector mask, you can see the individual shapes, but the results of the mask reveal one continuous area:

This may be what you want, but there are more interesting ways for paths to interact. Let’s start by undoing this last shape (Ctrl-Z/Cmd/Z) and then changing the interaction mode. This time, we will choose the second icon, “Subtract from path area:”

Now, notice that drawing a shape will cut a hole or carve away from existing shapes, and wherever you add a shape, it will show up in the vector mask with grey color, instead of white. Try a few different shapes or even some of the other tools, such as the ellipse shape tool:

Once you have a few paths in place on your vector mask, you may decide that they need to be moved. The great feature of shapes creates as work paths is that they are independently accessible and can be modified individually. In order to gain access to a single path on the vector mask, switch to the Black Arrow Tool, also called the Path Selection Tool (keyboard shortcut “A”). Using this tool 9with the vector mask still selected) you can click on a path and drag it around to reposition it to a new location:

Notice how the mask updates as you drag the path around? Very cool! You can select multiple paths with the Path Selection Tool by simply drawing a marquee around them; selected paths are highlighted and their anchor points become visible (circular dots on the path). In this image, I’ve hidden the background layer so you can see the marquee and the selected paths:

With the paths selected, you have several options, You can press Ctrl-T/Cmd-T to transform the paths, and you can also press backspace or delete to remove the paths from the mask:

Before proceeding to the next step, let’s go ahead and marquee the rest of the paths we have here and delete them all.
Now, returning to the Options bar, we will re=select the “Add to Path Area” icon and draw a couple of large paths with the custom shape tool:

Now, before going any further, go back to the Options bar and select the fourth interaction mode, “Exclude overlapping path areas.”

Here’s where the fun begins. Choose another custom shape, and draw in such a way that the shape overlaps the other shape. Notice the “exclusion” interaction:

Where the new path sits alone, it reveals (add to shape area) but where it overlaps, it hides (subtract from path area). Notice the white and grey areas in the vector mask as you draw the shape – this is key.
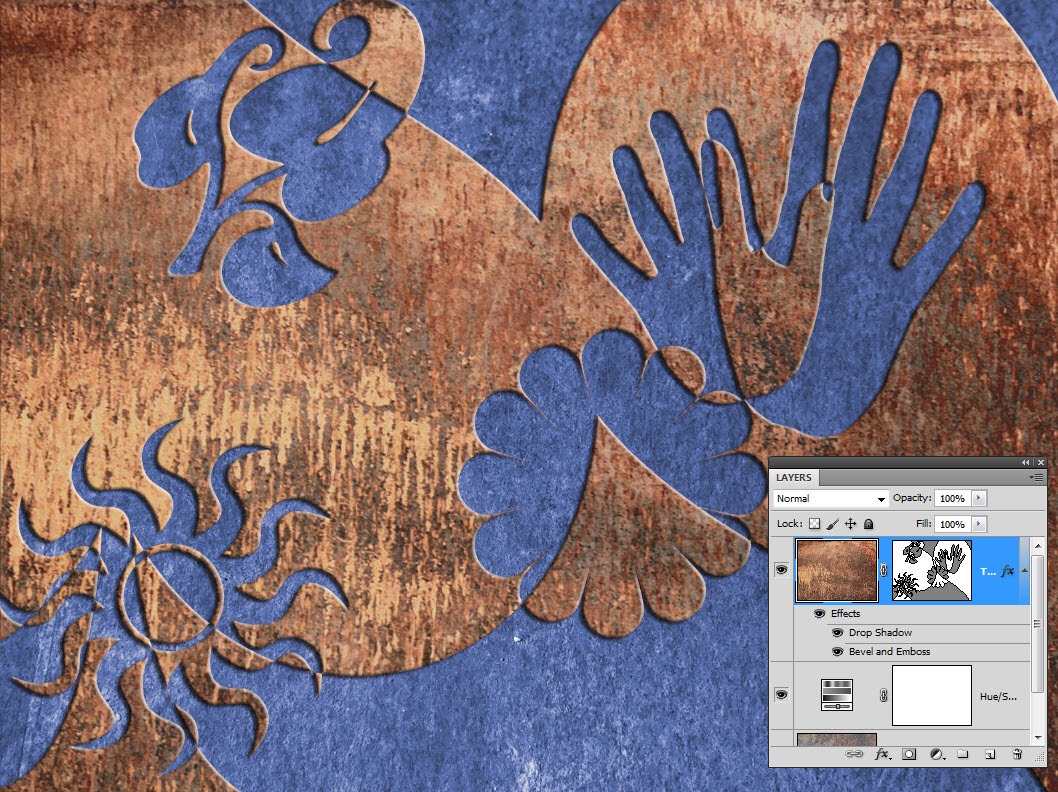
Continue adding more custom shapes, switching to the Path Selection Tool (black arrow) as needed to move, transform and replace shapes:

Once you get the desired result, you can make it really pop out by adding some layer styles. In this case, I’ve added a drop shadow and a bevel & emboss layer style:
I hope this gets the creative thought processes working! There are limitless possibilities here, and we’re just scratching the surface!
Remember a few points to help you as you explore working with vector masks:
- Make sure the vector mask is selected before drawing your shape. If the mask isn’t selected, you’ll just create a path, but it won’t be on your mask.
- Don’t forget to check your interaction modes before drawing shapes or paths.
- Watch out for the shift key! Shift constrains your shapes to their original proportion, but if you press it before drawing the shape, you will change the interaction mode back to “Add to shape layer.”
Next week, we’ll look at the counterpart to the black arrow tool – the “White arrow tool,” or as it is properly named, the Direct Selection tool. With that next step, we’ll have full control over our shapes and paths. Until next time, keep experimenting!

Whoa!!!
This is an awesome write up.
Thanks for the share 🙂