
Tightening Photoshop’s Layer Masks : Revisited
A couple of weeks ago, fellow Photoshop Nut A.J. Wood presented an “old school” technique for tightening layer masks, a great solution for when you can’t use the newer Refine Mask feature in Photoshop CS5, or are prevented from using it by the demands of your image (or just plain don’t have CS5). This got me to thinking of another technique from way back, using some filters that you may not have seen used before: Minimum and Maximum. These filters are so obscure, that they are classified in the filter hierarchy as “Filter > Other.”
This technique is especially useful when you want to tighten a small specific area of your layer mask. We’ll start below, with this image of a Gnome that is masked from its original background, and placed onto a new backdrop.At first glance, the masking looks OK:

However, if we view the gnome against a uniform dark background, some problems pop out, which could be remedied if we tighten up the mask – but only in a few areas:

Upon closer inspection, we can see the problem areas – only a small bit of the perimeter of the masked object:

If the visible fringe were uniform around the entire masked object, we could use refine mask to contract the mask, but in this case, we have only a few small areas of concern – if we contract the mask, we would lose pixels around the entire edge of the object – something we don’t want to do. What we need is a way to contract or expand only a small area: enter the Maximum and Minimum filters.
According to the Adobe Help file, “Maximum and Minimum are useful for modifying masks. The Maximum filter has the effect of applying a choke—spreading out white areas and choking in black areas. The Minimum filter has the effect of applying a spread—spreading out black areas and shrinking white areas.” This is a little tricky to remember, but it is exactly what we need. In order to keep it straight, think of the impact of the mask in white areas : Maximum makes the white areas larger, and Minimum makes the white areas smaller.
Let’s apply that principle to our mask. Looking at the mask in the area shown above, we can see the white and black areas of the mask, but only the area I’ve circled needs to be changed. The black area needs to grow, and the white area needs to shrink:

This is a job for Minimum. However, before using this filter, we must create a selection on the mask itself – that’s right, a selection of a selection – to restrict the area where the filter will take effect. With the layer visible, but the layer mask highlighted and active, choose the lasso tool and select only the area to be modified:

It also helps to feather this selection by a few pixels, to avoid any abrupt edges in your mask. Use Select > Modify > Feather… and choose a small radius value just to take off the edges:

Now, before the next step, check again to ensure the Layer Mask is selected, as shown by the arrow above. Then, run Filter > Other > Minimum…
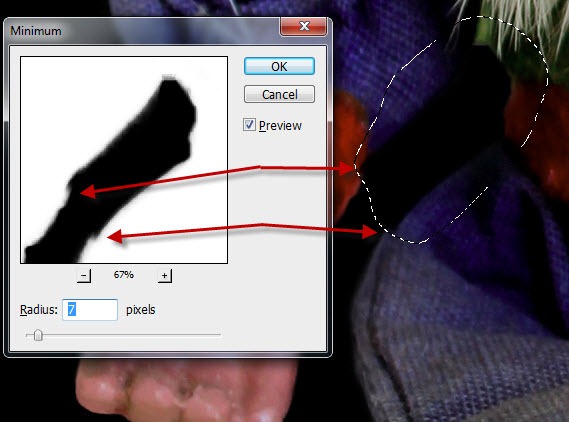
As you increase the Radius, notice how the black area of the mask in the filter panel gets larger, and notice how the actual image is masked (make sure you have Preview checked). In this case, 7 pixels is too far, and you can see the stairstep made by the mask in the selected area. A value of 4 is more appropriate here. Note the better edge alignment while the fringe color is still effectively removed.

Now, pan over to the other side and repeat the process. Lasso the area where the mask needs to be tightened, Select > Modify > Feather… and then Filter > Other > Minimum…

Don’t be afraid to click on the “+” and “-“ buttons at the bottom of the filter preview window to zoom in and out – and also don’t forget you can drag the cursor in this window to pan the view.
We’ve now cleaned up the loose edges of our mask and removed the bothersome fringe:

And our little gnome is ready to be returned to his composite image, with a little better edge definition (couldn’t we all use a little of that?).

The Maximum tool works the same way, only in reverse – I think you’ve got the idea by now. Bring these “oldie but goodie” filters into play when you want to modify only specific selected areas of your masks. Happy Photoshopping!


Thanks for sharing this very useful technique. I will be making good use of it in future.