Text Chiselled in Stone with Photoshop
This week’s tip is a two-for-one, bringing you some classic techniques. We’ll create a nice stone texture, then carve some text in it using layer styles, as well as a few additional tricks.
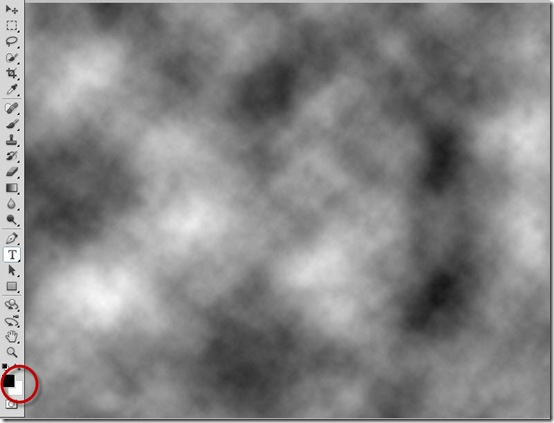
Let’s start with the stone texture. We’ll begin with a new document, 800×600 pixels, and use the keyboard shortcut “D” to set the default colors to black foreground and white background. Then, choose Filter > Render > Clouds.
Next, press Ctrl-F (Cmd-F on a Mac) several more times to keep changing the clouds until you get something that looks interesting.
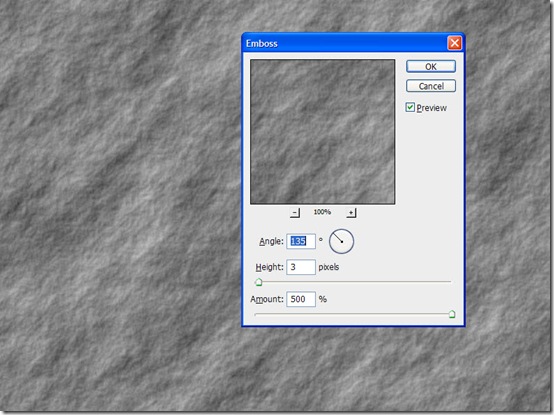
Now, with the clouds in place, choose Filter > Stylize > Emboss. Set the Height to a low number (we used 3) and the Amount to a high number (we maxed it out at 500%).
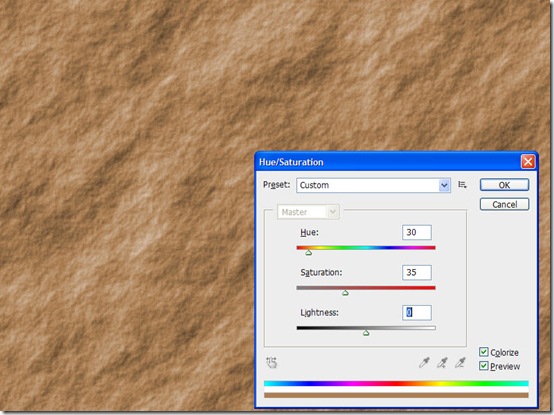
This creates a nice stone texture, albeit a grayscale one. Time to add some color. Press the keyboard shortcut “U” to bring up the Hue/Saturation adjustment, check the option for Colorize, and adjust the color to taste – here are the settings used for this example: Hue = 30; Saturation = 35; Lightness = 0.
Now, we’re ready to add some text. Start by creating some text on a new layer. This is a font called Dwarven Stonecraft, free from Dafont.com.
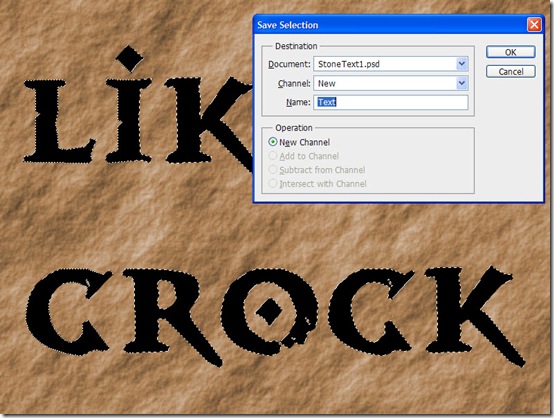
Now, we don’t need the text, but we need a selection of the text. Control-Click (Mac: Command-Click) On the text layer thumbnail to load the text as a selection, then choose Select > Save Selection… and name the selection “Text.”
Now, a few steps in succession:
- Press Control-D (Mac: Command-D) to deselect.
- Turn the text layer visibility off.
- Then, go to the Channels panel (Window > Channels) and click on the Text Channel to make it active.
Here’s what you should see:
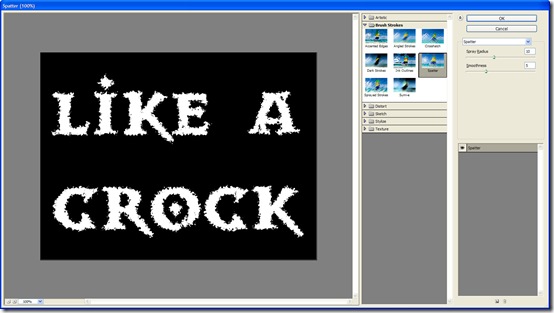
Now, we’ll rough up the text a bit. Choose Filter > Brush Strokes > Spatter and set the Radius to 10, and the Smoothness to 5.
Now, a few more steps to be done in precise order:
- In the channels panel, Control-Click (Mac: Command click) the Text channel thumbnail to load it as a selection.
- In the channels panel, click the RGB channel to go back to the composite view.
- In the Layers panel, click the Background layer with the stone texture.
- Press the keyboard shortcut Control-J (Mac: Command-J) to copy the selection to a new layer.
Here’s what we have now. You can’t see the new copied layer just yet – but you will:
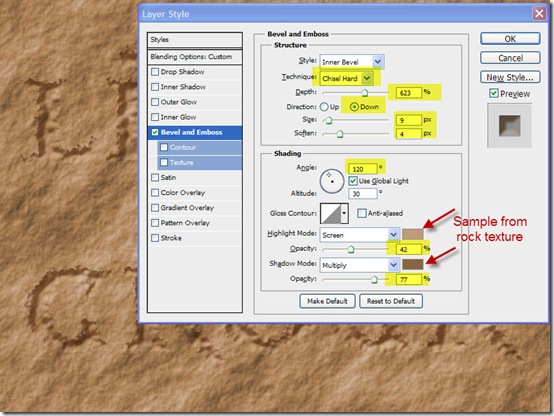
With the new copied layer selected, let’s add some layer styles. Click the stylized “fx” icon at the bottom of the layers panel, and choose Bevel and Emboss. Change the settings as shown. Note the settings for the Highlight and Shadow Mode color settings – the colors were sampled from some of the lighter and darker areas of the rock texture. Don’t close the dialog yet.
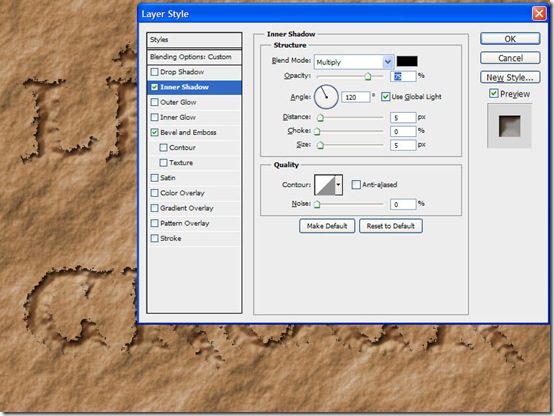
Next, click on Inner Shadow, but don’t change any of the default settings. Don’t close the dialog yet.
Next, click on Color Overlay, and change the settings to match what you see here. Again, the color was sampled from a darker area of the stone texture. The Opacity is set to a low value (14%) to just add a hint of darkness and smoothness. Don’t close the dialog yet.
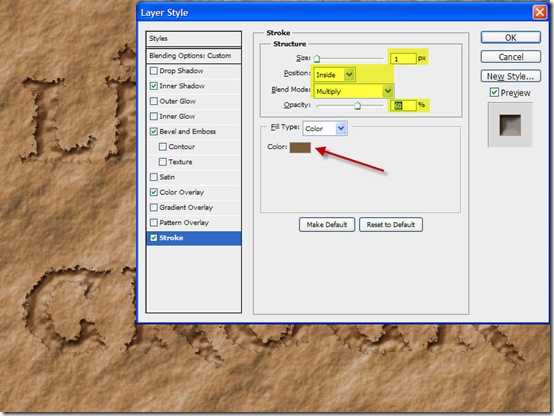
Now, click Stroke to add a stroke, and change the settings as shown, to Size: 1 pixel, Position: inside, Multiply blend mode, 60% opacity, and another darker brown color sampled from the image. This just adds a hint of edge definition; you may want to experiment with different opacity settings.
Click OK to finish adding layer styles, and we’re nearly done:
This looks pretty good – but we can take it one step further – to add some additional sense of chiseled stone to the interior of the text (and this may be needed more or less depending on the font), we can select the copied text layer, and choose Filter > Pixellate > Crystallize… and select a low number for the cell size. The preview gives you a sense for the size of the chisel marks you’re creating.
With the interior looking a little more chiseled (this also smooths the interior of the text a bit, we have our finished effect. You can adjust the fill opacity of the copied text layer to adjust the intensity of the chisel effect, if you desire, and here we are:








I can’t thank you enough. You have really made my night and made this so nice and easy. Isn’t photoshop incredible? I would have never, ever known how to make a stone looking surface this way (the filter, render, etc.).
Thanks.
Texture are very informative,Thanks:)