
Speed your scanning workflow in Photoshop
If you’re like me, you probably have stacks of old photographs sitting around in the “to be scanned” queue. In fact, you may, like me, have additional piles from family and friends in the same category. How do we work through all those images with greatest efficiency?
Today’s tip isn’t about editing the images, exactly – it’s more about the scanning workflow itself. And, this is a tip that works in both Photoshop CS5 and Photoshop Elements 10, as well as various earlier versions.
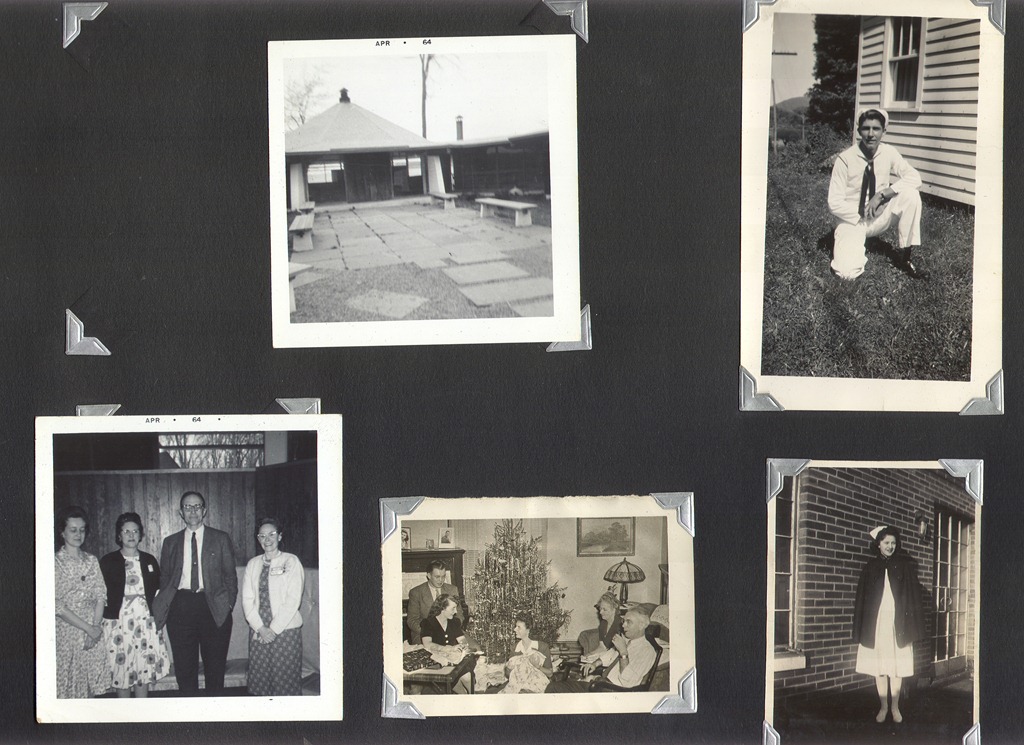
The trick, when scanning large numbers of images, is to scan multiple images at once – there’s no need to limit yourself to one image per scan. In fact, with the old family album shown in the image below, I didn’t even remove the photos from the album page. I was able to disassembly the album itself, and scan entire pages at a time, as you see here:
Now, in Photoshop, it would be relatively straightforward, although time consuming, to select each individual image with the crop tool or one of the rectangular marquee tools, copy the images to a new layer, and save them off one at a time. But, this is TipSquirrel, and we have a time saving tip!
Whether you’ve scanned this image directly into Photoshop, or used your scanning software to create a TIFF or JPEG file, you’ll want to go ahead and open it in the Photoshop Editor.
In Photoshop CS5, with the document open, look under File > Automate > Crop & Straighten Photos:

What? You’ve never been under the File > Automate menu? We need to change that!
When you select this, Photoshop will work for a few seconds, and (given the right conditions, which we’ll cover in a moment) suddenly you’ll have a bunch of individual documents, all ready to save out. In this view, I’ve changed my window appearance from tabs to floating windows so that you can see all of them:

This entire operation took less than 5 seconds on my machine.
Photoshop Elements users have this capability also, but the command is in a slightly different place. Load you image into the Photoshop Elements 10 Editor, and choose Image > Divide Scanned Photos:

In Photoshop Elemens 10 ion my machine, this was a little slower – maybe 6-8 seconds:

Even so, that sure beats creating the files by hand! A true automation delight.
Now, what about the “right conditions”?
This process works equally well with black and white or with color photos. However, having a contrasting background is a big help. In this case, with the black and white photos having a white border, the black background paper was a big benefit in helping Photoshop locate the edges of my photographs. White background works well with color photos, but for photos with white borders, you may not pick up the borders.
Besides a contrasting color, you also want to keep a clear separation between the images. More is better, although it doesn’t have to be huge. Here is an example of one that doesn’t work well:

In this case, if we try to run Crop and Straighten in Photoshop CS5, we get this result:

Not at all the result we hoped for – the central image that overlaps the others really interferes with the ability to divide the photos properly. From 7 images we only ended up with 4 plus a fragment, and one of the four isn’t properly cropped.
Leaving even a slight (5-10mm or 1/4-1/2”) gap between the photos will make all the difference in the world.
Here’s a bonus tip: Have one image you’ve scanned that is crooked? This command will automatically straighten it!
Before:

After:

So, when you’re working through that pile of old photos, scanning away, make sure to grab several at a time – as many as your scanner will hold – and use the Photoshop automation features to make your scanning job a whole lot easier and more efficient.

AWESOME!!!!! Thank you so much. This will make a tedious task possible. 😉
Ach! I wish I’d seen this a few years ago when I scanned into hundreds of my Gt Aunts photos dating from 1910 to 1990…!! Whilst I scanned many images on each scan tt took me days to crop, straighten and save out. For future reference, thanks!
There’s an automated way to do this, it’s called AutoSplitter. Not Photoshop related, so sorry for the offtopic, but it may prove useful for someone.
http://autosplitter.com/
Wow! I’m right in the middle of dividing up a scanned album and thought there might be an easier way. Thank you for your clear and complete directions. I know the second half of this album will be so much easier.
In case someone is looking for an alternative, ScanSpeeder (not Photoshop however) will do the above, including automatic correction for a crooked scan. http://scanspeeder.com/