Solving Common Photoshop Problems–The Brush Tool
Sometimes the simplest things can create the biggest headaches, and so it is with the Brush tool in Photoshop. You might think, grab the tool, set the color, shape and brush size, and paint away. But then… something is wrong. The brush isn’t painting at all, or it’s painting in a way you aren’t expecting? What’s gone wrong? Should I reset preferences? Reinstall Photoshop?
The answer is likely much simpler than that. Many problems with the brush tool can be solved by examining the Brush toolbar at the top of the screen. Let’s look at an example.
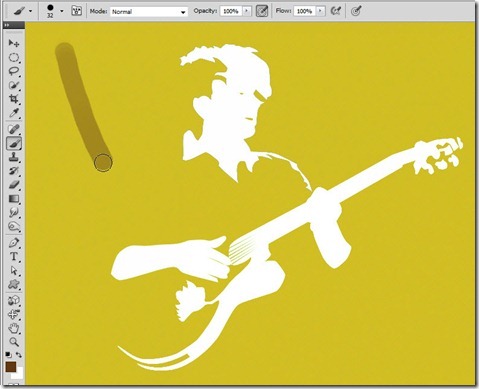
Here we have the makings of perhaps a bit of poster artwork. We want to paint some bold freehand strokes on this image, on a new layer in a contrasting color:
So, we grab the brush tool, and set the brush to a hard round brush, set the color to a dark brown color, and start to paint. Oh, dear:
The color we’re painting doesn’t match the foreground swatch at all. The observant reader may notice the problem straight away: The brush opacity, as set in the toolbar, is 20%:
If we set the opacity back to 100%, by moving the slider or pressing the “0” key shortcut, we will get the expected results.
However, it’s not always that easy! Let’s look at another example:
Similar problem, but the opacity is set at 100%, so what gives? Again, a close inspection of the toolbar shows an option is set – one that is new to version CS5 of Photoshop:
Take a look at the tool tip: “Tablet pressure controls opacity (overrides brush panel setting).” This is a very handy option, but I’ve found that many people aren’t aware of it, click it inadvertently, and then drive themselves crazy trying to figure out why their brushes are acting up.
Note the other options just to the right also: “Enable Airbrush Mode” with its very own Flow setting (similar to opacity, but like an airbrush, it builds up over time) and “Tablet pressure controls size.” These can also wreak havoc if they become enabled accidentally:
These options are sticky, and using a tool preset can enable these without you knowing it. So, be aware and look to the toolbar right away if you sense a problem.
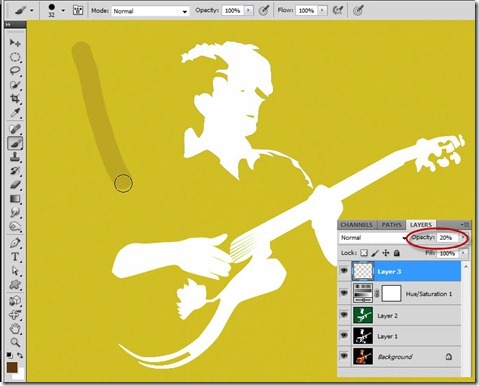
Now, let’s examine the brush tool bar to make sure everything is set properly – no errant options and no incorrect adjustments. We start to draw, and – uh oh. More problems:
Here’ I’ve brought the new culprit onto the screen, and as you can see, we’ve got the layer opacity set to 20% and we’re once again getting the wrong results. It may seem obvious and simple, but I can tell you this has tripped up many a student over the years!
Here’s another variation on the same theme. Can you spot the problem?:
We selected brown, but the foreground swatch shows gray. The color appearing on our image is green. The problem? We’re drawing on the wrong layer! The layer mask of the adjustment layer is active. Again, such a common problem, yet often a head-scratcher if you’re not paying attention.
Or how about just this one?
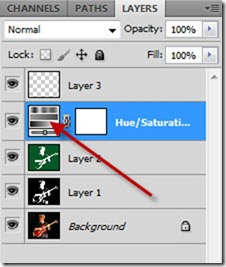
Ah, the dreaded, “You can’t do this” icon. If you try to paint, you get this ugly message:
Again, the layers panel shows the issue: The adjustment layer itself is selected (not the mask, but the adjustment icon). This will never work:
We’ve just run through a litany of potential problems with the Brush tool – some obvious, some not so obvious – but all relatively simple to fix, IF you know where to look. Keep one eye on the tool bar, and keep another eye on the Layers panel – and you’ll solve 99% of your problems with the Brush tool. And, that goes for the other painting tools as well: the Healing Brushes, Clone Stamp, Eraser, Smudge Tool, Dodge and Burn, and so forth – they all share the brush functions and are all susceptible to those little errors – little errors that can create great headaches if you’re not paying attention.
Got a Photoshop headache? Drop a note in the comments and we’ll try to cover it either directly or in a future tutorial!


Thanks Michael the number of times I’ve tripped over these odd errors because I focused on something else.
Nice article, but my prob is totally bizarre. Brush doesn’t paint in foreground color at all. I paints in black with red in the centre. Every brush!! I must have done something in the past and forgot. Help please, if you can.
Kathy
what about when my brush size is not painting the actual size of the cursor indicator…it is pin sized even if i enlarge my brush size
Hi Sterfanie, it sounds like you have the caps lock on, this turns the cursor into a cross hair.
I am having a weird problem when I use the art history brushes. No matter what I do, when I use any brush, any size, as soon as I click to paint, it spreads out in all directions, it kind of looks like spaghetti noodles going every which way. I can’t just paint and go over the petals of a flower, the brush spreads way past the petals. I have tried to reset to the default settings, I’ve messed with jitter, scatter, brush size, opacity, the “tight short – loose short”, etc. settings. I have tried everything I can possible think of. Any ideas??
I use Photoshop to make coloring pages for children. I pick a photo and put a layer on top of it and then trace with the brush tool. Hundreds of times I click shift click to get a short strait line. After an hour or so, the tool goes crazy and draws a long straight line in the wrong direction and then at a narrow angle back again with another long line. What the heck!
Super helpful…I’ve been fighting this one for a bit now…Thanks Michael!
hi- when i’m using the healing brush tool and click alt so select my pixel sample a second layer appears underneath and moves around wherever i move my mouse…this never happened before and suddenly it’s happening and i can’t get rid of it! please help me if you can as i have lots of editing to do today!
I painted a clip art dog BLACK. I want to simply draw a RED collar on top of the black dog. The red does not show up, or it shows up behind the dog, or it is a strange dull color. All opacities are set to 100%. I had a Bamboo plugged in for a minute, but unplugged it because I don’t understand how to get it to control the whole screen.
I don’t have a tablet but my photoshop program thinks i do and i don’t have a pen tool or brush presets
Thank you – you saved my life (and my sanity) today!
all of a sudden my brush tool does not want to work via any layer masks. HELP!
I’ve been trying to create different effects using Photoshop brushes but when I enlarge my brushes, they appear blurry and horribly pixelated. Help!
Hello I have a strange problem with my colors. Its painting only white-grey-black when I click on any color. Please can anybody help? 🙂
Nevermind I solved it
I’m a calligrapher going crazy with my strokes that are jittering like they are going over an invisible curb. Jittering in a pattern. What’s up? I can send you a picture if you like. Please help!
I am going nuts!! All I want to do is darken some white spots on a couple of photos. The circle selected for brush size seems correct – the colour I try to use to darken does nothing. Doesn’t matter what colour I choose – nothing! What has gone wrong? It worked okay last night but something has changed today and I don’t know what. It will not apply colour to the photo, period. thanks for any help
Why am I unable to apply any color to the photos I’m trying to edit?
Nothing shows up on the photo. help help anyone – I’m missing something and I don’t know what.
These are really helpful, but don’t cover one problem I’ve been encountering. Whenever I’m using my brush and two lines overlap on the same layer, the parts that overlap become substantially lighter. It’s making it almost impossible to ink or color. I’m using photoshop cc and the default brush, if that helps. Any advice would be greatly appreciated, as I’ve tried everything, but nothing seems to help.
My problem seems slightly different: When I choose a brush the beginning opacity is less than 100%. I change it to 100%, not much of a hassle. While working, however, the number wanders to something less than a hundred which I don’t notice until I see the brush not working the way I want. I then reset it and continue until it wanders again. Major annoyance. Googling the problem shows that many people have this issue but no one has an answer and Adobe is apparently ignoring it.
Can you confirm if this is a known bug that I just have to live with?
Thanks — Jim, iMac 5k, el capitan, pscc 2015.5
Hi ! My problem is the following : when I paint with the paint brush, it behaves a bit like the clone stamp tool (Im using the Airbrush soft round). It adds pixelated areas to the photo, as well as lines. The adjustment layer, or the background copy that I am working on is acting strange at the same time. On the background copy layer , the areas where I am not painting, gets empty (grey and white squares, like on an simple new layer). After a while, I cannot paint on certain areas. Nothing is set to dissolve and I am not using the pencil tool, and set the tool setting back to original . I checked all of these. Before this went wrong, I was practising with the clones stamp tool and the pen tool, after this the brush started acting like this.
I would appreciate some help if someone has any idea what else to check. I can send print screens too and I am using a Macbook if that’s of any relevancy.
Nóri
I have read several articles and watched YouTube videos but I cannot figure out what’s wrong. I am fairly new to Photoshop CC. I want to eliminate a large shadow on one subject’s face (image has a group of soccer players). I have created a layer mask and selected the brush but when I drag my cursor over the face, it doesn’t do anything. I have checked Opacity and fill……?
hey,
I used my gradienttool but now photoshop won’t let me go back to my brush an pencil tools did I click on something without noticing it? I have absolutely no idea how to fix it.
not sure how it happened or how to fix.
Working on a separate layer…when I went back to inside the previous layer image it was huge!
What could have caused it & how do I put it back to original size?
I’m getting a ‘donut’ effect with my brush.. It’s not filling up the cursor space, and changing the size of the brush does not fix it.
I’ve tried all fixes that I know of, to include uninstalling and reinstalling PS CC 2019.
Thank you Michael !! It is incredible how an article of 2012 can help still in 2019, until now was thinking my brush files where corrupted and switching between 32bits and 64bits versions, would have never realize was realted to that button at top being activated because of another tool was using.