
Solving Common Photoshop Problems–Greyed out Filters
In my role as moderator of the member forums over at the National Association of Photoshop Professionals Website, I routinely help struggling users to come to grips with the powerful, yet temperamental program we all love. Some of the most common problems are the easiest to solve, but like many technical problems, the answer often lies in knowing how to ask the question. But, over on the forums, we get the questions asked almost every way you can imagine, and over the next few weeks I’ll be bringing you a series of problem-solving tips aimed at overcoming the most bothersome and common Photoshop annoyances.
If you’ve got a problem that’s stumped you, or an annoyance you’d like to see resolved, add a comment at the end of this article, and we’ll see if we can work it in! That’s what we do here at TipSquirrel!
So let’s start with that all-too-common ailment:
Problem: “I want to use the Photoshop Filter XXXXX, but it’s greyed out! Is there something wrong? Do I need to reinstall Photoshop?”
The good news is, there most likely isn’t anything wrong – we just need to make a few adjustments to the file with which we’re working.
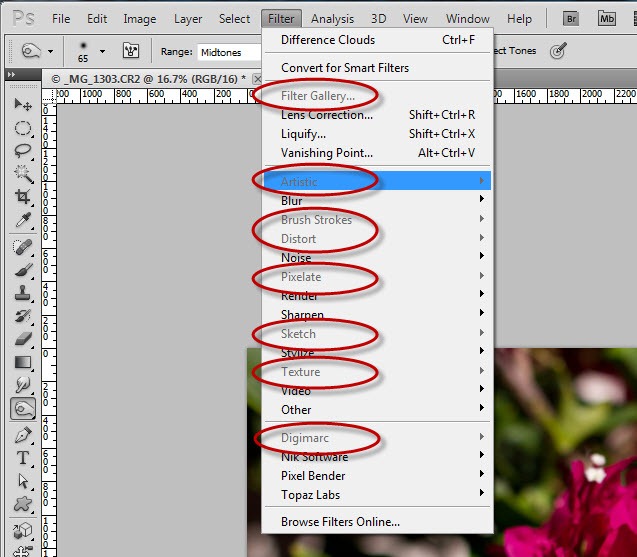
In fact, the answer most likely is staring us in the face, right beside the menu:

Yes indeed, we are working with a file that has 16 bits per channel, clearly displayed as “RGB/16” in the caption bar of the image. This is the single most common reason for the filters to be greyed out. You see, a great number of filters are from an old batch of filter effects Adobe acquired many versions back, and those filters haven’t been updated to modern standards. So, while they will work with 8-bit files, they won’t work with 16-bit files.
Another related problem shows itself with the Clouds filter (Filter > Render > Clouds). Normally you would expect the clouds to be rendered in the foreground and background colors, but with a 16-bit file you always get black and white:

Here’s how to solve both of these problems very quickly: change the bit depth of your file from 16 bits per channel to 8 bits per channel by selecting Image > Mode > 8 Bits/Channel.

Once you’ve made this change, all the filters become available:

Problem solved, right?
Well, maybe not exactly. Changing a file from 16 bits per channel to 8 bits per channel can be a hindrance, in that 8 bits per channel has fewer colors available – 256 shades of color in each of the three channels, as compared to 65,536 shades of color per channel in a 16 bit file. You may notice a degradation if the image, especially in subtle gradients such as skies, skin and clothing. So, is there a workaround?
You bet there is. There are several workarounds, in fact.
1) Make a copy of your document, and convert the copy to 8 bits per channel. Run the filter there, and copy and paste the result back into your 16 bit file.
2) Convert your critical layer or layers to a Smart Object (select the layer or multiple layers, and choose Layer > Smart Objects > Convert to Smart Object. Then, change the bit depth of your file by choosing Image > Mode > 8 Bits/Channel as we saw above. In this case, two important things happen:
- The contents of the smart object remain at 16 bits/Channel!
- All the filters now work, and as a benefit, they are applied as Smart Filters (see below*).
We covered Smart Filters and Smart Objects in some detail awhile back – if you need a refresher, please see my earlier tutorials:
Smarter Editing with Smart Objects
Smart Objects, Raw Flexibility
Smart Objects, Smarter Filters (*this tutorial describes Smart Filters and how they work)
And, for even more in-depth studies of Smart Objects:
Picture Package with Smart Objects
Exposure Blending with Smart Objects
Nested Smart Objects – (Part 1) – (Part 2)
Max Stacks with Photoshop
Noise Reduction with Smart Object Stack Modes
Creative Stacking Diversions
Stay tuned next week as we continue to attack common problems in Photoshop.


Dear Michael,
I would like you to ask the following about PS:
When I run bridge after starting the program it always opens in the same directory/map and not in the directory where I left of. I mean the map in which I did the latest work on a digital negative.
Is there a way to influence where Bridge begins opens?
Yours truly,
Henk Jan van Boeijen
great article…thanks for sharing… 🙂
I am unable to use the droste effect filter in CS5. It appears to be an issue with graphics acceleration but the open GL option is greyed out which means I can’t use the filter. According to adobe, my graphics card is fully compatible. Can you help?
All filters should be available when image is set as 8bit RGB – if not check you’re not in LAB or Grayscale modes. The smart object route is very handy for this and other similar problems!
Hi Michael,
Are you able to she’d more light on how I can use the liquify and blur filters on my Photoshop CS6 13.0.1?
I transfer from Lightroom to Photoshop as smart objects and the filters above also the filter gallery is greyed out.
Thought updating it will fix it. Change it back to 8-bit still does not allow liquify to be used.
Thanks
My file was created in 8 bits/channel, my layer is a smart object (I’ve tried it both ways, smart object and not) and still my artistic filters are greyed out! What now? I am using Photoshop CC 2014.2.1, if that matters.
apparently artistic filters don’t work in CMYK mode. I switched to RGB and they work great.
I’m working .psd document and I’d like to use the liquify tool in one of the layers.. The document is RGB8 and I changed from CMYK to monitor RGB, but the liquify tool and the option “convert to smart filters” still remain greyed out. Can anyone please help me?
Hello Michael, I want to do a very SIMPLE copy/paste in PE, Windows computer. I have done this many, many times, but now these the Copy feature is greyed out. The Paste future is not greyed out. I have tried both Guided and Expert modes. I know how to do this whole operation — why is it greyed out, and what can be done now? Thanks for your site.
PS I will be Pasting into a Word file. As I said, I’ve done this many times.
Thank you for all you info. Im having trouble with droplets . I see that the pc window option at the bottom of the droplet box is grayed out why is that and how can I access that. as of now with that grayed out i can’t get the droplet to work. Please help
i can’t find filter>render>cloud in ps cs6
Thank you so much for this!
Hi,
The file I am working on is in RGB 8 the filter icons are still grayed out. Do you have any suggestions on what could be causing this?
Thanks
Hi, I had tried the things listed in the article above to no resolve. Most of my filters are available but under render the lighting effects filter is greyed out. I double checked and I’m working in 8 bits and RGB color. I appreciate any help you might offer.
Hi Michael, I found this site because my “Nvidia Tools” was greyed out in Filters but if you can’t help is there any chance you know where I can get support for this? Basically, when saving a file as a DDS texture in Photoshop, regardless of what pixels per inch I set using image size, the resulting saved file shows on reopening that it is set to 72 pixels per inch. In addition, instead of being 256kb as the dimensions should have determined it was an odd 341kb. I sent the file to a friend and his Photoshop showed the ppi to be correct – the size I had set and intended but he did see the kb size error. So, my Photoshop is misreporting the ppi as 72 regardless and this only happens when I save as DDS.
Thanks!!!!!! You have solved my problems!!!!!
Hi – thanks for this, but mine was set on 8-bit and is still greyed out for lighting effects – problem not solved 🙁
thank you so much
Hello,
I have a question about focus stacking in PS6.
I photography with Olympus OMD cameras, and I shoot in RAW.
I download the RAW files onto my Mac desktop and place them into a folder and them move them into PS6. When I do, Adobe Camera Raw opens up; from there I can edit the images I wish to stack.
When finished I press the OPEN key in order to move the images from ACR directly into PS6. Once there, I go to FILE, select SCRIPTS and then choose LOAD FILES INTO STACK.
But something has changed when I do this. Now when I go to FILE and select SCRIPTS, I receive a box that reads (from top to bottom) Delete All Empty Layers, Flatten All Layer Effects, Flatten All Masks, Layer Comps to WPG and (at the bottom) Browse.
So my question is as follows: How do I get back to when I go from FILE to SCRIPTS to LOAD FILES INTO STACK?
Thank you for your help.
John Simpson
wth! this solved my issue! thank you!!!!!!!!!!