
Smarter Editing with Smart Objects
In my early Photoshop days, I created a fair number of disasters in which I edited my files, saved over the originals, and lost the ability to get back to an earlier, untarnished version of my files. Over time, I learned to approach my editing more carefully, and the idea of non-destructive editing began to make a lot of sense to me. Then, along came Photoshop CS3 and with it, the introduction of Smart Objects, and suddenly a whole new world of non-destructive goodness was available at my fingertips. I’d like to spend the next few weeks talking about Smart Objects, how they work, what they can do for you, and why they have become so crucial to my workflow.
Simply put, a Smart Object is a layer that contains a package – a document within a document. The enclosed package can be raster (pixel) based information, such as a Photoshop file or a JPG file, or it can be vector based information, such as an Adobe Illustrator file. The package encapsulates the entire native document in its original format, leaving you with just the final flattened appearance of the file it contains. Once you have a Smart Object layer, you can transform, filter or mask the layer in a completely non-destructive way.
You cannot use any tools that affect the pixel data directly on a Smart Object layer. Tools like the Brush tool, Clone Stamp, Healing Brush, Eraser, Blur, Smudge, Dodge and Burn do not work directly on Smart Objects. However, if you do need to edit at the pixel level within a Smart Object layer, you can open up the package, do your edits, and close the package again, and the Smart Object Layer is updated to display the results.
Let’s look at a simple example to see the power of Smart Objects in action:
Step 1: We’ll start with this simple shape on a regular layer above the background.

Step 2: Now, we need to resize this shape to a smaller size. We choose Edit > Free Transform, and drag the object to make it smaller. We click on the checkmark to commit the change, and in this case when we say “commit,” we mean it!

Step 3: Now the client has decided the image really should be bigger. If we use Free Transform again to enlarge the pixels, we get a severe loss of data – the fact that this once was a large crisp image is completely wiped out. We’re left with nothing we can use – we have to start over.

Step 4: Let’s go back to Step 1, but this time before we make any changes, we convert the layer into a Smart Object. From the Layers panel, choose the flyout menu and select “Convert to Smart Object.”

Step 5: Now, notice in the Layers panel, the layer still looks like a layer, except the thumbnail now has a small icon superimposed, the image of small packages. This is your indication that the layer is now a Smart Object.

Step 6: Let’s use Free Transform again to make the Smart Object layer smaller. Click the checkmark or press Enter to commit the change. In this case, “commit” isn’t so final….

Step 7: Use Free Transform again to scale the Smart Object back to a larger size. This time, when you commit the change, the detail is as crisp and clean as can be!

Step 8: Let’s take this even further – we’ll use Edit > Transform > Warp and give the Smart Object some really wacky distortions.

Step 9: Now, we’ve decided we need to change the color. Not to worry, we still have access to the original unwarped data. Simply double click the Smart Object icon, and you get this message:

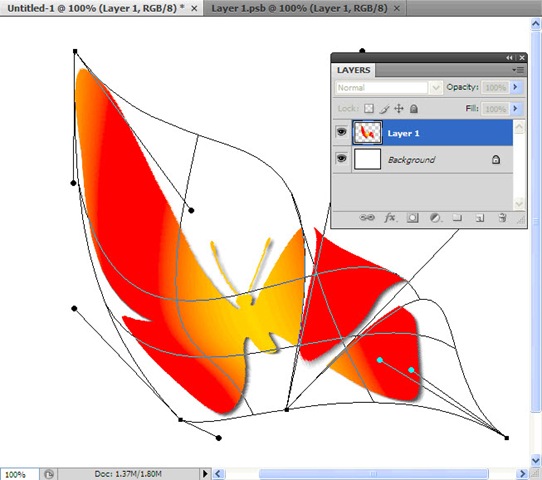
Step 10: The dialog box is VERY important. Do NOT “Save As,” you must simply choose File > Save. Now we are in the Smart Object, which has opened as “Layer1.PSB” in our editor – a separate document within a document! We’ll use Hue/Saturation (Ctrl/Cmd-U) and simply drag the Hue slider to modify the colors of the butterfly:

Step 11: Now choose File > Save, and return to the original document by selecting its tab in the document tab bar at the top. The colors have been changed and the warp has been re-calculated based on the updated Smart Object layer.

Step 12: Just for fun, let’s go back into Edit > Transform > Warp. Notice how the warp handles are exactly the same as we left them in step 8?
Step 13: In the Warp tool bar, we can change the warp to “None” and to undo the warp distortions we’ve applied:
![]()
Step 14: Now the Smart Object is unwarped, restored back to its original shape, and it still is as crisp and clean as before:

Now that you have seen just a bit of what Smart Objects are capable of doing for us, I invite you to join me over the next several weeks looking at various ways you can put this to good use. Smart Objects allow you the freedom to do all the following, and more:
- Scale, rotate, skew, distort, warp, or perspective transform your object without fear of losing any quality or ability to make adjustments later, since the Smart Object contains the original unaltered data and remains intact;
- Place data from vector files, such as Adobe Illustrator, into your Photoshop document – and still retain the ability to edit the original data in its native application, because the data remains vector data within the smart object;
- Create multiple instances of Smart Objects that are linked together – updating one updates them all;
- Use Smart Filters to create non-destructive filter effects that can be tweaked and edited any time after they are applied;
- Selectively mask Smart Filters, without the need to create multiple layers.
Smart Objects have been a huge step forward in Photoshop since their introduction in CS3. I encourage you to explore the many ways you can use them in your own workflow.


When using files as Smart Objects do you loose information when you crop the images as you normally would when cropping in CS5 and lightroom?
How do you use the burn tool on a smart object? It won’t let me do that unless it is rasterized. I’m afraid that might affect the quality. You mentioned that there is a way to open up your package and edit and then close your package. Please explain.
Double click the layer icon of the smart object which will open a new tab. Change the art on the new file, make sure to SAVE the changes. Go back to the original composite psd ( where you double clicked the smart object) and the changes will be reflected.