Selection Basics in Photoshop
Way back in my early days of learning Photoshop, selections were a mystery to me. Sometimes they made perfect sense, and other times they were nothing but a source of frustration. This cloudy understanding of selection basics came to a head as I was working through a tutorial that suggested that I “load the image’s luminosity as a selection by pressing Ctrl-Alt-~” and I knew it was time that I dig a little deeper and figure out what was going on there.
I mean, Ctrl-Alt-~ ?? what the heck is that? Despite my searching through books and help files, I couldn’t find anything that explained, “load the luminosity of an image as a selection.” Determined to get to the bottom of this, I dug deeper, and came away with an understanding of some of the most powerful concepts in Photoshop. I’ll hope to pass along some of the foundation of that learning to you today.
A selection is a channel
…but don’t let that scare you. We’ll step through this slowly!
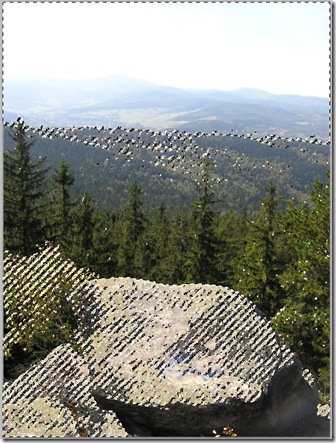
Let’s start with the most basic of selections, using the Lasso tool. What really happens when we drag a loose selection in an image?
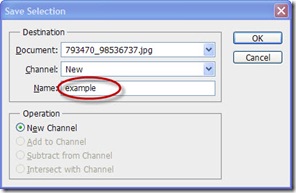
We get the marching ants, and the area inside the marching ants is selected. But, we can’t appreciate this until we save the selection with Select > Save Selection… Name it something meaningful like, “example.”
Now open the Channels Panel and what do we see? The file’s red, green and blue channels, plus a new channel called “example” which represents our saved selection. Notice how the interior selected area is white and the unselected area is black? The black area hides everything, while the white area allows things to show through. This is the source of the saying, “black conceals and white reveals.”
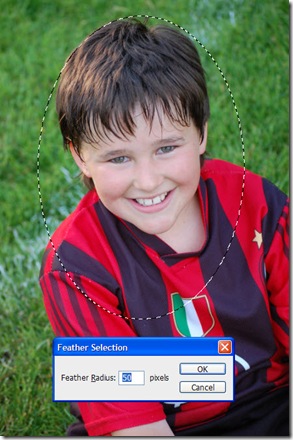
Next, let’s make another selection, this time an oval using the elliptical marquee. Now choose Select > Modify > Feather… and enter 50 pixels.
Can you see the feathered area with the marching ants? I didn’t think so. Save the selection as before, calling it “feather” and jump over the the Channels panel. You can click on the channel to show it… Notice how the border between black and white is blurred? The gray tones represent areas that are “partially selected.” Also notice how the blurred area extends well beyond the original marching ants, the dotted line represents an approximation of areas that are “50% selected” or more.
How does this work in real life? Deselect (Ctrl-D or Cmd-D) to deactivate the selection entirely.
Go back to the image by clicking on the RGB Channel at the top of the Channels Panel.
Use Select > Load Selection to load the “feather” selection we saved earlier. With the selection active, press Ctrl-J (Cmd-J) to jump the selection to a new layer. Now turn off the background, and notice how the area we had selected fades away to transparency in the same areas that the channel showed the blurry gray area.
If black conceals and white reveals, grays partially reveal depending on how light they are. The closer to black, the more that is hidden, the closer to white, the more that is revealed. Add a white layer under the newly extracted cutout to see the effect better:
A Layer Mask is also a Channel
In Photoshop, there’s more than one way to skin a cat. Let’s drop back a couple of steps to our original background image. Drag the lock icon to the trash to change the background layer to a regular layer, then add the white layer under it, like so:
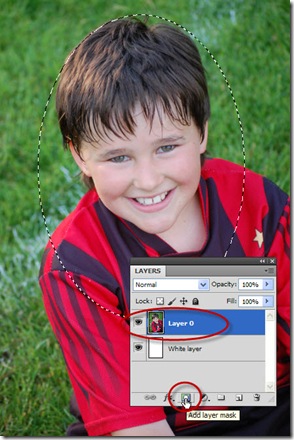
Now, load the selection again by using Select > Load Selection… and choosing “feather.” Now, with the selection active (the marching ants are showing), and the portrait layer selected, click the Add a Layer Mask icon at the bottom of the Layers Panel:
Doing this not only adds a layer mask, but automatically applies the selection that is active – instant mask for the layer! This also applies when you are adding adjustment layers, such as Levels, Curves, or Hue/Saturation – as we’ll see next week. Here is the result:
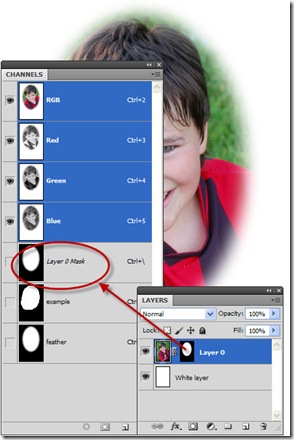
Notice that the resulting mask has the exact same appearance as the “feather” channel we created earlier? In fact, if we have the layer with the mask selected, and look again at the Channels Panel, we see a new channel called “Layer 0 Mask,” representing the working mask for that layer. This is only visible when the layer is selected, and its transience is indicated by the italic text in the channel name:
So, in summary, we now know that a selection is a channel, and that a mask is also a channel. Now we have a common basis of understanding from which to explore further. Next week, we’ll take a look at some other ways to switch between a channel and active selection, and we’ll get to the bottom of the mystery of the weird keyboard shortcut Ctrl-Alt-~ and its modern (CS4 and CS5)equivalent, Ctrl-Alt-2. I hope you stick around!








Hi Michael
Thanks for sharing and look forward to more.
Anthony
Thank you Michael. You explain the process so well.