
Selecting with Color Range
One of the most powerful and useful tools for creating a selection in Photoshop is also the most often ignored and the least understood. In fact, it generally isn’t even regarded as a tool at all, because it doesn’t appear in the tools panel. And when you use it, instead of a tool icon, you get a strange dialog box. Yet, this tool can give you the ability to create very convincing selections quickly, with much better results than its more famous counterparts.
I’m talking about Color Range.
Color Range is located in the Select menu, but it is more of a kindred spirit to the Magic Wand and Quick Selection tools. Kindred, but much more capable. Where the Magic Wand is inflexible and leaves jagged edges, where the Quick Select tool makes poor approximations of the areas you want selected, the Color Range tool will allow you to create dynamic, adjustable selections with very nicely defined edges that more closely follow the organic tonal ranges found within your image.
Let’s take a look. We’ll start with this image of a Roseate Spoonbill, one of Florida’s more spectacular birds. In this case, we want to isolate the bird from the background so that we can apply various adjustments or sharpening without affecting the background:

Examining the Red, Green and Blue channels doesn’t give us a well-defined selection candidate, but with the pink against blue, we can bring out the tools that detect color and luminance levels. We might consider starting with the Magic Wand tool – we can start clicking and shift clicking on the bird, but we eventually hit a spot with luminance too close to the background and get something like this:

So, we alt-click to remove areas, and in general this approach becomes an exercise in frustration. Plus, if we examine closely to see the edges we’re creating, the Magic Wand is leaving edges all over the place – and creating a lot of cleanup for us:

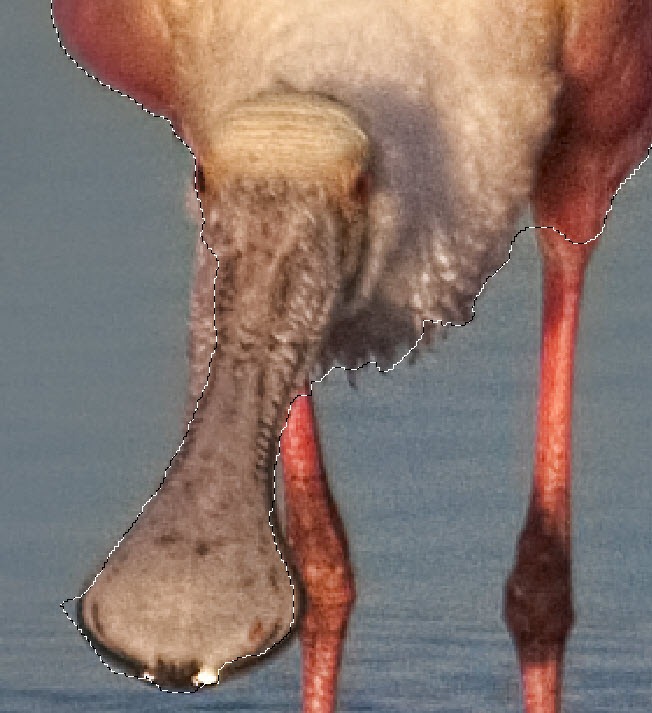
How about the Quick Mask tool, you might say? Sure enough, after a few drags with the tool we get this result:

But, inspecting more closely, we find that this tool has also give us a pretty poor approximation of our desired edge. And, what happens if we want to select some of the partially transparent parts of the bird in the water?
Enter Color Range. Where the Magic Wand allows us to select a tolerance range for every click of the wand, Color Range provides an adjustable tolerance where we can see the results. Where the Quick Select tool “finds” edges all over the place, the Color Range tool will work with the tonal boundaries in your image, again with live preview and the ability to make changes more easily.
Deselect everything (Ctrl-D / Cmd-D) and open Color Range by choosing Select > Color Range.

Instead of a tool, you get a dialog box, and your cursor (when you hover over the image) turns into an eyedropper. This is certainly not the most intuitive interface. Let’s take it a step at a time, though.
First, in the center of the dialog box, is a black and white image. You may see more black or more white, depending on your foreground color when you start the command, but don’t worry – we’ll change it in a second! This black and white image is a mask – a selection, if you recall from my previous tips on selections – and the old rule, “Black conceals, White reveals” holds true here.
We will select colors by sampling spots on the image, and the color that we sample will be selected – represented by white.
The non-selected area is in black. And, the transitions, as we’ve seen before, are shades of gray. However (and this is quite different from the Tolerance in the Magic Wand tool), the transitional area is a gradual fade as the colors vary from the sampled color. Instead of Tolerance as in the Magic Wand, in this case, we have Fuzziness with a default of 40.
Notice we have three eyedropper icons under the buttons on the right. I recommend using the one on the left. Then, adding the Shift key changes automatically to the Add eyedropper (the one with the “+”) and adding the Alt or Option key changes to the Subtract eyedropper (the one with the “-“). This is similar to all the other selection tools’ operation.
Now let’s start by clicking on the back of our bird. We get a selection based on that color:

Now, let’s adjust the Fuzziness slider. We get a gradual increase in the area covered as we raise the value. This is a live effect!

Now, if we go too far, we will start to pick up the background. Instead, let’s return the value to 40, and add some more sampled colors. Shift-click with the eyedropper to add new sampled points, and the colors at those points are included in the selected range (sampled points are indicated with yellow arrows):

But, we can do more than just shift-click. We can hold the shift key down and drag across an area of the image, and the entire set of colors we drag across are added to the color range:

Want to get a better view of what we have selected? Simply change the Selection Preview dropdown at the bottom of the dialog from None to Grayscale and the entire image is shown as the mask. We can still sample and drag colors within the grayscale preview:

Continue to shift-drag and add more sampled colors until the entire bird (not the reflection) is showing in white. Don’t worry about the background being slightly gray, we’ll fix that momentarily:

At this point, we’re looking pretty good, but we need to fix the background. Enter a new option introduced in CS5, Localized Color Clusters. While this isn’t the most user-friendly name an option could have, it is actually very useful. What it does is to limit the effect of the color ranges chosen to within a certain distance of the actual sampled point. This distance is controlled by the “Range” parameter, which will become active as soon as we enable this option. Since all our sampled points are on the bird itself, the Localized Color Clusters will help limit the selected colors to nearby pixels and will allow us to avoid selecting pixels farther away.
Go ahead and check the box, and we get this:

There is a remarkable improvement in the background, but it isn’t perfect yet. Also, the bird has lost some of its selection as well. We’ll fix that first, by adding new sample points (shift-drag the eyedropper to add more points). Additionally, I found that I needed to lower the Fuzziness to 20:

Now, let’s work with the Range parameter affecting the Localized Color Clusters. As we lower the value of the range, we not only lock in the black background, we also partially deselect the area of the reflection in the water, so that we will have partial transparency in this area of the mask – a nice effect for a watery reflection:

Once you’ve gotten the desired results, we can click OK in the dialog box, and we are returned to the image, with the “marching ants” showing our selection. Notice at the bottom how the marching ants seem to end before they get to the end of the selection – this is because marching ants only show areas that are more than 50% selected, and we have a partial selection fading out at the bottom.
We can verify this by adding a layer mask (in this case I have a white layer underneath) and we can see the extracted image:

Notice the layer mask looks exactly like the mask we created with the Color Range command.
A more practical use might be to have our selection active and add an adjustment layer. Remember, that when you add an adjustment layer with a selection active, you automatically get a mask on the adjustment layer – and the adjustments will only affect the selected areas, as in this example with a Hue/Saturation adjustment layer:

Now you’ve had a quick walk-through of the Color Range tool – one of the least understood but most powerful selection tools in your Photoshop arsenal. I hope you’ll give this a try, and dig around to explore some of the capabilities of this excellent tool – the truly capable successor to the Magic Wand.


Michael,
Thank you for the excellent post.
Now that’s what I call a useful tip.
Thanx Michael.
Michael:
Great job on the color range tool! It helped clarify what I had read in a couple of manuals – your explanations and text are more detailed than any manual I have read, and hence illuminate some of the confusing details.
Frank