Scattered Photo Portraits in Photoshop and Photoshop Elements
I was browsing through Flickr the other day when I came across this image by DanleyC. I thought it would make an interesting and fun Elements (or Photoshop) project; so here it is.
The image concept is simple and effective, of course, and has been used before in many different guises. The purpose of this tutorial is more about how to achieve the effect quickly and easily using a variety of shortcuts than it is about the end result itself.
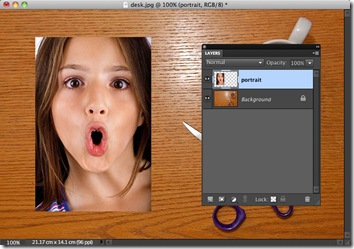
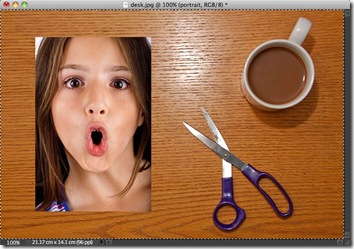
1. We’ll start, as ever, at the beginning. Our image comprises two layers: the background layer of the tabletop with the scissors and mug. Above this is the photo of the girl.
2. The first thing to do is cut up the portrait into four pieces. We could do this freehand by eye but there is a better and far more accurate way. Begin by selecting the entire document from Select > Select All or Cmd+A (Mac)/Ctrl+A (PC) on the keyboard.
3. Make sure the portrait layer is active by clicking its entry in the Layers panel. Select the Move tool (keyboard shortcut: V). Go to the Options bar at the top and click on the Align menu and choose Vertical Centers. Click the menu again. This time choose Horizontal Centers. The portrait is now perfectly centred in the document.
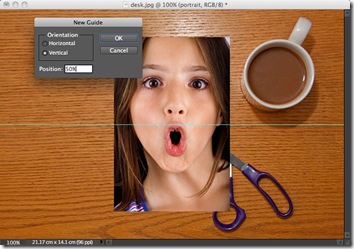
4. Deselect by going to Select > Deselect or by pressing Cmd+D (Mac)/Ctrl+D (PC). Go to the View menu and select New Guide (Note: This is only available in Elements 8 and above. See the notes section at the end of the tutorial). In the dialog box set the Orientation to Horizontal. Enter 50% for the position. Reopen the dialog. Do the same, this time selecting Vertical. We now have a visual indication of the document centre to work from.
5. From the View menu go to Snap To. If Guides is not checked, click to enable it. Select the Rectangular Marquee tool (keyboard shortcut: M). Click where the guides intersect and drag the cursor out to one corner of the portrait layer. The start-point is automatically centred because we’ve set the Snap to option.
6. Now we can start dividing up the portrait. Go to Layer > New > Layer via Copy or press Cmd+J (Mac)/Ctrl+J (PC). This creates a new layer with just that piece of the portrait. Do the same for the remaining pieces, remembering to click back onto the original portrait layer in the Layers panel each time. Once you’ve finished, hide the original portrait layer by clicking its Eyeball icon in the Layers panel. We can also hide the guides now by pressing Cmd+; (Mac)/Ctrl+; (PC)
7. Hold Cmd (Mac)/Ctrl (PC) and click the current layer’s thumbnail in the Layers panel. This ‘loads up’ the layer’s transparency selection. Go to Edit > Stroke (Outline) Selection. The width depends greatly on the size of the image. For a web-sized image like this, 5 pixels is about right. I chose an off-white for the color as 100% white looks too fake. Set the Location to Inside. Although this covers part of the image, it gives us nice sharp corners.
8. Click the next layer in the Layers panel. Load its selection as before and open the Stroke dialog. The settings will be retained from the last time so simply click OK to apply. Do the same for the remaining two pieces. Press Cmd+D (Mac)/Ctrl+D (PC) to deselect once you’ve finished.
9. Now we can arrange our individual pieces on the desk. Press Cmd+T (Mac)/Ctrl+T (PC) to enter Free Transform. Click and drag anywhere inside the bounding box to move the layer around. Move outside the boundary and the cursor will change to a bent arrow. If you click and drag now, it will rotate the layer in the direction of the mouse. Press Enter or click the green tick to apply the changes. Repeat this for the remaining pieces.
10. The final stage for this project is to add a shadow to the pieces to make them look like they are part of the scene. Go to the Effects panel. Select Layer Styles (the second icon from the left). Now choose Drop Shadows from the menu. Double-click the Low preset to apply it. You could also click and drag it onto the image or single-click and click Apply.
11. The shadow is still a bit too big and is making the pieces look like they’re hovering. Double-click the Style indicator in the Layers panel (fx) in more recent versions. The Style Settings dialog will open. To create a more subtle effect, lower the size (the amount of blur) and the distance (the amount of offset from the layer). We can also alter the lighting angle to mimic the shadows on the desk. Click OK to apply the changes.
12. Rather than go through the same process for each of the other pieces, we can duplicate the altered layer style. Right-click on the layer’s label in the Layers panel to bring up the sub-menu. Select Copy Layer Style. Now right-click each of the remaining pieces’ entries in turn and select Paste Layer Style. They will now all have the same effect applied.
And here is the final image. There are a couple of things to note about the technique. First is the use of guides. These are only available from Elements 8 and above. If you’re using an earlier version, you can use the Line tool to create faux guides. Simply centre them the same way as you do the portrait at the beginning of the technique. You can’t snap to them but it’s still a useful visual aid. The second point is the way the image is divided up. We used a layer copy but we could have used a cut instead. This does remove the need to hide the original portrait but it also means that if we made a mistake, we’d have to bring another copy in. Another reason is that cutting can leave slight traces of overlap if we don’t hit the edges correctly; this is more likely if we weren’t using the snap to guide option.
I hope you enjoy this project. Have fun!


very nice tutorial 😀
Thanks for the tutorial…its very nice.
Nice idea…… Where would one get a copy of the tabletop to try out this tutorial/
Hi Gasport,
I can send you a copy of the image; although it’s actually just a photo I shot of my own tabletop.