Photoshop Selection Techniques
In last week’s tip, I presented some Selection Basics in Photoshop that were intended to get you thinking about selections in new ways and with a better understanding of what was happening. In particular, we learned that:
- A selection is a channel
- A mask is a channel
- Whenever we save a selection or create a mask, we can find the result in the Channels Panel
- When we are using a channel to create a selection, black conceals and white reveals
These concepts form a solid foundation and a common framework we can use to look at new ways of creating selections within Photoshop.
Creating quick selections from layers
For example, let’s look at this layered document, simplified to illustrate our point (images courtesy of stock.xchg):
Here we have a guitar, all by itself on a layer, above a stage on a separate layer. Now, to make a composite more realistic, we may want to add a shadow to the guitar. But, in this case, a drop shadow isn’t going to work for us, so layer styles won’t help. We need to create a shadow in the shape of the guitar, and then distort it to suit our needs. How do we create a shadow in the shape of the guitar? Use a selection! How do we create a selection in the exact shape of the guitar?
You might think, use the magic wand, or something along those lines. But, an even easier way is simply to Control-click (Mac: Command-Click) the layer’s thumbnail. If we Control-Click on the guitar’[s thumbnail, we immediately get this:
Instant selection! We can then create a new layer under the guitar, and fill the selection with black (press “D” to set the default colors, then Alt-Backspace, or Mac: Option-Delete, to fill with black):
And, making a second copy (one for the floor and one for the curtain), we distort, scale and blur, erasing the parts we don’t need. Merge the two parts back together, and reduce opacity:
Now, let’s go back and take another look at the “Control-Click the layer thumbnail” step.
Whenever we Control-Click (and again, for Mac users, Command-Click) a layer’s thumbnail, we get an instant selection defined as follows:
- Any transparent pixels are not selected.
- Any fully opaque pixels are 100% selected.
- Any partially transparent pixels are selected according to the transparency.
So, with the guitar, we had a simple case: the pixels that compose the guitar are fully opaque, and become selected, while the area around the guitar is transparent, and becomes non-selected. Let’s Control-click the layer thumbnail of the guitar once again, then use Select > Save Selection… (call it “Guitar”) and visit the Channels panel:
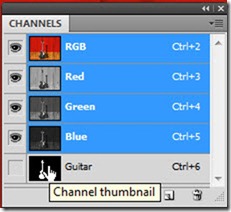
Now, notice the new channel, that contains the visual representation of your selection. Black conceals, white reveals. The area of the guitar, the selected part, is white.
Just for fun, click the Guitar channel in the channels panel. You can now see the channel in your editor, and can see that the detail in the black and white representation is true to the contents of the original layer. Control-clicking a layer is a great and fast way to create selections and masks:
Creating quick selections from Channels
Now, before we go any further, click again on the RGB Channel in the Channels panel to return to the normal document.
Also, deselect be pressing Control-D (Mac: Command-D) or using Select > Deselect.
Now, we’ve seen in last week’s tip that you can use Select > Load Selection… to reload from a saved selection (channel) and make the selection active. But, there are easier ways, which are especially useful if you have multiple saved selections.
Drag the channel to the load channel as selection icon (shaped like a dotted circle) to load it quickly:
Control-click (Mac: Command-click) the channel’s thumbnail, just as we did in the Layers panel:
That’s right, Control-clicking works in the Channels panel too, and is my preferred way of loading a saved selection. Much faster than wading through a dialog box with a pull-down list and trying to remember the name of the channel.
Creating quick selections from masks
But wait, it gets even better. You can Control-click a layer mask to create a selection, too. For example, let’s take a look at this image where we want to brighten the subject in the foreground, and darken or blur the background (image courtesy of stock.xchg):
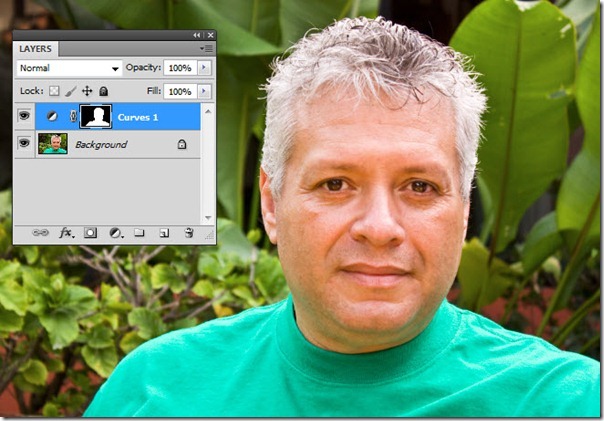
If we create a layer mask for the outline of the man, we can quickly make some adjustments to his face and shoulders (I pulled the center of the curve upward just a bit):
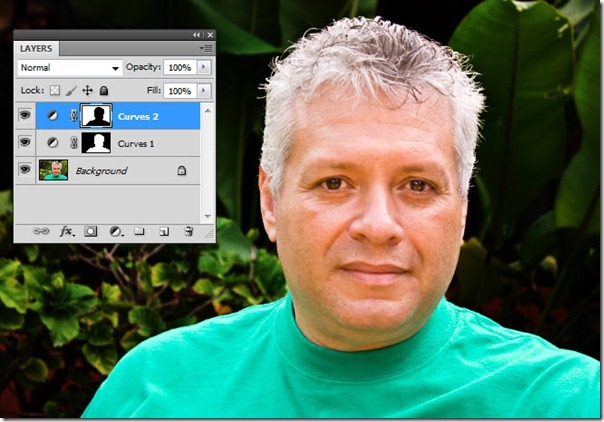
Here we’ve added a Curves adjustment layer to brighten him up just a bit. But now, for the quick-tip. We want another curves layer to darken the background. Here’s the process:
- Control-Click (Mac: Command-Click) the Curves 1 Layer Mask. The mask is loaded as a selection.
- Press Control-Shift-I (Mac: Command-Shift-I) to invert the selection so the background is selected.
- Click the “Create new fill or adjustment layer” icon (looks like a half-black, half-white circle)
- Select Curves and make your adjustments (I just pulled the center of the curve downward).
Now, that’s some quick work. Notice that the second layer mask is the opposite of the first, since we used the “invert selection” command before creating the mask. We can learn a few things from this:
- Control-clicking a layer mask loads the mask as a selection, just as we saw with channels and with layers.
- Inverting the selection changes the content of the mask or channel (remember, back conceals and white reveals, so in the second instance the darkening effect of the curves is seen only in the white areas, which is the image background).
- Adding an adjustment layer with an active selection creates a mask automatically according to that selection.
These are all great time savers!
Putting it all together
In summary, today we’ve seen that Control-clicking (Mac: Command-clicking) a thumbnail can generate a selection very quickly.
- For layers, the transparency of the layer defines the selection boundary and density.
- For channels, the rule is “black conceals, white reveals.”
- For layer masks, the effect is identical to channels.
- Loading a channel as a selection by clicking the thumbnail is far faster than using the Select menu.
Today, we’ve looked at simple selections, black and white. Next week, we’ll add shades of gray, discuss partial selections, and finally address the nagging question, “What the heck is with that crazy shortcut Ctrl-Alt- ~ ?”
I do hope you’ll stick around. Until then, happy Photoshopping!


Thanks for the tutorials on selections. Very helpful.
Audrey
Very informative! On a different topic, can anyone give me a general idea of what Photoshop *cannot* do well, vis a vis editing a digital photo? Obviously there is no easy correction for bad composition, but I was just curious what the photographer must do well, i.e. mistakes or missing characteristics that Photoshop really can’t correct effectively.
Thanks,
Frank
Frank, that’s a loaded question 🙂 However, the one thing that I’ve found most significant that Photoshop can’t correct is focus. If your image is out of focus, the result is never going to be stellar. So, work on your techniques to get sharp images in camera, and as a result you’ll have great material to work on within Photoshop.
mh++