Photoshop Selection Power Tips
Over the past two weeks, we’ve looked at Selection Basics and Selection Techniques using Photoshop CS5, and we’ve developed a fundamental framework of understanding about selections, masks and channels that will allow us to work quicker and more effectively with our favorite imaging program. To recap the key points from the previous two sessions, we can summarize these basic ideas:
- Selections are channels, and so are masks, and all can be seen in the Channels panel.
- Control clicking (Mac: command clicking) a layer loads a selection based on the transparency of the layer’s pixels.
- Control clicking a channel loads a selection according to the rule, “Black conceals, white reveals.”
If you haven’t already read the two previous tips referenced above, please follow the links to learn more about these concepts.
Today we’ll look at fast ways to generate selections, directly from channels – and some examples of why we might want to do that. We’ll learn how to target channels quickly, and finally solve the riddle of the crazy keyboard shortcut “Ctrl-Alt-~”.
Selections in Black and White
Let’s start with this cute image of Baby Sofia, courtesy of stock.xchg. We want to extract the baby from the rather mundane background and place her in front of a more interesting and colorful background:
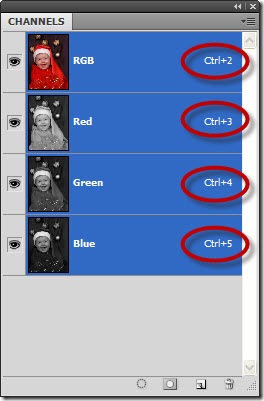
You might try the magic wand, or the quick select tool, or the lasso tool, pen tool, or any number of tools for creating a selection, But, examining the image, we can find a candidate for a selection almost ready made, if we look at the channels. Let’s glance for a moment at the Channels panel:
Notice the keyboard shortcuts listed to the right of the color channels? We can use these shortcuts to scan very quickly through our channels to see if we have any good candidates for a selection. On Windows, press Ctrl-3, Ctrl-4 or Ctrl-5 to see the red, green or blue channels. On Macs, press Command-3, Command-4 or Command 5. This is a quick way to display a channel. Choosing the red channel with Ctrl-3 (Command-3) we see this:
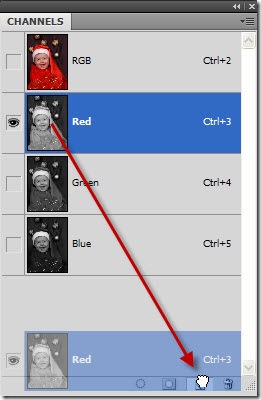
Notice the strong contrast between our subject and the background in this channel – a great candidate for a selection. We can work with this! Duplicate the red channel by dragging its thumbnail to the Create New Channel icon:
This creates a new channel called “Red Copy” and selects that channel for editing:
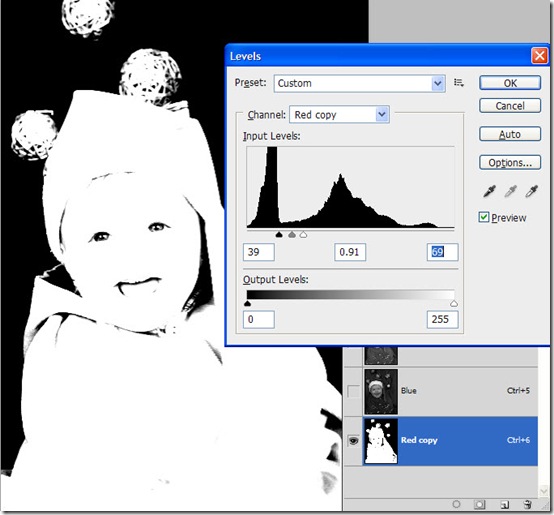
Next, we want to increase the contrast in this channel – we are aiming for “black conceals, white reveals.” Press Control-L (Mac: Command-L) to bring up the Levels command and increase the contrast as shown:
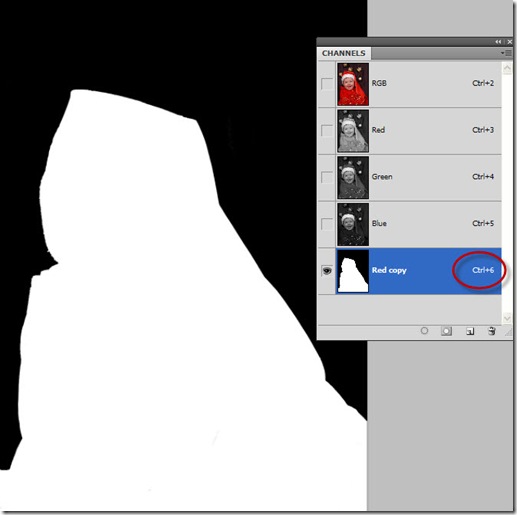
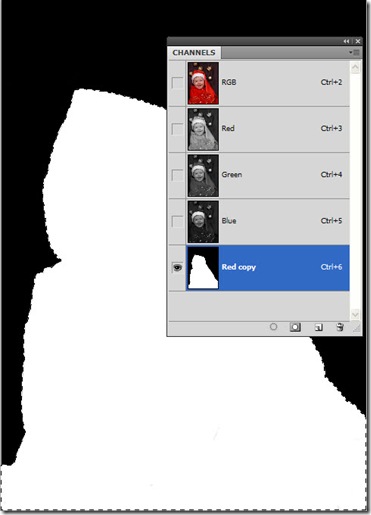
With that one quick adjustment, we’re nearly there. A little work with the brush tool to paint in white on the baby and black on the background and we have our selection:
Now, notice that our new channel has a keyboard shortcut like the others? We can get back to this channel anytime with Ctrl-6 (Mac: Cmd-6). Now, let’s put this channel to use. Recall from last week that we can load this channel as a selection by Control-clicking (Mac: Command-Clicking) on the thumbnail? We can also do this as a keyboard shortcut, without even having the Channels panel visible, by adding “Alt” (Mac: “Option”). So, Control-Alt-6, or Command-Opt-6, loads this channel as a selection, and we can see the marching ants:
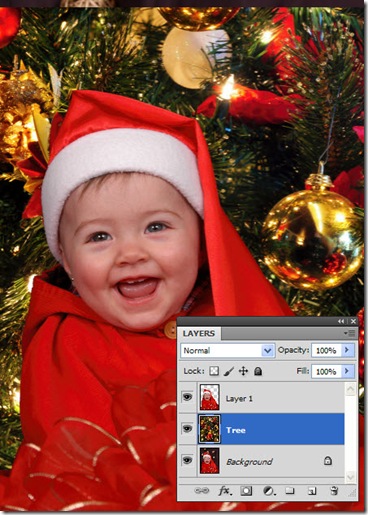
Press Ctrl-2 (Mac: Cmd-2) to make the RGB composite channel visible, then press Ctrl-J (Mac: Cmd-J) to “Jump” the selection to a new layer:
And Baby Sofia is ready for her new background:
So, we have added some new skills to our repertoire:
- Use the keyboard shortcuts Ctrl-2, Ctrl-3, Ctrl-4 (Mac: Cmd-) to display or target a channel
- Use a high contrast channel as the basis for creating a quick selection
Selections in shades of gray
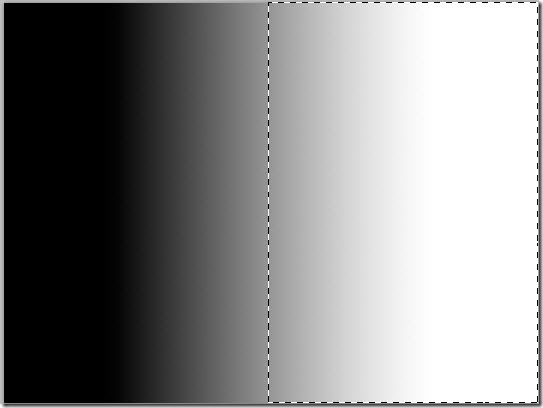
Now, we’ve seen how channels create selections from black and white, but what about gray? Consider this channel with a gradient that fades slowly from 100% black to 100% white:
If we load this as a selection (either by Ctrl-clicking the thumbnail, or with our newly learned shortcut, Ctrl-Alt-6 / Cmd-Opt-6), we get the marching ants – but they are a little misleading – they form a line where the pixels are 50% or more selected:
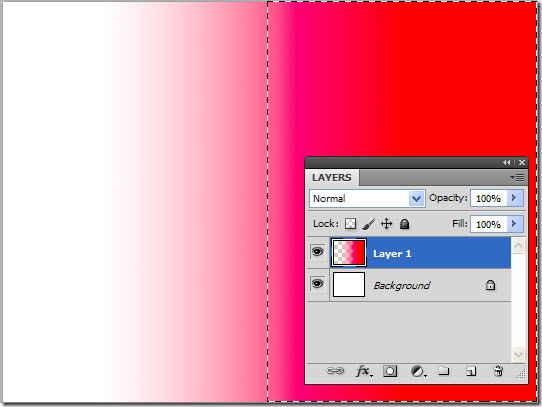
However, the reality is as we’ve discussed before – the real selection is a gradual feather, where the percentage of gray is equal to the percentage selected. We can see this in action by switching back to the composite channel (Ctrl-2/Cmd-2) and filling a blank layer with a new color, such as red:
Here, we can clearly see that the marching ants give only an approximation of the selected area. The true boundary is much more complex. We can put this type of selection to good use as well – by using partially selected areas to define our masks and selections. Consider this image, which contains a variety of tonal shades:
If we want to perform some image adjustments here, we can use our color channels directly as masks to bias the adjustments toward specific areas of our images – all very quickly. For example, if we want to adjust the foliage to really make the colors pop, we can load the green channel directly as a selection to mask our adjustment. Press the keyboard shortcut Ctrl-Alt-4/Cmd-Opt-4, or Ctrl-click / Cmd-click on the green channel to load it as a selection (remember, using the keyboard shortcut you don’t even need to have the Channels panel showing:
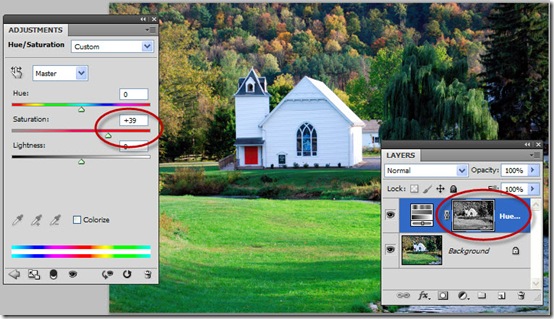
Don’t be fooled by the marching ants – the image contains all manner of partially selected areas. Add a Hue/Saturation adjustment layer (Layer > New Adjustment Layer > Hue/Saturation…) and notice that the mask is created for you – in exactly the same tones as the green channel that was selected! Boost the saturation as shown:
Notice how it affects only the lightest parts of the image? Let’s go back to the background layer and take a look at the blue channel (Ctrl-5 / Cmd-5):
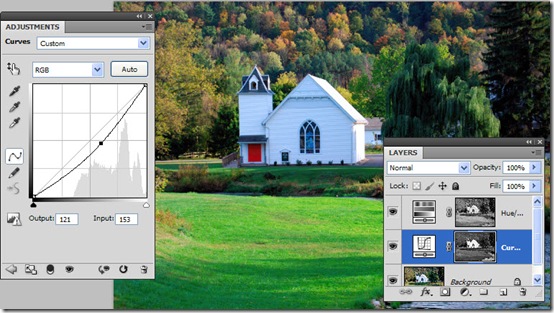
Notice how the house if very bright, and everything else isn’t? We can target the house and make some further corrections. Go back to the RGB Composite layer (Ctrl-2/Cmd-2) and load the blue channel as a selection using Ctrl-Alt-5 / Cmd-Opt-5. Then add Curves adjustment layer (Layer > New Adjustment Layer > Curves):
Notice the subtle difference in the layer mask this time – if we pull down on the curve to increase the contrast, the majority of the effect is seen directly on the house – the brightest part of the mask – remember that white reveals, and the lightest areas reveal the most of our adjustment.
By using our own image’s color channels as selections, we can create tremendously complex, yet precisely accurate masks that target the areas we want to affect with our adjustments and corrections. And we can always modify the mask further by painting in black or white to hide or reveal additional areas.
But, what about Ctrl-Alt-~ ???
We’ve seen now that Ctrl-Alt-# (Cmd-Opt-#) will load channel # as a selection. In older versions of Photoshop, up to version CS3, the Channels pallet 9as it was then called) showed us that the color channels, starting with the RGB composite channel, were numbered starting ~,1,2,3 and so on. So, the “~” channel was the RGB composite, and pressing Ctrl-~ displayed the RGB channel. With Photoshop CS4, Adobe made a change and moved everything over two keys to the right – so now the channels start with 2,3,4,5 and so on.
So, the CS4 and later keyboard shortcut of Ctrl-Alt-2 is the new, modern replacement for the old keyboard shortcut of Ctrl-Alt-~. And after following this lesson, you should be able to determine that this was, in effect, loading the black and white tones of the RGB channel – the overall image – as a selection based on the tones, or luminosity, of the image. Now you know!
I hope you’ve learned from this series on creating and using selections – and I hope you are no longer afraid of the Channels panel. You now have a solid foundation of knowledge in selecting and masking, a foundation that opens the door to some of the most powerful features in Photoshop.










*very nice post, i certainly love this website, keep on it