Photoshop in the 3rd Dimension
For artists and designers who have been working with Photoshop, Illustrator and other traditional 2-dimensional graphics programs, the thought of moving into 3D can be intimidating. And, in earlier versions of Photoshop, the tools that Adobe provided have been a mix of promise and disappointment. However, with CS5, Adobe has improved things greatly, and with some of the new capabilities (especially, the new “Repousse” feature), they have nearly hit one out of the park. There’s no longer any need to fear, the new features make it easy for everyone to dabble in 3D.
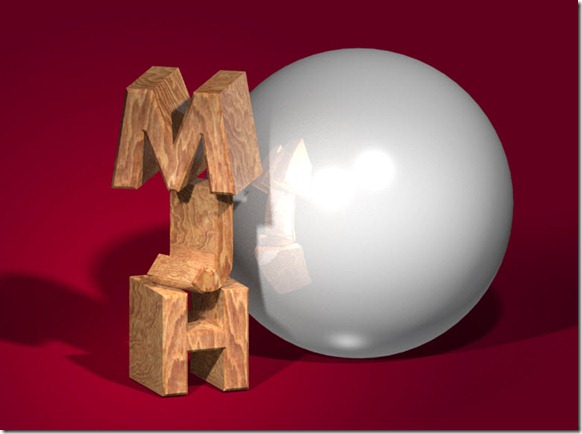
While there is a lot to learn to master all the 3D power in Photoshop CS5 extended (and, yes, you will need the extended version to use these features), the basics are easily picked up and you can build on what you learn, a step at a time. Over the next few weeks I’ll cover the steps needed to construct something like this image, complete with textures, lights, reflections and shadows:
Over time and a few lessons, we will dig into the many controls and dialog boxes that are available in Photoshop’s 3D engine. But we’ll begin with something simpler, a short exercise just to get your feet wet… and the new Repousse feature in Photoshop CS5 will get us there quickly. We’ll go back and learn about all the control later, but today’s goal is to create a 3D object and start having some fun with it.
Let’s start with a new blank document, 1600 x 1200, and a background layer with a nice subtle gradient as shown below:
Next, grab the text tool, and with a nice bold geometric font, add some text. The color isn’t important, as we will change it later, but if we make it a bright contrasting color it will be easier to see. I’ve use a yellow color, and chosen the font Aharoni, which ships with Creative Suite 5. For this 1600 x 1200 document, I’ve used a font size of 144:
Now let’s create a 3D object using Repousse. From the menu, choose 3D > Repousse > Text Layer… and this warning appears:
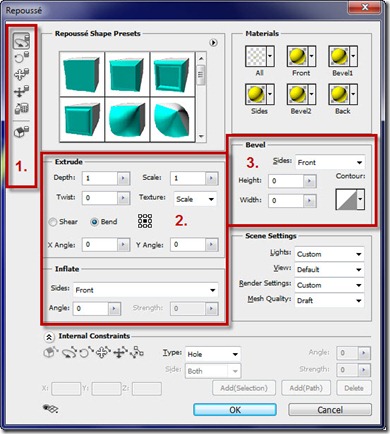
It is OK to proceed, but keep in mind, if you want to maintain editable text, you’ll need to create a copy first, since the Repousse command will convert the text, just as it says. After dismissing this dialog, we are confronted with the somewhat daunting Repousse dialog box. Not to worry, I will break it down for you. In this tip, we’ll focus just on the three areas shown:
1. 3D Manipulation Tools – used to move the object or to move our point of view around the object
2. Extrude and Inflate – used to control the overall shape of our 3D object
3. Bevel – allows us to add a chiseled corner edge to the front and back of our object
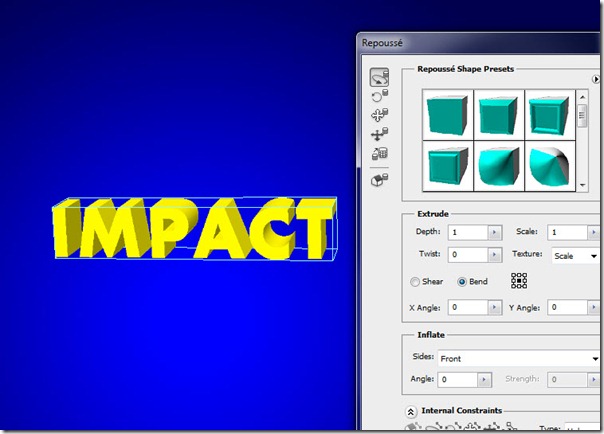
We’ll start with the manipulation tools. Notice the top one is already highlighted for us? If you hover over it, you’ll see the tool tip “Rotate the Mesh.” Slide the dialog box over to one side so you can see the text, and notice that it has a bit of 3D appearance already? With the Rotate the Mesh tool active, you can place your cursor over the object and drag to move the object around in 3D space.
It will be a little clumsy at first, but practice moving around and see if you can manipulate the text into the position shown below:
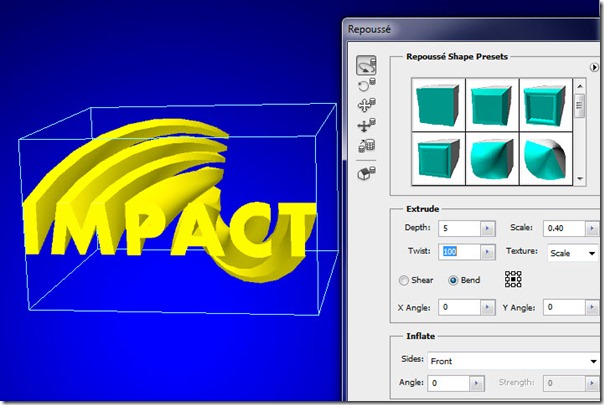
Now, it is time to experiment. The Extrude section controls the way the text stretches away towards the background. If we bump up the Depth parameter, we can create some very long extrusions. In this example, I’ve changed the Depth to 5:
The Scale parameter will cause the extrusions to become larger or smaller as they extend outward, allowing you to create an exaggerated perspective effect. A scale smaller than 1 shrinks the extrusions inward, greater than one expands them. Here I’ve set the Scale to 0.4:
The Twist parameter, as you might expect, twists the extrusions around as they recede. Be careful, as a little goes a long way. Here I’ve set the Twist to 100, creating a clockwise rotation to the extrusion; a negative value would simply twist counter-clockwise.
Note that you can continue to manipulate the object, or “mesh”, and look at it from different angles as you adjust the parameters. This should encourage experimentation! Once the object looks as desired, we can move on to inflation. I’ve settled on a Depth of 3 and left Scale and Twist at their original values of 1 and 0, respectively.
With Inflation, we have the ability to add a curvature to the surface on the front or back (or both) surfaces of the object. We can impart a pillow-like effect, adding just a bit of curve or a very pronounced bloat. With a negative value, we can cause the surface to appear sunken. Here’s am Inflation value of 84. Note the rounded surface, almost akin to a bevel and emboss layer effect:
Finally, we’ll have a look at the Bevel controls. With Bevel, as with Inflate, you can control either the front or back surface, or both. A bevel consists of two values, a height and width, corresponding to how much of a chiseled-off effect you want to add to the face (height) or side (width). Here is an example with the Height set to 20, and the Width set to 10. Note the chiseled edges (I’ve removed the previous inflation effect to make this easier to see):
Once all the parameters are adjusted to taste, we are almost ready to finish. But as a final step – and I ALWAYS recommend this step before exiting from the Repousse dialog – click the icon shaped like a house. This will Return the Mesh to its Original Position, undoing any rotation you may have given it while viewing. This is very important for reasons we’ll learn in a future lesson. So, get used to doing this:
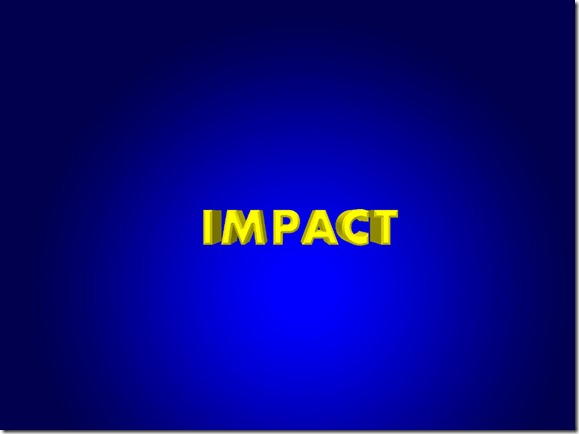
Now we’re back in Photoshop, and ready to finish off this quick example:
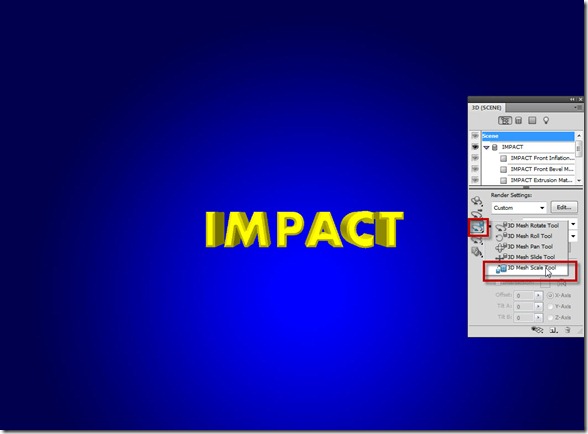
Open the 3D panel (Window > 3D). Choose the 3D Mesh Scale Tool from the flyout menu as shown.
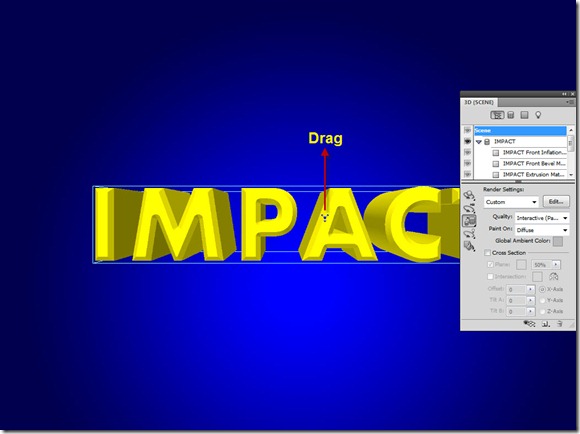
Now, move your cursor over the text until you see the bounding box, then drag upwards to make the mesh bigger.
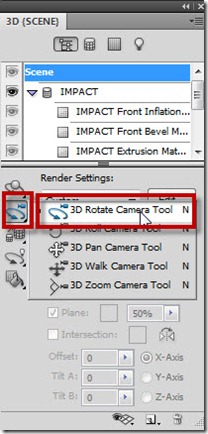
To finish it off, switch to the 3D Rotate Camera Tool as shown:
Now, drag the cursor anywhere in the drawing to position the view as shown.
Since you are moving the camera position, not the mesh object, the motion and direction may not be intuitive. Keep practicing, and next time we’ll look at some ways to add even more cool effects to our 3D objects.









Leave a comment