Photoshop Blend Modes Part 5
Monday means Mike Hoffman. Here he continues his tour of Photoshop’s Blend Mode
This week, we’ll continue our exploration of practical uses of the Overlay blending mode in Photoshop. Recall from our discussion last week that Overlay is a “contrast” blend mode, and we will be using it in today’s examples to sharpen images. Recall also, from our previous overview, that the magic color for Overlay (the “overlay-neutral” color) is 50% gray.
If you’ve studied sharpening (and if you haven’t, you should, as soon as possible!) you’ve seen that images are sharpened in a two-step process: 1) find the high-contrast edges within an image; and 2) increase that contrast, by darkening the side that is darker and lightening the side that is lighter. There are various ways of accomplishing that task, including Photoshop’s built-in sharpening filters, but we’re going to approach this from a different angle, giving you more creative control.
Let’s start with this image of a butterfly. It is a nice, colorful image, but it could stand some sharpening, especially if we want to print:
Here’s what we’ll do: start by duplicating the background layer (press Ctrl-J/Cmd-J, or simply drag the layer thumbnail in the layers panel to the “create new layer” icon). Rename this new layer “High Pass Sharpen.”
Next let’s run the High Pass filter on this image. Select Filter > Other > High Pass… to bring up the filter dialog. There is only one setting, “Radius.” In general, for web resolution images, you’ll want a value between 1 and 3, for typical camera images a value from 3 to 5. I chose 4 in this case:
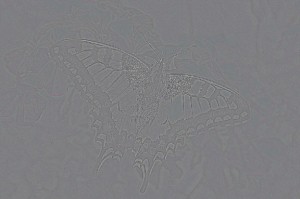
Press “OK,” and see what we’ve done:
If you’ve ever experimented with the High Pass filter before, you may have seen something like this and thought, “useful? Not!” However, there are a couple of key things we’ve done here: first, the High Pass filter has essentially found all the high contrast edges in our images, and increased the contrast along those edges – just as we would want in a sharpening process. But, second, the filter has turned everything else in the image – everything that isn’t an edge – into a gray color. Not just any gray, but “50% gray,” which is the magic, neutral color for Overlay blending!
Let’s set the layer’s blend mode to overlay:
Now we see an immediate “pop” as the edges are enhanced. We can control the effect by changing the opacity of the layer, but we can also control the effect by adding a layer mask. We don’t want to sharpen our background – it is pleasingly soft and we want to keep it that way.
Let’s hold the Alt (Option) key down while pressing the “Add a layer Mask” icon in the layers panel, to create a new black layer mask that hides the entire layer:
Now, with a soft round brush set to white, paint on the layer mask to reveal the sharpened image only in the area of the butterfly:
Note that you don’t have to paint the entire butterfly, only the areas with sharp lines that you want to enhance:
Here’s a before and after comparison:
Now, at this point, you may consider yourself done, but there are further things you can try:
– Reduce the opacity of the High Pass Sharpen layer to make the effect more subtle;
– Increase the radius value in the High Pass filter (experiment!) and combine with lower opacity;
– Use a different contrast blend mode: Soft Light, Hard Light, Vivid Light;
– Try desaturating the High Pass Filter layer (Image > Adjustments > Desaturate);
– Change the High Pass Sharpen layer to a Smart Object (Layer > Smart Objects > Convert to Smart Object) before running the high pass filter – this allows you to change radius values after the fact and experiment more easily with your image.
As you can see, sharpening with Overlay blend mode affords a wide range of creative possibilities. I encourage you to try some of these variations on your own images.
Next week, we’ll look at the opposite process – using Overlay blend mode to smooth images by reducing contrast. Until then, Happy Photoshopping!


Leave a comment