Mastering the Photomerge Command (Part 1)
The following tutorial is adapted from the book Motion Graphics with Adobe Creative Suite 5 Studio Techniques from Adobe Press. This is the first part of the tutorial. We’ll be back in 2 weeks with part 2 on how to clean up the panoramic file. If there’s enough comments and interest, I’ll add part 3 on how to bring the file into After Effects as a virtual set.
[Please show your interest in the comments below the post, thanks TS]
Photomerge is a specialized “mini- application” within Photoshop that assists in combining multiple images into a single photo. You can access it from either Photoshop or Bridge. Depending on the resolution of your sources and the speed of your machine, it can take a while to complete.
All the assets used in this tutorial, including the final QuickTime panorama, can be downloaded here
Click and drag on the image to move
Organizing Images
Bridge is a great way to organize your photos. You can group, rename, sort, and sift. I typically use Bridge to navigate to my panoramic photos, and if needed to make selects between multiple exposures.
Once you’ve selected all of the images, it’s time to process. Hold down the Command (Ctrl) key to select multiple images as you click on Bridge. You can also use the Shift key to select a range of images. In Bridge, choose Tools > Photoshop > Photomerge to open the selected images and send them to Photoshop for processing.
Choose a Layout Method
The Photomerge command offers six different layout options when creating a panoramic photo. Each method interprets the panoramic photos differently. I often try to run multiple methods to see which produces the best results. A good place to start is Auto, which attempts to align the images but will bend them as needed.
• Auto: With this method, Photoshop first analyzes your source images. It then applies either the Perspective, Cylindrical, and Spherical layout option. Photoshop attempts to choose which method to use that will produce a better Photomerge.
• Perspective: This method creates a composition by designating one of the source images as the center of the panoramic image. Photoshop generally picks the middle image, then transforms the other images around it. Photoshop will stretch and skew images as needed to overlap the layers and blend them together.
• Cylindrical: The cylindrical layout option works best for creating very wide panoramic images. The source images are overlapped in a way that looks like an unfolded cylinder.
• Spherical: The spherical option is best suited for 360-degree panoramas. The images are mapped to the inside of a sphere and can create a seamless image for use in specialty applications like multimedia or animation.
• Collage: This method only changes rotation or scale in order to overlap the content.
• Reposition: This method only changes the alignment of images, but does not transform (stretch or skew) any of the source layers.
Aligning Images
If you’d like some practice files you can download them here.
Once you’ve chosen your images and sent them with the Photomerge command you’re on your way. The Auto layout method is usually the best place to start for creating 180˚ – 360˚ panoramic images.
The other option you want to choose is blending. Select the check boxes next to Blend Images Together property to have Photoshop automatically generate masks and blend exposures together. Another option, Vignette Removal, is useful if you have darkening caused by the lens hood. Both of these options will attempt to blend the edges of the photos together and can hide subtle differences in exposure. By blending images together, variations in exposure are hidden and a more seamless image is created by masking.
Once you click OK, Photoshop opens all the source files and attempts to build the panoramic image. Photoshop assembles the panorama based on your choices in the dialog box. Since layers are preserved, however, you can still make small tweaks to individual layers. Nudge any layers with the Move tool if your alignment is off. You can also paint to touch up the layer masks help to blend the photos together.
Once you are happy with the photo, you should finish it. Flatten the layers so you have a large, single layer file by choosing Layer > Flatten Image. I also recommend cropping the image to remove unwanted areas at the top and bottom (avoid removing much from the left or right edges or the seamless loop may be broken.
Making a Seamless Loop
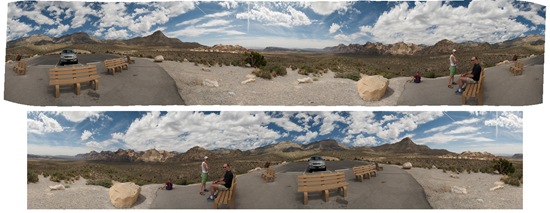
The resulting image from the Photomerge command is quite large, but not a perfect loop. While you’ve blended all of the interior overlap of the images, you still have extra pixels at the left and right edges. The outside edges need to be blended together.
This process can be done with lots of compositing and cloning, except that would be a waste of perfectly good design time with a pile of monkey work. Instead of several tedious steps, I offer a Photoshop action that will finish processing the full 360˚ panoramic image.
- Download the original action I wrote here.
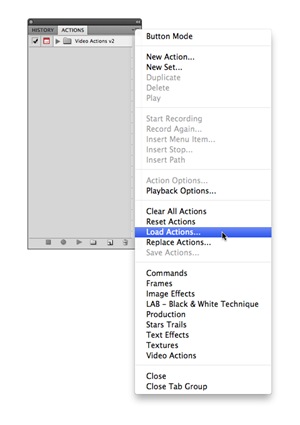
- Choose Window > Actions to call up the Actions panel.
3. Click the submenu of the Actions panel and choose Load Actions. A new browser window opens.
4. Navigate to the downloaded action and select the action Panoramic_Loop.atn and click Load.
5. In the Actions panel, locate the Panoramics set (folder) and choose the Seamless Loop action.
6. Click the Play selection button in the Actions panel.
7. The image is now seamless on the left and right edges. A new dialog box invites you to crop the image as needed. Click Continue.
8. Crop as needed.
9. Choose File > Save As and name the file. Save it to your project folder. I recommend using a TIFF file. You can apply LZW image compression to reduce file size.
If we get ten comments asking for it, we’ll be back in two weeks with part two where we clean up the panoramic and remove ghosts and blemishes.
This tutorial is adapted from the book Motion Graphics with Adobe Creative Suite 5 Studio Techniques from Adobe Press.


yes would love the next one this is fantastic but i could not locate the zip love your tuts
A few tips for photographing a panorama:
1: To make it easy to locate the images in Bridge (or wherever you’re looking for them) shoot a frame with your hand, or a finger or something noticeable in front of the lens before and after the pan shots.
2: shoot in “portrait” mode to capture more of your pan, when you have to crop later you’ll be grateful to have the extra image
3: Most importantly, overlap each shot by 20%. Photoshop needs this to stitch the images together.
4: If you’re shooting on a windy day, hurry up! Moving clouds will mess with your final panorama.
Oh I must be the eleventh comment on here looking forward to the next part, the previous 10 comments were written really small,
Rich
this I am needing desperately as I have a arch job soon and this is going to save my bacon.
This is good info. I am letting others know.
Bring on part 2!
many thanks for ths tut
i didn’t know this was a possible in Photoshop
i have been wanted to do this for a while now…i have alot of photos that i always intended to stitch together so thanks for getting me to the next step!
Nice article Richard. Am looking forward to the next instalment. Bring it on!
Part II! Wanna see it! Thanks for Part I
Very informative and well written article Richard. I will definitely be putting it to use when my machine is running again. Please keep this series running as I am curious what other tips I can pick up
Thanks
Scot
I’ll give the action a go today. Thanks
I would love to see more!
I am going to try this today, looks great.
Thanks
Karen
Thanks for the very useful and simple lesson
🙂
Fantastic resource & tutorial. Please do post part two on cleaning up the panoramic images.