Making a Moody Sky even Moodier with Photoshop
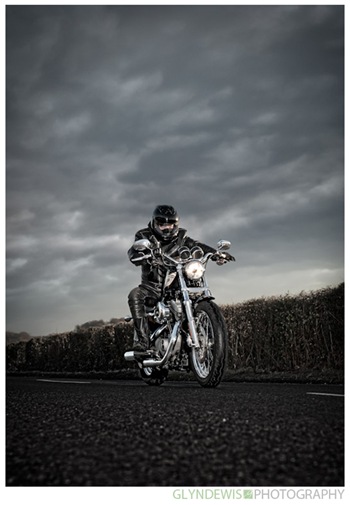
On my own blog recently I posted a photograph I’d taken of a guy riding a Harley Davidson motorcycle and went on to explain that on the day of the shoot there wasn’t a single cloud in the sky. In fact no lighting or cranking up of shutter speed to Mach 3 would have revealed even the slightest trace of a cloud.
I went on to explain that for this particular shot, as the original brief was to create an image with a moody/dark feel to it in order to match what the rider was wearing, I had to resort to adding in a sky during the post production stage in Photoshop.
It was this ‘adding in’ the sky that I thought I would have been asked about i.e. “How did you do it?” but no…the majority of responses asked how I made the sky look so dark and ‘aggressive’ for want of a better word.
Anyway, I thought the ‘how’ would make an ideal short tutorial for my post here on TipSquirrel; a technique that will take you no more than 60 seconds!
The ‘How’ to making a Moody Sky even Moodier
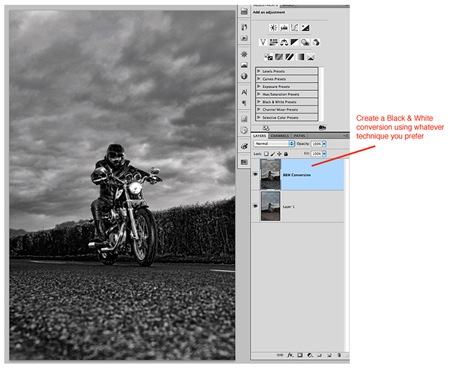
Step 1: Create a Contrasty Black and White Conversion
It’s fair to say that for all of my Black and White conversions I use a plug in by Nik Software called ‘Silver Efex Pro’, however this technique will work with whatever method you use.
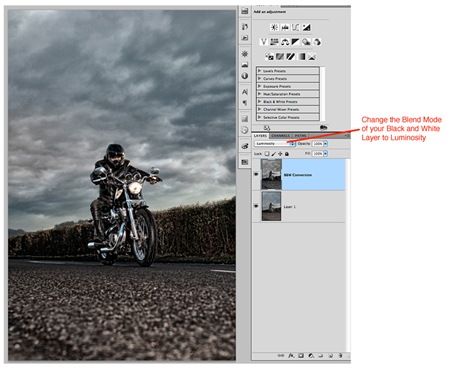
Step 2: Blend Mode
Change the Blend Mode of the Black & White layer to Luminosity so that just the contrast of the black and white conversion is left on the layer.
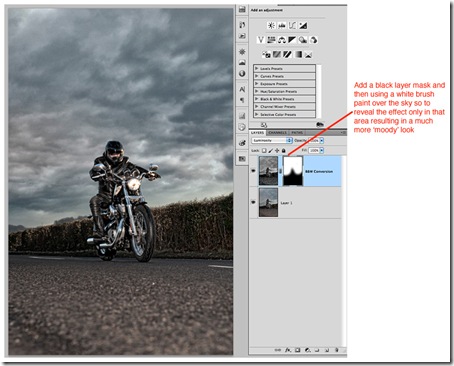
At this stage the effect has been applied to the whole of your image, so in order to restrict it to just the sky all we need to do is to add a layer mask and then paint over it with a brush to either reveal or conceal certain parts. My general workflow is to add a black layer mask by holding down the ALT/OPTION key on the keyboard and at the same time clicking on the New Layer icon at the bottom of the Layer Panel. This hides all of the effect and then using a white brush paint over the sky to reveal the effect but only in that area.
And that’s all there is to it.
This technique is one I use on 99% of my images that include ‘sky’. Occasionally I may apply a little dodging and burning to the sky too if I really want to increase the effect in certain areas but generally this particular technique suffices. The two images below show the ‘Before’ and ‘After’ so that you can see the quite dramatic effect this very quick and simple technique creates.
*Note…The ‘After’ image has also had a little burning applied to the road surface which is how it looked at the final stage.
One last thing….
As this particular photo had a ‘sky’ added into it during the post production stage I thought I’d share this video that I recorded a short while back showing a similar technique to that which I used to do it…
Enjoy 🙂


Leave a comment