
Lightroom 3 Publish Services
Adobe Photoshop Lightroom has always had the capability to export images from the catalog. You could create presets, select your images, start the export job and send them on their merry way. The catch has always been that, once exported, the images are now completely out of the Lightroom workflow. You can do with them as you please (email, web, slideshow, etc.) but Lightroom has no knowledge of how these images are used or where they’ve been sent.
Enter the new Publish Services with Lightroom 3. Publish Services are a new kind of export, a smarter export, with the ability to keep track of images after they leave Lightroom, and, to some degree, continue to manage those images externally. In addition, Publish Services allow a relatively tight integration with some of the more popular social media and photo sharing services. Lightroom 3.0 shipped with two predefined Publish Services, and the recent update to version 3.2 added another two, for a total of four different services (more to follow? I’d bet on it). The services available now are:

- Hard Drive
- Flickr
- SmugMug
In today’s tip, we’ll look at these services and talk about how to incorporate them into your workflow. This tip has a lot of information, so I’ve done my best to split up by sections, so you can go directly to the part you’re interested in. I have divided this tip into the following sections, so feel free to jump forward to any section of interest, but note that the configuration details in the Hard Drive section are applicable to all the services.
What we’ll cover today:
- Setting up a Hard Drive Publish Service
- Using the Hard Drive Publish Service
- Setting up the Facebook Publish Service
- Using the Facebook Publish Service
- Setting up the Flickr Publish service
- Using the Flickr Publish Service
- Setting up the SmugMug Publish Service
- Using the SmugMug Publish Service
What we won’t cover today (left for future tips):
- Creating Hard Drive Smart Folders and Folder Sets
- Creating Facebook Smart Collections
- Creating Flickr Photosets, Smart Collections, and Smart Photosets
- Creating SmugMug Smart Galleries and Categories
We’ll start with the Hard Drive publish service, as it is the most basic, and the other services have many of the same options. Once configured, all the Publish Services behave like collections, and adding or removing images from the service will manage the external images – whether on the hard drive, Facebook, Flickr, or SmugMug (with some specific nuances depending on the external service).
You might think to yourself, “Why do I need a publish service for my hard drive? How is that better than simply exporting?” A few examples might be best. If you have an iPad, or iPhone, or any other device that syncs with your computer to maintain an image library, Hard Drive publish service is a natural. Set up the service, and manage your images from within Lightroom. Lightroom will manage the folder that you specify, and take care of adding and deleting images based on its Publish Service. Let’s set up a new Hard Drive Publish Service, this one serving images to an Apple TV.
1, SETTING UP A HARD DRIVE PUBLISH SERVICE
Step 1: Start in the Library module, with the left sidebar visible, and look at the new section at the very bottom called Publish Services. Depending on your monitor resolution, you may need to scroll down, and it may help to collapse the other sections as shown. Click the “+” icon next to the section header and choose Go to Publishing Manager:

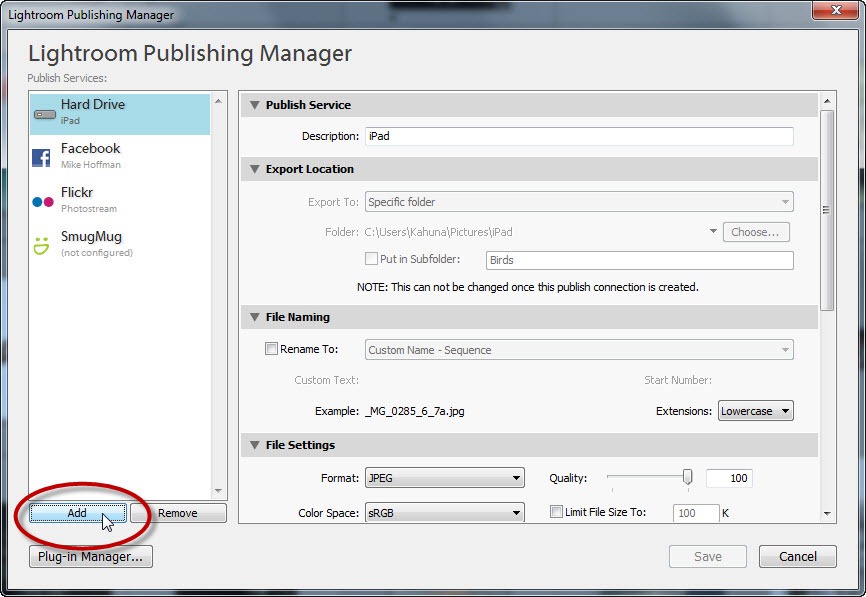
Step 2: The Publishing Manager is the place to add or remove Publishing Services. Notice the four existing services which may not be configured in your case. Choose Add to create a new service:

Step 3: In the next dialog box, Create a New Publish Connection, Choose Hard Drive for the service and give it a descriptive name, I’ll call this one “Apple TV.” Then click Create:

Step 4: Now, back in the Publishing Manager, we see the new service, ready to be configured. Note that you’ll need to scroll downward to see all the settings.
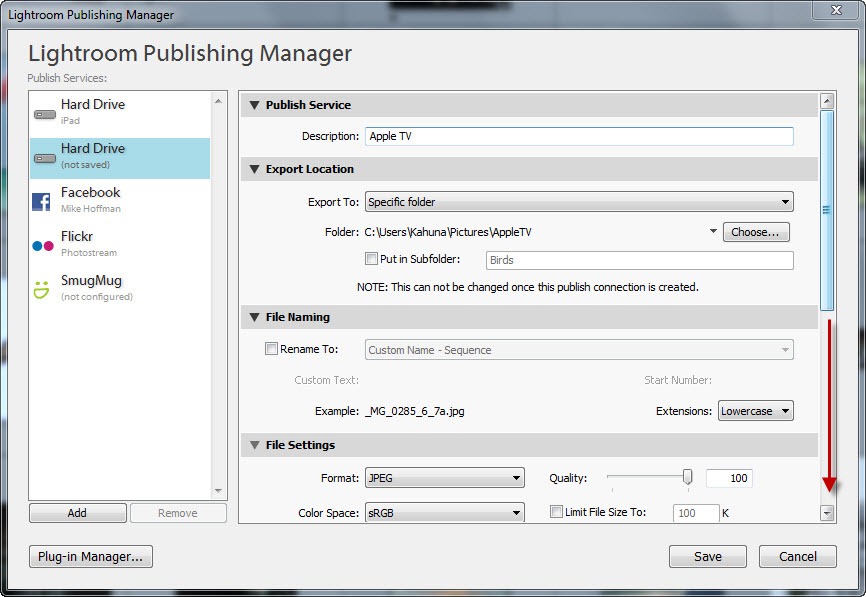
The settings are:
Publish Service – Description: The name we gave the service in the previous step (can be changed later)
Export Location – Allows export to one of the standard system folders, or a “Specific Folder” of your choice. Note that you can select a subfolder, but also note that once configured, this cannot be changed for this service. You have to create a new service for different folders.
File Naming – As with Lightroom’s typical Export functions, we can choose to maintain our original filename, or rename with any of Lightroom’s standard presets, or customize to our liking. For the Apple TV, we’ll leave the original file name.
File Settings – We can choose JPG, TIFF, PSD, DNG or even Original (Raw) as our export format. Depending on the format, we’ll see different Format-related settings available. For Apple TV, we’ll choose JPG and set the Quality to 100%, and color space to sRGB. Note the ability to constrain file size (which will adjust quality automatically as needed).
Scrolling down, we see the rest of the settings:

Image Sizing – Again we have a range of settings available with the drop-down list. For HDTV, we will choose Width & Height, and specify 1920×1080 as the maximum dimensions. Resolution is adjustable as well, but irrelevant with images viewed on a screen.
Output Sharpening – Can be set to Screen, or to Glossy or Matte for printed output. We’ll choose Screen for the Apple TV and set the amount to Standard.
Metadata – Choose how we want metadata exported. For Apple TV, we’ll minimize to save space.
Watermarking – We can choose a simple text watermark using the IPTC Copyright data, or use a more complex watermark as available elsewhere in Lightroom.
Once all settings are made, click “Save” and your Service is created. You should see the new service appear in the Publish Services in the left sidebar. If you click the dark triangle at the right, the service will open and you’ll see Apple TV with 0 images. We’re ready to use the service:

2. USING THE HARD DRIVE PUBLISH SERVICE
Step 1: Here’s the easy part, because you’ve already done the hard work. Whenever you want to publish images to the Apple TV, just select the images from your library, and drag them to the Publish Service:

Step 2: Notice the number of images increases as you drop additional files there. Once you have dragged all the images to publish, click on the Apple TV export folder. It looks and acts similar to a collection, but notice at the top the header “New Photos To Publish.” We can publish these to the hard drive by clicking the publish button either at the bottom of the left sidebar or the top right of the publish window:

As the publish process is running, we can see the images moving down to the “Published Photos” section as they are exported to the hard drive:

Step 3: Any new images we drag into this service later will again be added to the top for publishing. Furthermore, any images we delete from this publish service will also be deleted from the hard drive the next time you publish. For example, here I’ve added two more images and deleted one, and I’m ready to publish my changes:

3. SETTING UP THE FACEBOOK PUBLISH SERVICE
Step 1: As before, we will need to start with the publishing manager. If you haven’t already set up Facebook, you’ll have a Set up… button next to the service. Or, you can click the “+” sign next to Publish Services and choose Go To Publishing Manager:

Step 2: Once in the Publishing Manager dialog box, click “New” to add a new Publish Service:

Step 3: In the Create New Publish Connection dialog box, choose Facebook, give the service a descriptive name, and choose Create:

Step 4: This will take you back to the Publishing Manager dialog box and you’re ready to configure Facebook. We see the descriptive name we gave it above (you can change this later if you’d like, but the next thing to notice is that we need to register our credentials with Facebook. Click on the button that says Authorize on Facebook:

You’ll see this message, and once you click on OK, your browser should be launched in the background. You’ll need to switch over to the browser at this point:

This will take us to Facebook, where we will need to login and authorize Adobe Photoshop Lightroom (your screen may look slightly different depending on whether you’ve done this before):

This will bring you back into Lightroom, where you can click Done in this dialog box to continue:

Step 5: Now your Facebook Publishing Service is authorized and ready to be configured. Note that you must scroll down to see all the options.

The first configuration option is Facebook Album – you can pick an existing album into which to upload your images, or you can even create a new one specifically for this Publish Service. In this case, I’ll set mine to the “Wall” album.
The next is Facebook Title – this controls the title of the image as seen on Facebook. You can use the IPTC Title field from the metadata, the filename, or you can leave it blank.
After that, all the options are essentially the same as for the Hard Drive export, as shown above. Finally. click on Save to return to Lightroom – your Publish Service is ready:

4. USING THE FACEBOOK PUBLISH SERVICE
To use the Facebook Publish Service, you can drag and drop photos as shown above under the Hard Disk Publish Service. You can add and remove photos following the same process, but note: Photos removed from the Publish Service will also be removed from your Facebook Album! Furthermore, any modified photos that get republished will lose any comments on Facebook. That is a feature of Facebook, not of Lightroom.
Also keep in mind that if you delete the photo from within Facebook, Lightroom will not be aware that you have deleted it.

5. SETTING UP THE FLICKR PUBLISH SERVICE
There are a couple of important points to note about Flickr. You can have a free Flickr account, or a “Pro” account, and the two offer different levels of support for managing images. In short, with a free account, any time you modify your images and re-publish them, you lose the existing ratings, comments and favorites. With a pro account you can update in place.
Step 1: As with the other services, from the Library module choose the “+” sign next to Publish Services in the left sidebar to select Go to Publishing Manager…:

Step 2: Within the Publishing Manager dialog box, click Add:
Step 3: In the Create New Publish Connection dialog box, choose Flickr, give the service a descriptive name, and choose Create:

Step 4: This will take you back to the Publishing Manager dialog and you’re ready to configure Flickr. We see the descriptive name we gave it above (you can change this later if you’d like, but the next thing to notice is that we need to register our credentials with Flickr. Click on the button that says Log In:

This dialog will pop up, and when you click Authorize, your web browser will launch.

Within your browser you’ll need to log in to Flickr, and you will be presented with the following screen. Click on the appropriate “Next” button to allow the service to connect:

You’ll get one more screen from Flickr, where you’ll need to authorize Lightroom:
 Once you’ve clicked “OK I’ll Authorize it,” you’ll get this final screen, and it’s OK to close your browser and go back to Lightroom:

Back in Lightroom, you may click the Done button in this dialog box to continue:

Step 5: Now we’re logged in and ready to configure our Flickr Publish Settings. Note that you must scroll down to see all the settings:

The first configuration option is the Flickr Title. This allows us to select the IPTC Title from the metadata, or use the file name, or leave blank. Note also that the IPTC Caption will automatically flow through to Flickr as well.
After that, all the options are essentially the same as for the Hard Drive export, as shown above. Finally. click on Save to return to Lightroom – your Publish Service is ready:

6. USING THE FLICKR PUBLISH SERVICE
To use the Flickr Publish Service, you can drag and drop photos as shown above under the Hard Disk Publish Service. Click Publish to update the external images.

You can add and remove photos following the same process, but note: Photos removed from the Publish Service will also be removed from your Flickr Photostream! Furthermore, if you are using the free Flickr account, any modified photos that get republished will lose any comments, ratings and favorites status on Flickr. That is a feature of Flickr, not of Lightroom.
When you try to re-publish a modified photo, you’ll get this dialog, and you can skip over the images if you don’t want to republish them. This is an all-or-nothing step, you can’t pick and choose individual images to update:

Also keep in mind that if you delete the photo from within Flickr, Lightroom will not be aware that you have deleted it.
7. SETTING UP THE SMUGMUG PUBLISH SERVICE
Step 1: As with the other services, from the Library module choose the “+” sign next to Publish Services in the left sidebar to select Go to Publishing Manager…:

Step 2: Within the Publishing Manager dialog box, click Add:
Step 3: In the Create New Publish Connection dialog box, choose SmugMug, give the service a descriptive name, and choose Create:

Step 4: This will take you back to the Publishing Manager dialog and you’re ready to configure SmugMug. We see the descriptive name we gave it above (you can change this later if you’d like, but the next thing to notice is that we need to register our credentials with SmugMug. Click on the button that says Authorize Account, or if you don’t have a SmugMug account you can even create a new one right from here:

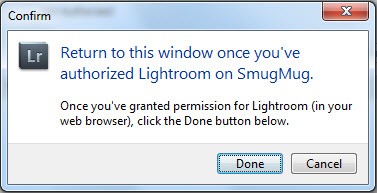
This dialog will pop up, and you’ll need to click on Authorize, which will launch your browser:

Over in your browser’s window, you’ll need to sign in to SmugMug and you’ll be presented with this authorization window:

Once you’ve clicked Authorize, you’ll get a confirmation and you can return to Lightroom:

In Lightroom, you’ll find this dialog waiting. Click Done to continue:
Step 5: Now we’re logged in and ready to configure the SmugMug Publish Service settings. Note that you’ll have to scroll down to see all the settings.
The first set of options to configure are the SmugMug Settings – allowing you to synchronize gallery settings with your SmugMug account. We’ll accept the default just to get started, which will synchronize our galleries that already exist on SmugMug.
After that, all the options are essentially the same as for the Hard Drive export, as shown above. Finally. click on Save to return to Lightroom – your Publish Service is ready. Notice the galleries that have already been set up since we chose to synchronize galleries:

8. USING THE SMUGMUG PUBLISH SERVICE
To use the Flickr Publish Service, you can drag and drop photos as shown above under the Hard Disk Publish Service. Click Publish to update the external images.

Note that, unlike Flickr, modified images are silently updated and replaced in their SmugMug galleries.
FINALLY!
Well that’s it for the Publish Services in Adobe Photoshop Lightroom 3! I hope this was useful and that you’ll go try some of these out for yourself. As always, feel free to drop us a line in the comments section, we try to answer any and all questions.


Hi Michael, This was very informative and I look forward to using this LR3 feature. I also submit photos to one other publishing service not yet listed. Do I lobby the service to get connected to LR or can I create my own connection, viz, can I use the +Add function to connect to my other publishing service (i.e., RedBubble)? Many thanks!Liz
Thanks for the detailed help with the Publish Services. I noticed though that in Facebook when I set up an album I can customize the individuals allowed to see the album, however, if I set up a Facebook album through the LR Publishing Manager, I don’t get that option. Is this correct?
Thanks
Milomannn, that’s correct; you’ll need to manage the privacy on the Facebook side. mh++
Liz Finnie, LR provides only a few publish services so far: hard drive, Facebook, Flickr and SmugMug. However, go to Adobe.com and check the Lightroom Exchange and you can find additional plug ins for other services. I would imagine that over time we’ll see lots more different services become available. mh++
Michael,
What I would like to do is upload a group of images to different albums without publishing them to everyone’s wall at that time. My understanding is that I can do this with Facebook’s program, but how I do it in Lightroom 3?
Philip,
This is completely controlled on the Facebook side, managed by individual app. In Facebook, click in the upper right on “Account” and choose Privacy Settings. Then, at the lower left under Apps and Websites, “Edit your settings.” Next, in “Apps you use,” click “Edit Settings.” Find Lightroom in the list, and “Edit Settings” again. You’ll see in there a control that permits or denies the app from posting to the Wall. It’s all or nothing, unfortunately, and not controlled on a per-photo basis.
That’s the best I can do!
mh++
Thanks Michael for the quick reply. I’ll see if it works!
The publish feature is great got it working to Flickr with no problem. My issue is with the hard disk which should be the simplest of the lot!
I’m afriad this is the worst type of problem to address.
First attempt – worked perfectly, low res jpg for each file on the hard disk. Each file about 600 k.
Second attempt. Decided to try and increase jpg quality. Was asked if i wanted to re publish. Clicked yes. All but two files on the hard disk replaced, file size now ~5 mB. Two files unaffected despite having hi res files in library. Several attempts nothing I could find that would make Lightroom replace them.
Third attempt. Added two more photos to the publish list for export to the same folder. One file exported as high quality jpg, the other ignored.
….an hour or more later. Nothing I can do will make lightroom publish this file as a jpg. It is clearly visible in the list of files to export, but is just ignored.
No error message, nothing. It just ignores the file. Filters are off.
Tried several other files and it works with no problem, it’s just that every now and then it hits a file that it doesn’t seeme to like which is ignored.
Stuart, that’s a tough one. Is it possible that (unmanaged) files already existed in the folder to which you’re publishing, with the same name? Maybe LR is skipping those files. Check the creation and modification dates in the metadata as well, just to see if anything is unusual (like a date in the future).
I would try removing the troublesome files from the HD publish collection, republish (presumably to remove the files from the HD), then inspect the hard drive folder to see if the files are still there. Delete them if necessary and then publish those files again from scratch.
I’d be interested to see if that helps, as well as anything else you may find that could help our readers in the future.
mh++
Tried that – when I click on the publish to hard disk button I now see one “new photo to publish” two “modified photos to re-publish” and 5 “published photos”.
Every time I click on “publish” the programme goes through the motions, says that it’s completed the job, but nothing changes.
Only slightly odd thing is that my computer has Windos XP but this should be OK.
All other publsihing seems to work like a dream!
Problem sorted…..I set the publish dialog to rename the files as they were written onto hard disk. I had set it as file name – sequence number (or whatever) and I really just wanted to renumber the files.
However, the root file name I supplied was the same as the root filename in the library. I has thought that since the published files were jpg this would be OK (in fact I didn’t really think, just typed something into the field).
Take home message is that this is a bad thing to do – when I went back in and edited the publish options with a root file name that was completely new, it all worked properly.
I think that’s the problem solved!
I spoke too soon…..
….there is definately something odd about this. I’ve just tried to publsih the same photo to Flickr and to hard disk. Flickr worked like a dream, publish to hard disk just ignored the file.
Tried selecting all files for re-publication, it created a jpg for every file apart from the new one which just sat in the “new files to publish”.
Tried clicking on “publish” and, as before, it went through the motions and left the file there.
I’ve just tried again, but this time I used another option in file naming so that it kept the same shoot name (the “filename – sequence” option) and everything worked as planned.
There is some odd little issue about renamining I’m sure!
I tried the suggestions for Flickr; it worked, but the results are not good. The Flickr image lacks the clarity and definition of the same image in Lightroom. I am trying to find a way to maintain the quality of the image in Lightroom when I export to Apple TV. So far the best way is through iPhoto, but there is still a loss of quality. How about Adobe Slideshows. Can they be shown on an HDMI television? Any suggestions would be appreciated. Thank you.
Norm Horner
Hi Michael,
very useful tutorial.
I am missing the possibility to publish photos with a watermark or overlay that includes automatically the date the picture was taken. I used to do that in LR2 with the Print options but I can’t find a way to do it with this new Publishing Services features.
Any idea is appreciated as I like to share pictures showing the date of shooting.
thanks!
Question…
I notice that after I have published my Smugmug account in LR3 that although all my existing folders that are on my Smugmug website appear under the Smugmug bar in the Library Module of LR3, that none of the photos that are on my Smugmug website appear in those folders. Each folder shows a “0” next to it. How do I get those photos to appear when I select those folders in LR3? Do I need to somehow sync the photos to LR3, or import them in some way into LR3? Confused.
Thanks for any help.
Can i add a universal description to all my photos while uploading ? is there any easy process?
Hi Michael, just getting started! I hope you can help me! I have successfully uploaded my pictures to smugmug but in the process, have lost my “icons”. The ones that say “flicker”, hard drive, smugmug and Facebook! Do you know what might have happened or how I might get them back??? Please help, I’m pretty desperate! Shannon
Shannon, it’s hard to say without seeing your screen. Are you in the Library Module? The PublishServices are only visible in the Library. Have they scrolled off the bottom of the screen? The left pane on the Library module has several sections – Catalog, Folders, Collections, Publish – that are collapsible by clicking the triangle next the the section (which opens that section).
Drop me an email to mike (at) hoffmanartdesign (dot) com if you need more help.
mh++