Jack-O-Lantern in 3D (Part 2)
Last week on TipSquirrel, I started a project to create a 3D scene of a Jack-O-Lantern, together with some spooky text. This week, as promised, we will finish this project by adding some light effects, building on my tip from two weeks ago on Lighting a 3D Model in Photoshop CS5. Here’s the scene as we left it last week – a pleasant 3D image, but somewhat lackluster; it needs some moody lighting to give it a bit of mystique.
Note: If you’d like to work along with me, I’ve placed a copy of the PSD file for this project on my site for download. Enjoy and work along with me!
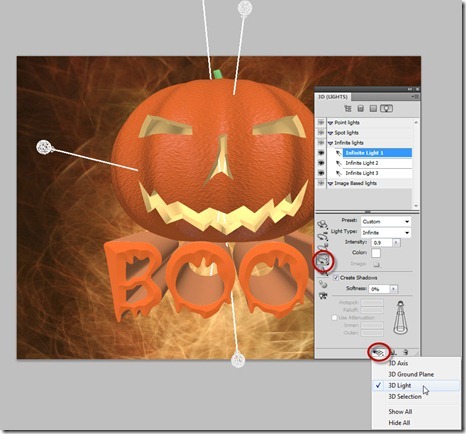
Recall from my earlier tips that Photoshop gives us some default lights in every 3D scene, and we can use those to start us off with this image. Let’s open up the 3D panel (Window > 3D) and click the fourth icon at the top of the panel to Filter By: Lights:
Notice our three default lights: Infinite Light 1, 2, and 3. We can see where these lights are directed by selecting the Light Rotate Tool, and then clicking the extras icon at the bottom of the panel and selecting 3D Lights. With the lights visible, we can see the default configuration of one light above center, one light off to camera left, and one light below center shining upward:
We can light the scene with these default lights, and evaluate the results.
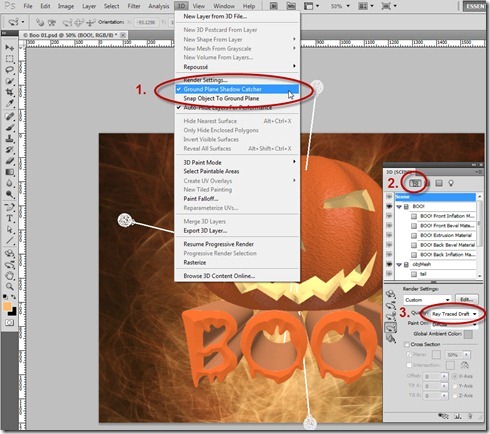
- First, we will want to turn on the feature that allows us to cast shadows on an imaginary plane: 3D > Ground Plane Shadow Catcher.
- Second, in the 3D panel, click the first icon to Filter By: Whole Scene.
- Third, change the render Quality from Interactive to Ray Traced Draft.
Once you change the quality to Ray Traced Draft, the render engine will begin and you will see the square tile pattern working its way across the image. We can let it render long enough to see what the image will look like, then press Escape or click anywhere in the window to pause the render:
And there’s our default render. It is perhaps a little better, we have some shadows now; but it is still not moody like we’d like it to be. Also, notice that the interior of our Jack-O-Lantern is quite dark – none of the light reaches there – which isn’t very realistic. Let’s make some simple changes to the lighting to see what we can do.
Before making any lighting adjustments, be sure to set the render Quality back to Interactive. Otherwise, the progressive render will restart every time you make an adjustment. Periodically throughout this tip, we’ll need to jump back over to the Scene view, and change the lighting to Ray Traced Draft in order to see our rendering. I won’t describe this in detail from here on in, so keep that in mind going forward.
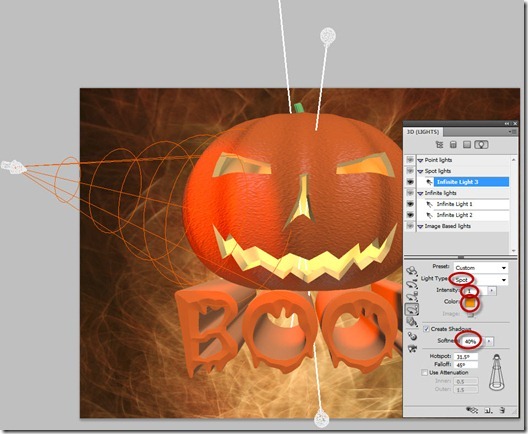
Let’s go over to the lights view and change the light on camera left. It is Infinite Light 3, and we want to change it from an Infinite Light to a Spot Light, increase its Intensity to 1, and change the Color to a nice bright orange. Change the Softness to 40%, which will soften up the edge of the shadows considerably. Finally, change the Falloff to 60%, which will increase the “cone” of light:
Next we need to pull the light towards us, and rotate it around a bit so it shines more on the front of the face and text. From the flyout menu select the 3D Light Slide Tool, then drag downward to pull the light toward you:
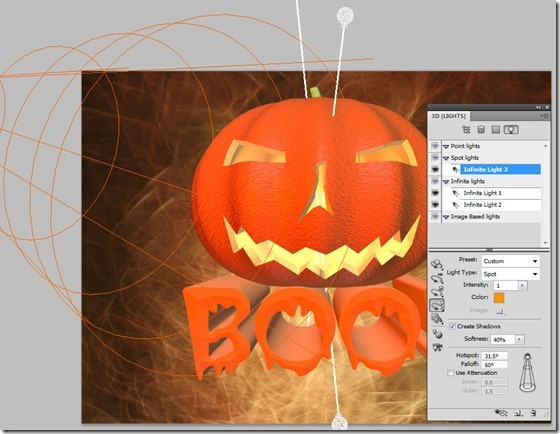
At this point, the light isn’t shining on the scene directly (look at the letter “B” for example), so we need to switch to the 3D Rotate Light Tool, and drag slightly to the right to rotate our light more directly onto the scene. This may take a bit of practice:
Now, let’s select Infinite Light 1, which is the top center light. Change its Type to Spot, leave the Intensity at 0.9, but change the Color to a bright yellow. Change the Softness to 40%, and change the Falloff to 60% (which will increase the size of the “cone” of light).
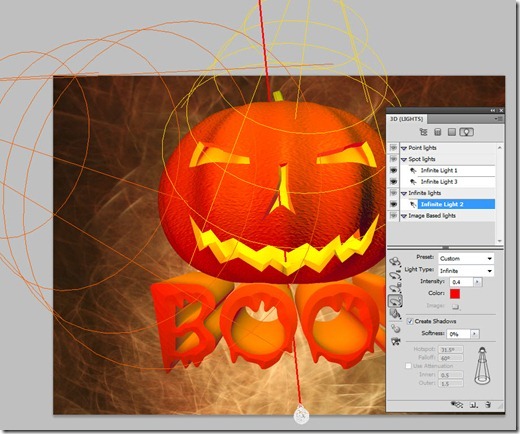
We’re starting to see some interesting things happening in the image, but don’t be fooled – the real results won’t happen until we go back and render once again. Before we do, let’s make one final change to Infinite light 2, the one that shines up from the bottom. We will leave it as an Infinite light for now, but let’s change the color to an eerie red, which will shine up from the bottom and illuminate our text and pumpkin from the bottom. Notice how the light wireframes show the colors of the light, in addition to the shape and direction of the light:
Let’s go ahead and render this by changing the render Quality to Ray Traced Draft. Here’s what we have. Certainly more moody:
Notice the nice soft shadows on the “ground,” and the dark shadows around the camera right side of the Jack-O-Lantern. There are a few tweaks, though:
1. The text has lost some definition, so we need to decrease the intensity of Infinite Light 1 (the orange one on camera left) to around 0.6. This will bring back some of the contours of the text.
2. The interior of the pumpkin is still dark, with only a bit of light shining into it. Let’s fix that now.
Note: Don’t forget to set the Quality back to Interactive!
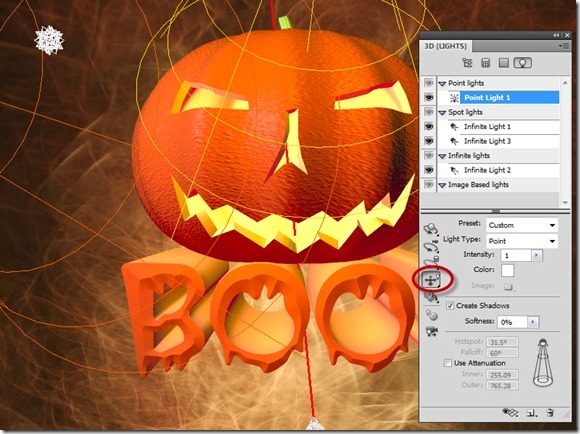
Back in the 3D Panel, click the icon at the bottom to Create a New Light and choose Point Light. A point light behaves like a light bulb or candle, so that is just what we need to light our Jack-O-Lantern from the inside:
The new point light appears somewhere off to camera left. You’ll need to use the 3D Slide Light Tool again to move it over to the right until it comes into view (it looks like a many-pointed star):
Now, use the 3D Slide Light Tool to move it right to left, and front to back. Use the 3D Pan Light Tool to move it up or down and right to left. Maneuver the light until it is inside the Jack-O-Lantern. In this case, I’ve positioned it between the eyes, right above the top of the nose opening, and just inside the front wall of the pumpkin.
Now, set the light Intensity to 0.4, Color to a bright yellow, and the Softness to 30%:
We’re ready to render again. Set the quality to Ray Traced Final, and go get a cup of coffee. when you return, you should see something like this. Notice not only the interior lighting, but notice that there are soft shadows and illumination actually being cast on the ground through the openings of the Jack-O-Lantern face (change the Softness of the point light back to 0% and you’ll see a jagged illumination in the shape of the mouth):
There you have the finished project. At this point, you can continue to add and change lights, try moving the 3D objects around, change the camera view, and so forth. Experiment, have fun, and learn… and have a Happy Halloween!










Leave a comment