Its All In The Name
One of the best practices to get into is naming your layers, but this can be quite tedious. Oh yeah, it only take a couple of seconds, but that’s a lifetime when you’re all fired up to be creative. So, let’s look at some short-cuts and good practice.
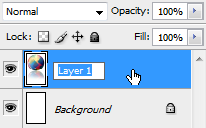
Let’s start with the basics. To name a layer that already exists double click in the blank bit beside the layer name the layer name (in this case ‘Layer 1’) and the layer name becomes editable
If you’re making a duplicate layer, and you should if you are doing work on the original of course, then you have a few options;
With the layer selected, press Ctrl/Cmd + J to duplicate (or Jump) the layer then follow the instructions above. Bit long winded.
Hold down Alt and drag the layer down to the New layer Icon and you’ll get the Duplicate Layer dialogue box.
In this dialogue box you can name your layer, but you can also put it in another document. That can be handy sometimes.
Next let’s use the Alt modifier key again and add it into the Ctrl / Cmd + J combination.
A different dialogue box this time. Again we can name the layer but we also have a chance to change it’s blend mode [1] and, very conveniently, clip it to the layer directly below [2]
Ok, so we’ve got all these layers, nicely named but we’re trying to get in the habit of keeping things tidy. That can only mean one thing, Groups.
Making a new group and naming it works the same as the new layer.
Clicking the group icon will bring up a group folder called ‘Group 1’
However, holding down our now best friend the Alt key, we get the New Group dialogue box where we can name the Group and give it a mode.
Now that’s all well and good, but it just plonked the folder on the top of all the files, now we have to go and find the layers to go in it.
Let’s look at another way then.
Select the layers you want, if they are all together click on the bottom one and the shift click on the top to select them all. If they are separated, ctrl / Cmd click each layer. Caution, click in the space to the right or you’ll make a selection.
OK, so we have our layers selected. Now hold down Shift and click the Group icon.
BAM! The selected layers are in the new Group 1 folder! Cool eh?
Well no, not really. We were talking about naming everything and now we’ve got a rouge folder. That’s when we call our friend the Alt key back again.
So, with the layers selected, Shift + Alt + Click the Group icon. This time we can name the group AND the layers will go into it, all in one movement…. beautiful.
So there we are, everything named and put away all nice and tidy. Hope this helps, see you tomorrow.


Nice tips! I especially like the shortcut for grouping.
I usually use Cntl/Cmd + G after selecting the layers to group, but this doesn’t allow naming the group or selecting a blend mode. Thanks for passing it along!
If you double-click directly on the layer, be sure to click the text, if you click the open space next to the layer text, it’ll open the ‘layer styles’ dialogue box.
Well noticed jdzellers, thank you. The tutorial will be amended.
Nice thing indeed. It will help a lot when we have like 20+ layers.. thanks