Half-Sketch Half-Photo Morph with Photoshop
Today’s tip comes to you courtesy of my wife, Carol, who liked the image you see below well enough to hang it on a wall in our house. That’s saying a lot to me, since I have over 30,000 images in my library to choose from! We’re going to take a photo, and create a sketch from the photo – but then, we’’ merge the original photo back in with the sketch to give an appearance of a sketch coming to life on the canvas.
I’ll be starting with this image, a photo I captured of a Yellow-Crowned Night Heron hopping out of the shallows and onto a nearby rock to enjoy a quick meal – seafood of course!
I’ve chosen this image because it contains lots of edges – lines which will translate well into a sketch. I’ve already modified my image at this point to clean up the nits, adjust the levels, colors and details, and cropped it to size.
The first step we’ll take is to make a copy of the background layer, and turn it into a sketch. There are many ways to do this, but I’ll step through a quick one here – search around and I’m sure you’ll find many other ways to do this.
On a duplicate of the background layer, run Filter > Stylize > Glowing Edges. Change the Edge width to 3, bump up the Edge Brightness to taste (I’ve set it to 9) and increase smoothness all the way to 15:
Next, choose Image > Adjustments > Desaturate to remove the colors from the edges and leave a monochromatic image:
Next, we’ll invert the image by pressing Ctrl-I/Cmd-I (Image > Adjustments > Invert). Our sketch has taken form:
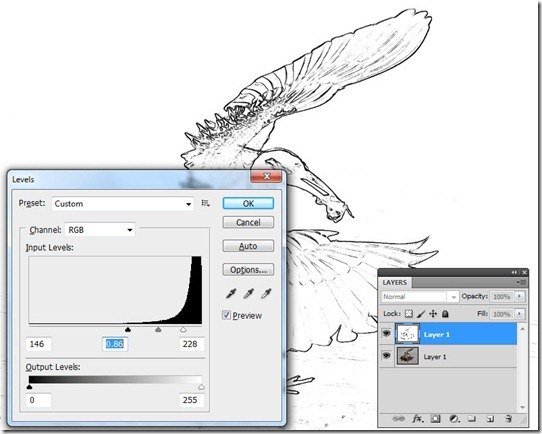
Now, we can increase the contrast, using levels, to give a little more definition to the sketch. Choose Ctrl-L/Cmd-L (Image > Adjustments > Levels) and set the controls approximately as shown. Bringing the black slider to the right darkens the black areas, and bringing the white slider in towards the left will send a lot of the light gray noise to pure white. Adjust the center gray slider to taste:
Now let’s add a layer mask to the sketch layer by clicking the icon at the bottom of the layers panel while the sketch layer is selected:
Now with the layer mask active in the layers panel, use a black color (press “D” then “X”), and a soft brush to paint away part of the sketch to reveal the actual photo underneath. You can get as detailed as you like, and can choose to follow the lines, or to stray over them with soft brush strokes. If you go too far, simply press the “X” key to toggle the color from black to white and paint away the mask:
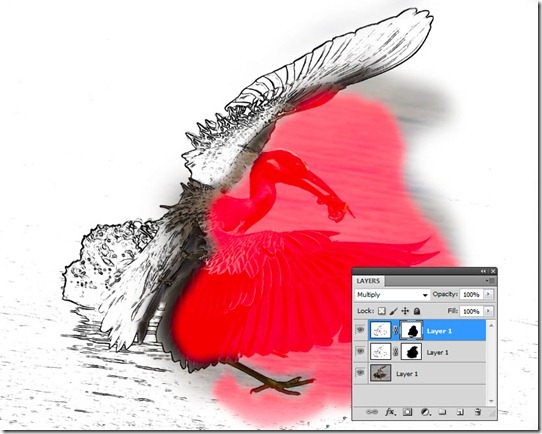
Now this is starting to look good, but we want to give more of the impression of a blend of the sketch with the photo. We can make another copy of the sketch layer, fill its layer mask with white to reveal everything, and set its blend mode to “Multiply” to hide all the white and simply leave all the black lines:
Now, this has had two major effects on the image: 1) it has darkened the sketch even more, and 2) it has overlaid the sketch onto the photo. This gives the impression of an ink tracing over the photo, but the effect is too intense. Let’s paint on the layer mask with a black brush to hide most of the effect over the photo, but leave it revealed near the areas where the photo and sketch blend together in this case, I’ve turned on the quick mask so that you can see where I’ve hidden the extra sketch lines. Note that I have left them intact all along the edges of the transitional areas:
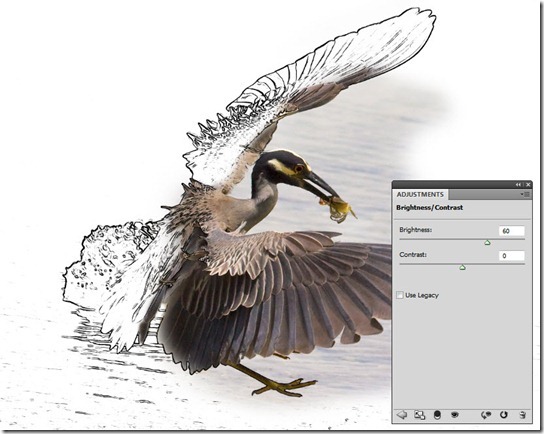
We’re nearly there, time for the finishing touches. I think the sketching has darkened the image a bit much, so let’s brighten it up a bit. Use Layer > New Adjustment Layer > Brightness/Contrast and adjust the brightness control to 60:
Finally, I think this image could benefit from a little density in all the white areas. Using a very light gray to white radial gradient, I’ve created a layer at the top of the stack, filled it with the gradient and set the blend mode to multiply to complete the effect:
And there you have the half-sketch, half photo hybrid image.There are dozens of ways to vary this and create a wide array of effects – get out there and discover some of them!


Leave a comment