Exporting Panoramas to Photoshop from Lightroom
Before I go into the how’s and wherefores of this tutorial I think I ought to explain a few things in case any of you are a little unsure of what panoramic photographs are and how they are made.
 A 360° panorama from the top of Cats Bell, Cumbria
Panoramic cameras were available in the days of film and they allowed photographers to take a wide angle shot that was recorded on a long, thin piece of film; the camera I used to use was a cumbersome, beast of a thing made by Fuji and recorded a 6cmx17cm image. Due to the technical difficulties of making a camera that could make images of that size these cameras were not cheap. You can still find equipment that does this sort of thing or you can invest in a parabolic tripod head to create technically “correct” panorama with your DSLR. However, for us mere mortals who do these things a couple of times a year there are ways of doing it on the cheap, handheld and using Photoshops merge to panorama tool.
There are couple of things to do when shooting the images to make sure you have enough information to work on and to limit the way panoramas tend to be fat on the ends and thin in the middle. First, and this will feel counterintuitive, hold the camera in portrait aspect. Find your starting point and fix the focus and then turn the focus to manual so the camera will not try to refocus through the series of shots, also once you have established the correct exposure put the exposure to manual. Each shot has to overlap the proceeding image so that Photoshop has enough information to work out what goes where (10%-20% is usually enough). While shooting a series of images try not to just turn your shoulders as this will increase the bellowing of the shot, so instead shuffle round with your feet turning your shoulders as little as possible.
Finally we get to the nitty gritty of processing the images once you have downloaded them to Lightroom (all the following happens in the Grid view of the Library module in Lightroom). I like to collect my panorama shots into stacks with the top image colour coded so that I can clearly see where the panorama shots are and it makes it easier when selecting images to export. To create a stack select the images either by shift clicking or cmd (Mac) ctrl (PC) clicking noncontiguous images then press cmd G (Mac) ctrl G (PC) to create the stack. If the tool bar isn’t visible press T so you can see it then select any of the colour filters to highlight the stack. Please note stacks don’t work in collections; don’t blame me blame Adobe
Once you images are stacked you can expand or collapse the stacks by clicking on the faint vertical lines either side of the top most image (see image 3) or by pressing S. If you want to remove your photographs from stacks completely press shift-cmd G (Mac) shift-ctrl G (PC).
It is important that you don’t crop or make any major changes to the exposure, colour temperature etc. (remember you should have got the main things right in camera!) before you export them to Photoshop.
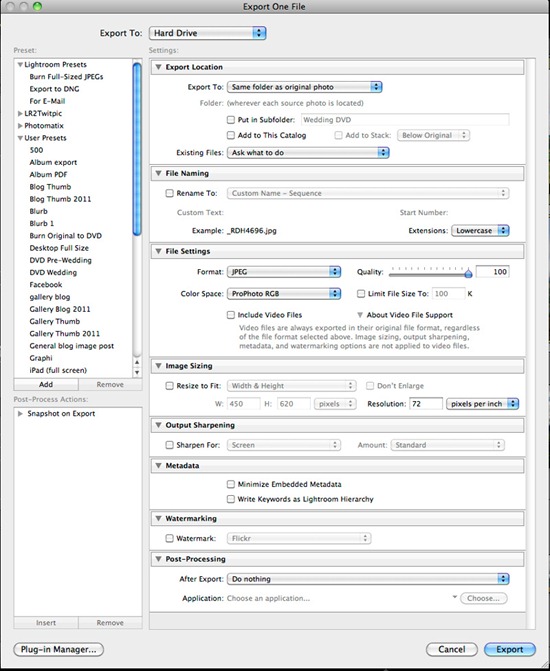
The stitching process in Photoshop can take a while, especially if you are using 16 bit images when you need to find a good book to read while Photoshop eats up all of your RAM processing them. After having gone through this palaver a couple of times only to find the final result a little wonky (and having read most of War & Peace) I now make screen-res JPEGs from my original files via the Export With command, shift-cmd E (Mac) shift-ctrl (PC). The Export With dialog allows you to create bespoke export actions, which I’ve done for this task. If you want to set this action up yourself copy the settings in image 4 then click on the Add button on the left of the dialog and name the action to whatever you wish.
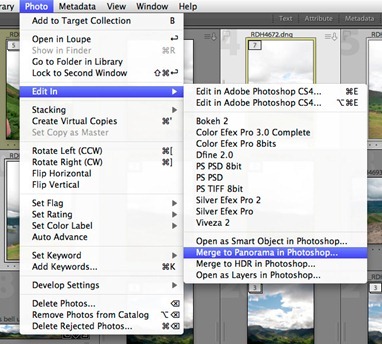
Finally, using either the JPEGs or your original files, select all the images you wish to use for the panorama, go to the Photo pull down menu, then choose Edit In – Merge to Panorama in Photoshop.
If Photoshop isn’t open it will now open and present you with this dialog box
Leave the settings as they are and press OK, then wait…
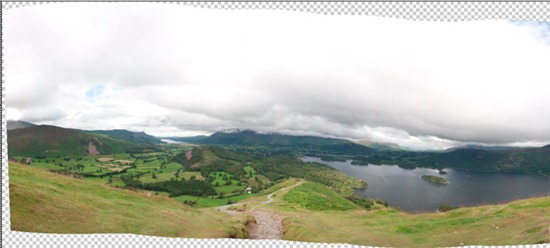
Eventually you will have a panorama, it will need some cropping as there will be areas with out any pixels (if you see any fine white lines on the image don’t worry as they are only the masks used when stitching and won’t appear on the final image), if you are happy with it flatten and start burning/dodging or whatever you wish to do to make your masterpiece come to life.


Leave a comment