Exporting multiple files with Image Processor
Sometimes tried-and-true methods are very efficient at getting the job done, and the Image Processor script (which has been around for quite some time) is one of those old standby tools. When you need to export many images in a batch, and especially when you need to export multiple formats, turn to the Image Processor to get the job done quickly. Something this important and useful should be common knowledge, but I’ve found this to be one of the most often asked questions I’ve encountered.
Bridge CS5 includes some new export features (which we will review next week) but the Image Processor Script has some unique capabilities that make it a relevant and useful utility. However, it remains somewhat of a mystery to those who haven’t used it. Today, my mission will be to not only introduce you to this feature, but to empower you with the knowledge you need to use this tool confidently whenever the need arises.
Image Processor has several features that combine to bring tremendous synergy into one dialog box:
- The ability to process multiple images, even across different folders
- Save the output into a designated folder
- Save to any or all of JPG, TIFF and PSD formats
- Resize images to a specific maximum size during the export process
- Run an action during the conversion process
- Add copyright information prior to saving the output
The many different features of this script, combined into a single dialog box, make for a somewhat scary-looking dialog – but don’t worry, we’ll step through the process sequentially and it will all become clear!
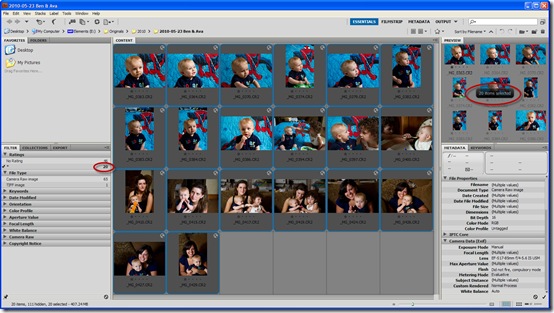
You can run Image Processor from within Photoshop, but I recommend running it from Bridge – you’ll have more control over the images you choose. Let’s take a look, starting in Bridge. You’ll want to select the images you want to process. You can select from Folders, Collections, filtered results or search results. In this case I’ve selected 20 images with a one-star rating within a folder containing more images. After filtering on one star, I clicked the first image and pressed Ctrl-A (Mac: Cmd-A) to select all:
With the images selected, choose the menu item Tools > Photoshop > Image Processor…
This launches Photoshop, and brings us to the dialog box shown below, which we’ll take one step at a time:
Notice that the dialog box is conveniently broken into numbered sections to guide us through this process. We’ll follow the numbered guides in this description:
Part 1 – Select the images to process
When you run this from Bridge, as I’ve demonstrated above, there are no choices here. The selection is hard-wired to “Process files from Bridge only (20).”
There is a checkbox labeled “Open first image to apply settings.” I almost never use this, but for camera raw files, this will launch the ACR dialog box to allow you to make camera raw settings that will then apply to the entire set of images. Also, for JPG or PSD files, this will allow you to open the first image to choose a color profile if the files’ color profile doesn’t match the working space. As I said, I usually just leave this blank.
Part 2 – Select location to save processed images
As you process the images, where do you want to save the output? You can save in the same location, or choose a folder (you’ll get your normal system dialog box to choose).
Important note: in either case, the processed files will be placed in a subfolder under the chosen folder – and the subfolder will be named according to the file type you are saving (JPG, PSD, TIF).
Part 3 – File Type
Here is where the real work gets done in this dialog box.
First of all, there are three sections you can choose to select to save JPEG, PSD or TIFF. You can select any or all of these file types, and image processor will allow you to create these. As mentioned in the previous section, each file type will be saved into its own subfolder named for the file type (i.e. JPG).
For each file type, you can elect to resize the image, constraining the size within the width and height specified. Note that your image will not be stretch or squeezed; it will be resized with constrained proportions so that the maximum size falls within the limits you enter.
Finally, there are options specific to each file type:
- JPG – Select the compression Quality from 1 to 12; you can (and normally should) select to Convert Profile to sRGB, especially if you plan to post the images on the web.
- PSD – Maximize compatibility saves a flattened version of the file within the image for increased compatibility with other programs such as Lightroom.
- TIFF – LZW Compression will save in a compressed TIFF format, if you so desire.
Part 4 – Preferences
This part is strangely named, but it will allow you to do a few useful things:
- Run Action – will allow you to select an action to be run after the image is processed and before saving. Be careful, as this action will be run against all selected file types, so make sure you intend for this to be the case.
- Copyright Info – will embed the text into the image metadata under the Copyright tag.
- Include ICC Profile – embeds the color profile in with the saved image. Use with care for JPGs where it may not be needed and will add size to the files.
 Once you’ve entered this all in, you do have a chance to save these options to be used again in the future. Select Save… from the dialog box to save settings, and choose Load… to reload them again on a subsequent run.
If you use this tool often, and frequently load in the same parameters for file types, sizes, and preferences, this can save loads of time in setting up the processor .
Once you’ve got everything set, choose Run.
At this point, depending on the number of files you are processing, and the number of output formats you’ve chosen, you may want to go get a cup of coffee. Photoshop will run and process the images according to the parameters you’ve entered:
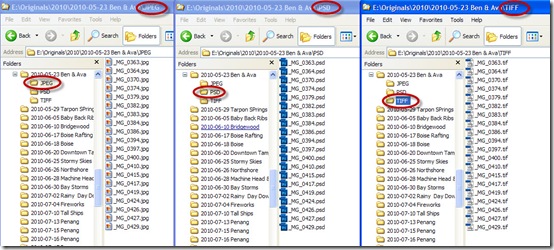
Once Photoshop is finished, take a look at the output folder, and you’ll see the results nicely arranged in subfolders as we’ve reviewed above:
And there you have it – a lot of work done in the background, leaving you free to be productive while Photoshop does the dirty work.
Keep in mind, there are some things that Image Processor cannot do – maybe you’ve noticed:
- You cannot rename files as you are exporting
- You have no control over what to do if an output file already exists
- You don’t have control over the resampling method for resizing images
- Metadata control for output files is very limited
- Photoshop is used to run the processor and is tied up, only one processing job can be run at a time.
Next week, we’ll look at Bridge CS5’s new Export Panel, and we’ll see how we can use that new capability to address some of Image Processor’s shortcomings.
Image Processor, however, remains a very powerful and useful utility, one that you should have in your toolbox and use regularly. I encourage you to get out there and give it a try – don’t let the dialog box intimidate you, follow the steps outlined here and you’ll be converting and exporting images by the boatload in no time at all. Until next week, Happy Photoshopping!


Great tip, thanks very much. As a photographer who submits images to libraries in differing sizes and formats this tip will be very useful.
Hello,
Great tip, as usual 🙂
I have a question, what resize method is used by this tool?
Nearest neighbor
Bilinear
Bicubic (3 methods)
Thanks !