Enhancing Black and White Images with Photoshop and Lightroom
Welcome to my third tutorial on black and white photography. In this tutorial we will be looking at ways to further enhance your images once they have been converted into black & white.
Contrast
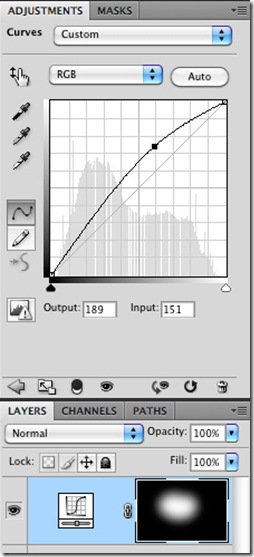
The first of these methods we will discuss is contrast which is probably the simplest and most important adjustment you can make. Contrast is an essential part of the aesthetics of your image. A slight boost of contrast using an S curve in the Curves adjustment layer can lift an image, adding crispness and emphasizing texture and tone. Similarly a reverse S curve can be used at times to reduce contrast.
A simple S curve
Because you are using a curves adjustment layer the intensity of the effect can be controlled using a layer mask and the brush tool.
Dodging & Burning
Dodging & burning are techniques used in the darkroom to lighten or darken areas of a print; you could either place an object (usually a piece of card on the end of a piece of thin wire) between the enlarger lens and the paper to lighten an area which was known as dodging, or you could create a mask (usually using your hands) to darken an area and this was burning. All of these techniques were accompanied by flapping of hands and wire to stop the effect being too hard edged. You don’t need to know all of this but it does explain Adobe’s icons for these tools.
The Dodge & Burn icons
The dodging & burning tools in Photoshop (accessed via the O key) have come in for some criticism in the past and, although they have been improved in the last few iterations, they aren’t great for colour images but they are quite good for monochrome images.
When using these tools less is best and they should be used at low exposures (about 5%) building the effect up gradually. I find it useful to pause while using these tools and go and get a coffee or something before returning to the image and studying how the effect looks before proceeding, or lessening, the effect (you can back-track your steps in the history palette). The other setting you need to bear in mind when using these tools is the Range setting, generally when using the dodge tool it should be set to Highlights and when using the burn tool it is generally set to Shadows.
The tool bar for the dodge & burn tools
Another way of dodging and burning uses the Lasso tool and a curves adjustment layer. Firstly select the lasso tool (L) and then set the feather to 250 in the tool bar, also check the anti-alias button. Now loosely select the area you wish to lighten or darken with the lasso tool, then create a curves adjustment layer. If you get a warning saying “No pixels more than 50% selected. The selection edges will not be visible” ignore it an press OK.
When you create the adjustment layer a layer mask is automatically created from the selection you made and, because of the high feather amount, the selection has a very soft edge, you can then use the curve to lighten or darken the area selected.
How the curves selection will look
Toning
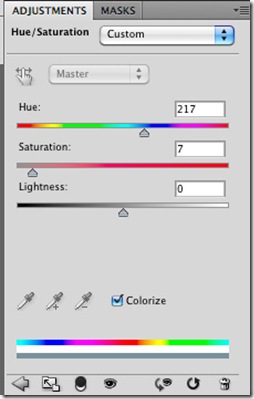
Some images, not all, benefit from adding a bit of colour back into them. Photoshop offers a couple of ways of adding a tone to a photograph but the most common way of adding a single tone to an image is via a Hue/Saturation adjustment layer. This is one of the simplest tones to apply and offers quite a lot of control.
The Hue/Saturation panel
The first thing you must do is check the Colourize tick box or it won’t work. Its an idea at this stage to ramp up the saturation as you can get a better idea of what the colour of the tone will be; you will reduce the saturation afterwards. Now shift the Hue slider left or right until you get a colour you like. Finally reduce the saturation to an acceptable level.
A method of adding more than one colour to an image has been dealt with by my fellow Nuts Michael Hoffman and Janine Smith and they can be found here
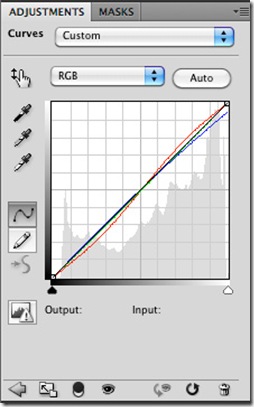
This next way of toning I found in a tutorial from David Nightingale and is takes a bit of practice to use well. These tones are created in a curves adjustment layer. As well as the standard control in the curves panel you can also control each of the primary colours individually. The individual colours are accessed via the dropdown menu at the top of the panel.
The dropdown to access the individual colour channels
Each of the individual primary colours can be added to an image by moving their curve upwards, however if you move the curve down you are not removing the colour but adding their opposite, secondary colour (the sum of the other two primaries mixed together) to the image. The primary and secondary colours are probably not the same as you were taught in school so here are the “real” primaries and their opposite secondaries:
Red – Cyan (green & blue)
Green – Magenta (red & blue)
Blue – Yellow (red & green)
So, to drag the curve down in the red channel will make the tone cyan.
You can tone your image using any combination of these colours or just one but because you’re working in the curves panel you can also choose which areas of luminance are affected; you can “pin” the curve to stop it affecting other areas; you can use an S curve so one area of luminance is affected by the primary colour and the other affected by the secondary.
The curves palette offers a massive amount of ways to affect the tone of the image, too many to do justice to here, and the best way to learn more about them is to have a go yourself
An example of a toning curve
The resulting toned image
The final toning tool is not in Photoshop but resides in Lightroom, so sorry if you only have Photoshop because the toning control in Lightroom offers many of the advantages of curves toning but is a lot easier to use. Because the toning stage is usually one of the final things you to do to an image adding the tone in Lightroom can is done once the image has been saved and closed in Photoshop. If you wish to open the image into Photoshop after toning don’t forget to select the “Open with Lightroom adjustments” option.
The Split Toning panel in Lightroom
As with Hue/Saturation toning its useful to increase your saturation to help you select your colour before reducing it for the final image. You can select any colour you wish for either the highlights or shadows but a good combination to start with is to choose a warm colour and a cool colour and see how that looks. in between the colour sliders is a balance control. The balance control handles which colour is the most dominant. To see how this works move the slider to either end of the scale and you will see that the opposite colour has disappeared from the photograph. The balance is a nice way of subtlety altering the toning and its always worth having a play with.
An example of a Lightroom split tone
The resulting toned image
So those are my tips for enhancing your black & white images. We have one more tutorial to come in this series and it will be something of a confession.


Have you tried to replicate this in Camera Raw? I understand it is not the same as working in Lightroom, but I’ve played around with the split toning adjustment panel in CR and thought it might be possible to make the same adjustment there if one doesn’t have Lightroom with maybe an extra step or two.
Just a note to say that you can get into Camera Raw from Photoshop by using Dr. Brown’s Edit Layers in ACR script. Then use the Split Tone tab – not as good as Lightroom’s since you cannot select a specific color for the tones, but it does allow you to add some Clarity and fine tune the basic image more accurately. Nice tutorial. Had never thought of creating a feathered selection and then adding a Curves Adjustment Layer for contrast
I really didn’t expect to see a page like Enhancing Black and White Images with Photoshop and Lightroom – TipSquirrel | TipSquirrel today. Very impressive. Reminds me of something I found out about black and white cross the other day.