Drawing with shapes and paths in Photoshop
Today we begin an exploration of drawing in Photoshop. Not drawing as in grabbing a brush and making marks or blobs, but drawing with precision and with flexible elements that provide a multitude of capabilities. I’m talking about the vector tools in Photoshop, and in this tip we’ll start to look at how they work. Within a few lessons, you’ll be up and running, and I don’t mean running away! Let’s get started.
To begin, we’ll need to understand a few basic principles. Within Photoshop, the basic unit of our image is the pixel. The entire image contains a grid with a fixed number of pixels arranged in a rectangular pattern. Each pixel contains a color value, and that is what makes the image. The fact that pixels are rectangular is what leads to the jaggedness of curves, which is especially obvious in lower resolution images (images that have a small number of pixels):
With pixels, we can approximate a curve, but even with the presences of “antialiasing” (the lighter shaded pixels in between the solid stair steps) we still have a jagged edge. With enough pixels, in a higher resolution image, this becomes too small to see, but it is still there.
In drawing programs like Adobe Illustrator, the images are created using vectors. A vector is a mathematical construct that contains numerical coordinates of the end points of lines, and information about the curvature. With vectors, you can create a smooth curve or sharp edge that will always be smooth or sharp no matter what the magnification:
Now, Photoshop doesn’t have quite this capability, but it does support vectors in some special ways, and that’s what we’ll start to learn to use here.
Shape Tools
The Shape Tools within Photoshop offer the easiest introduction to using vectors within Photoshop. Looking at the tool panel, we see the Shape Tools (keyboard shortcut U) include the Rectangle tool, Rounded Rectangle tool, Ellipse tool, Polygon tool, Line tool, and the Custom Shape tool.
Let’s start by selecting the Rectangle tool.
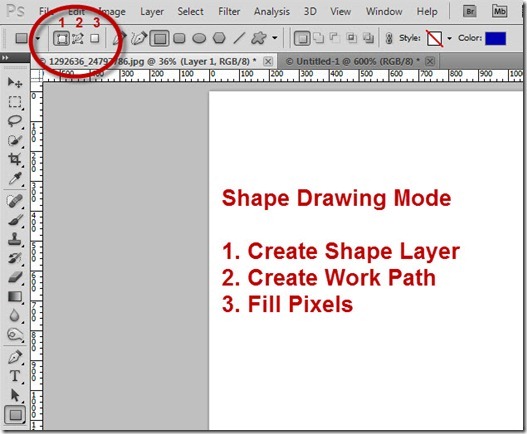
With the Rectangle tool selected, the first place we need to look is at the tool options bar at the top of the screen. Notice that all the various shape tools are available, so we can easily switch back and forth. But most importantly, notice the three icons that define the Shape Drawing Mode. If you get hasty and forget to take note of this option, you are guaranteed to have problems later.
The three options are as follows:
Create Shape Layer – when you draw with a shape tool and this is selected, a new solid fill layer is added to the layer stack, and the shape is created as a vector mask for the layer. Every time you draw a new path, another layer is created. If you’re not careful, you can create many layers very quickly:
Create Work Path – when you draw with a shape tool and this is selected, you are creating a path, which shows up on the drawing but is not really part of the drawing! The path can be seen in the Paths panel, and as long as it is selected, the path is active and will be visible. Click off the path in the Paths panel, and the path is deselected – and it becomes invisible. Paths are not printed, but are useful in creating other objects, as we will soon see. Note that, in this case, the multiple instances of the rectangle shapes are all included in a single work path, rather than separate work paths:
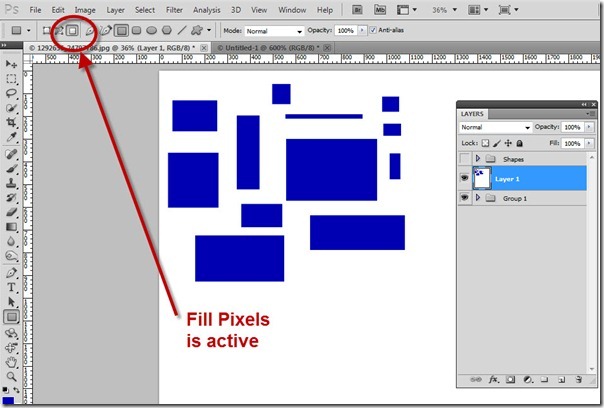
Fill Pixels – This isn’t really a vector feature at all. With this selected, the shape tools immediately fill pixels with the foreground color, and you lose any benefits of vector shapes. The pixels are filled on the current layer:
For the rest of this series of tips, we’ll largely ignore the “Fill Pixels” option. After all, we want to learn to use the vector shape drawing capabilities!
Combining Multiple Shapes on a single Shape Layer
As we saw above, when we have the Create Shape Layer option active, by default we generate a whole lot of layers when we start drawing multiple objects. In order to prevent that, we need to look a little further to the right of the tool options bar, at the options that determine how shapes interact:
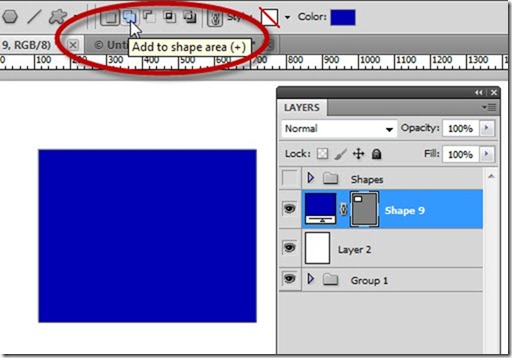
As you can see, the default is Create new shape layer. This is the reason that every click of the shape tool produced a new layer for us in the example above. However, notice that the rest of the options are grayed out. But, if we draw a shape, the options then become available to us:
If we choose the next option over, Add to shape area (+), then subsequent clicks with any of the shape tools will allow us to create more shapes within the same layer. This is far more useful:
Again, notice how the result of this method is a solid fill layer, with a vector mask. The shapes are actually paths within the vector mask, and we can see the paths if we look at the Paths panel:
Now that we’ve established the foundation required to work with paths and shapes, I hope you’ll start experimenting with the tools and options we’ve discussed today. Then, join me next Tuesday, when we will start to explore how to manipulate and work with these paths. We’ll continue to develop techniques and skills for working with paths and shapes while uncovering the secrets behind how and why they work. Join me next week for part 2!


thanks Michael for sharing,very helpfull
Where do I find part 2 of this tutorial?
I searched index, only part 1 appears to be there.
Hi Michael, the next part “Vector Masks in Photoshop” can be found here : http://bit.ly/iGOhBY