
Creating the Sin City Effect with Photoshop Elements

Call it hackneyed, call it cliché; the spot colour effect may well have had its day, but it can still look stunning when used with the right image. In this tutorial we’ll pay tribute to the the film, Sin City; one of my all-time favourites. If you’re not familiar with the the film, it’s shot in black and white, punctuated by bold splashes of colour; none more striking than the opening scene, where a woman in a bright red dress looks out over a monotone skyline. This effect used to be a a fairly involved process of hand-painting masks but as we’ll see here, Elements’ Smart Brush tools make light work of it; we can produce superb results in minutes.
The tools are capable of far more than selective colour, of course. You might also want to check out Gavin Hoey’s video, here on TipSquirrel.com for making skies bluer and grass greener.
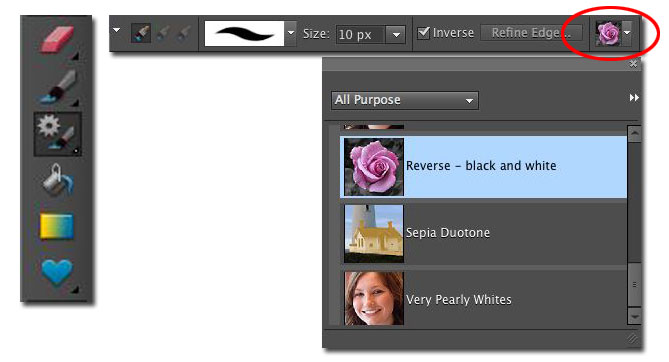
We’ll begin by selecting the Smart Brush tool (keyboard shortcut: F). Go up to the Options bar at the top of the workspace. Click the arrow next to the preset thumbnail to open up the preset picker. Now select the Reverse Black and White preset.

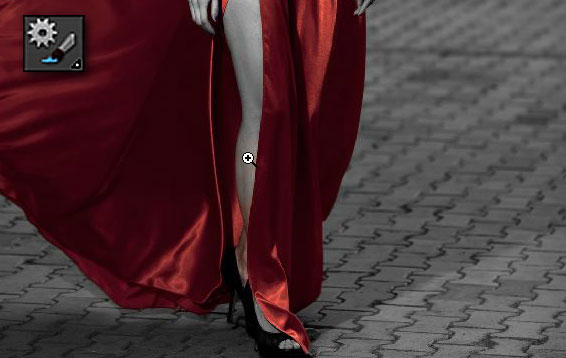
Go to the image and click once on the red dress; the large area to the left is fine. Immediately, the image turns black and white, apart from the area we just selected. If we look at the Layers panel, we can see it’s created a new adjustment layer above the background.

Instead of continuing to select inside the dress, hold the Option key (Mac) or Alt key (Windows) or click the brush icon with the minus symbol in the Options bar. This changes the mode to Subtract. Make the brush fairly small using the left or right square brackets [ to decrease the size, ] to increase it. Now start to paint around the outside of the dress. Keep close to its edge but don’t touch it.

Continue around the entire outline of the dress; make sure you Include as much of the woman’s skin as possible. We don’t see anything happening yet, however; what we’re doing here is telling Elements the areas we don’t want to include in the selection. This will make it easier to select the dress later.

Release the Option/Alt key, or switch back to the brush icon with the plus symbol. This puts us back into add mode. Now start to paint in the rest of the dress. As we do, the selection expands out and also adds to the adjustment layer’s mask. Because we created the negative area previously, we don’t have as much spillage outside of the dress. It’s not perfect but we’ll have less to tidy up.
Once we’ve selected as much as possible with the Smart Brush, switch to the Detail Smart Brush tool so we can clean up the problem areas. We can do this by pressing the keyboard shortcut F again, or by clicking and holding the mouse on the icon in the Toolbox. We’ll need to zoom in to the problem areas to make sure we pick up all the detail. We can do this on-the-fly by holding Cmd (Mac)/Ctrl (PC) and space together. This gives us temporary access to the Zoom tool.

The Detail Smart Brush behaves just like a normal brush but, instead of painting normally, it carries on creating the adjustment layer’s mask. For the areas where the selection spilled over onto the woman’s skin and the background, we need to be in Subtract mode. We can vary the brush size by pressing the square bracket keys [ ]. For the parts of the dress that were missed, we can switch back to Add mode and paint them in.

Continue around the image, cleaning up the problem areas. The final part to this stage is to paint in the woman’s lips. Again, zoom in close and use a small brush to ensure we get all the detail.

Our image is looking great. The dress could do with a little colour boost, though; just to complete the effect. Select the Smart Brush tool again (F). The selection will reappear. Now go to the Layers panel. Click the black and white circle at the bottom to display the list of adjustment layers. Choose Hue/Saturation. A new layer is created above the effect layer. The selection has been applied to the mask automatically. Now all we need to do is increase the saturation a little to make the red really pop.


That’s a fantastic tutorial, I think it’s going to help a lot of people cause most of the retoucher is need to do this everyday. So thanks for sharing dear.
Awesome tutorial!! Photo retouching service is one of the essential graphic design works. So, obviously that is a great tutorial.