Creating the One Ring in 3D
As a Tolkien fan, I’m always interested in the lore and art that accompany the Lord of the Rings literature. So, I thought, why not try to recreate the One Ring in all its fiery presence? Fortunately, this isn’t a tremendously difficult task with Photoshop CS5 Extended.
We’ll start with a blank document with a black background, and add a second layer filled with a light yellow color representing gold. The exact color isn’t important, as we will change it later:
With the yellow layer selected, go to the 3D menu, and choose:
3D > New Shape From Layer > Ring.
That’s right, the Photoshop engineers already thought of this! While you’re there, notice all the other premade shapes available in Photoshop. While I can’t see much use for a 3D hat, there are quite a few other very useful shapes there. Don’t be afraid to play around with them!
But, back to our ring. Notice that right off the bat, the ring looks quite nice. You can use the 3D Object Rotate Tool to flip it around to the position you’d like.
Now, let’s make it look more realistic. First, we’ll give it a more natural gold look.
Open the 3D Panel (Window > 3D) and click on the third icon at the top to show materials.
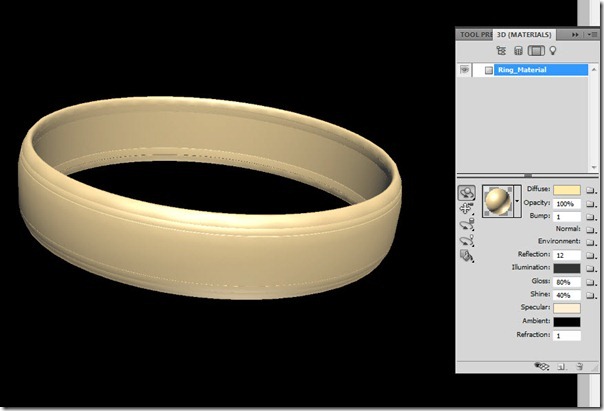
Select the flyout menu next to the gold marble to see the materials that are loaded, and choose the flyout menu from there. Choose metals from the list. Then, scroll down to find Metal Gold3, and choose it. The ring takes on a more realistic tone, but it will look much better later when we render it with lighting. By the way, this is why we didn’t really care about the color earlier, the Gold material replaces the previous color completely.
Note: If you don’t have metals, go to the menu and choose 3D > Browse 3D Content Online. You’ll find a nice library of materials free on Adobe’s site.
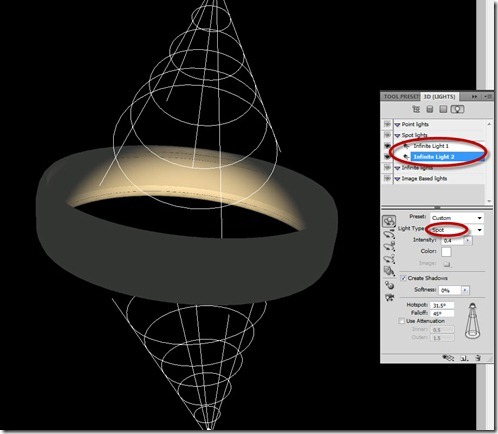
Next, we’ll work on the lights. Click the fourth icon in the 3D panel to filter by lights, and at the bottom of the panel choose the small icon menu and click on 3D Lights to toggle visibility of the lights. Notice that the “ring” shape comes with two default lights. We’ll need to change these:
The default lights are “Infinite” lights; we’ll want to change these to “Spot” lights. Do this by selecting the lights from the list, and changing the “Light Type” to Spot. Notice the change in appearance of the lights (they now have a “cone” of light) and notice how they interact more interestingly with our model:
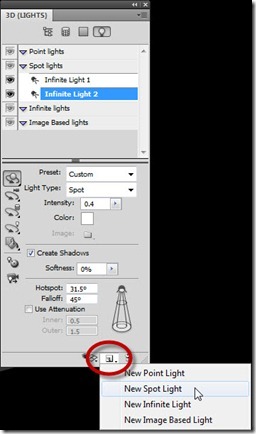
We’ll need to add a third spot light to the mix, so let’s go ahead. At the bottom of the 3D Panel is an icon that looks like a “New Layer” icon, click this and select “New Spot Light:”
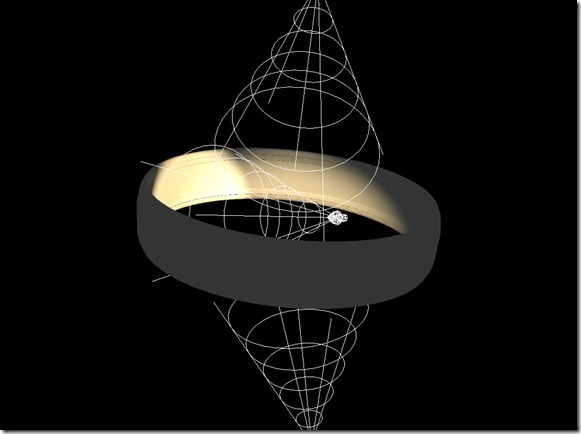
We now have our three lights, but they’re not well positioned:
In order to move the lights, we have to select each one in turn, and use the 3D Light tools from the 3D panel to move the lights into position. There are 3 tools:
- 3D Light Rotate Tool – swivels the light around in its current location.
- 3D Light Pan Tool – moves the light left/right and up/down, parallel with the surface of your screen.
- 3D Light Slide Tool – moves the light left/right and forward/backward, parallel with the surface of your desk.
You’ll need to play around a bit to get the hang of it, but make small moves at first. Here’s where I ended up with my lights. Notice the pleasing shadows and illumination/highlights on the ring:
A few tips in working with lights:
- If you can’t see the light wireframes, make sure you have a light selected in the 3D panel and make sure you have one of the light tools active as described above.
- Don’t be afraid to adjust the intensity of the lights, as well as the hotspot and falloff (the size of the cone).
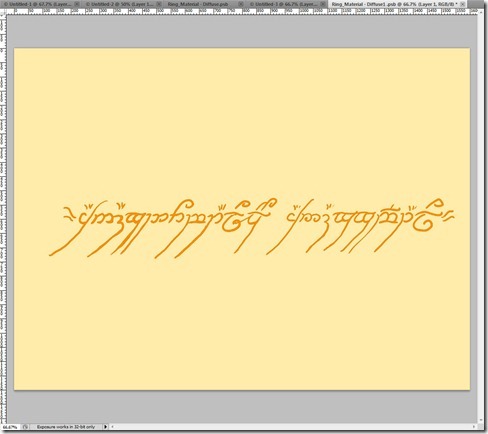
Now that we have the lights positioned, it’s time to add the text. The distinguishing feature of the One Ring in the story is that when it was heated by fire, text would appear inscribed into the ring. The text was in an ancient language in ancient characters, and for this project, I simply drew them in a blank document with my Wacom pen. I added a few layer styles to give a bit of depth to the letters:
With the text created, we need a place to put it. Go to the 3D panel of the ring document, and click on the Filter by Materials, then click the flyout folder icon next to Diffuse and choose New Texture…
This creates a new Diffuse material, which shows up in the Layers Panel. Double click this to open the Diffuse Material (it opens as a document, just like a smart object):
With the new Diffuse document open, first fill it with the gold color we need to maintain the appearance of the ring. I used RGB values of R=249, G=229, B=163. We can use the move tool to drag our text into this document, then Use File > Save to save the document.
You can close it and return to the 3D document. Notice how the text wraps both inside and outside the ring. I haven’t found an easy way to restrict it to only the inside.Nevertheless, it still looks cool!
Now, with the ring all set, we simply add a suitable fiery background (I found this image on stock.xchg). Also, consider adding layer effects such as drop shadow to the 3D layer to integrate it more naturally with the background:
Now, go to the 3D panel, click the first icon to show the scene and change the Render Settings to Ray-Traced Final. You’ll see the little square rendering icon making its way across the object. For a final render it could take minutes or even hours depending on the speed of your system and the size of the file. Notice the better lighting effects, reflections, etc. Once you’re done, it’s always a good idea to stamp visible (Ctrl-Alt-Shit-E or Cmd-Opt-Shift-E) to create a merged copy – if you make the slightest 3D tweak you’ll have to re-render everything.
And there you have it… the One Ring recreated in Photoshop 3D. But more importantly – a whole load of tips for working with 3D objects. I hope you’ve enjoyed this project!







Hi! I found your post while looking for a way to restrict text to front / back as needed. Turns out, I found a way and it’s fairly simple. Thought you may want to hear.
Before editing the Diffuse texture and placing your text, first select the ring material, then go to the 3D menu and select Generate UV’s. Boom! Photoshop breaks out the planes of the ring, fron and back as well as edges.
Move your text into the required spot and save. Job done. Enjoy!
It may help when placing your text (or other decoration) to make sure that View > Show > UV Overlays is turned on.