Creating a Lensbaby Effect with Photoshop Elements
If you’re not familiar with the Lensbaby range, they are a set of lenses you can buy to attach to your SLR or DSLR camera. They are manual focus and designed especially to produce random and creative effects, where the image has a strong centre of focus with a softer, sometimes distorted outer edge.

In this tutorial we’ll be using Photoshop Elements to create a similar effect. It can be used to add a little more pizzazz to your portrait shots or to perk up an otherwise lack-luster photo. Just as with the real thing, the fun comes from experimenting with the technique: choosing different focus points; often not the one you’d normally go for, and changing the strength of the blur effects.
1. The first thing we need to do is create our area of focus. Grab the Elliptical Marquee tool (keyboard shortcut: M). Position the cursor where you want the centre of the selection to begin; for this image I decided to concentrate on the gate, slightly off centre. Hold Shift and Opt (Mac)/Alt (PC) together and drag out the selection to the size you want. The Shift key keeps the selection to a perfect circle, the Opt/Alt forces it to expand from the centre.
2. We need to feather the edge of the selection. This will create a smooth blend between the area of focus and the blur effect. Go to Select > Feather or press Cmd+Opt+F (Mac)/Ctrl+Alt+D (PC). We need a fairly high value, 30 pixels works well here; the amount will vary depending on image size – see the notes at the end of the tutorial for a tip on gauging the amount required.
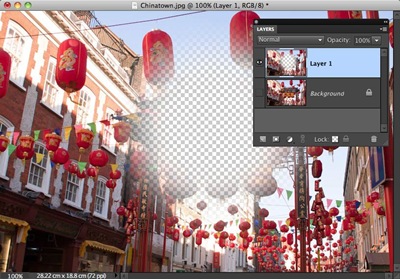
3. We’ll be creating the blur effect on a separate layer. First, go to Select > Inverse. Now everything apart from the focus area is selected. Now go to Layer > New > Layer via copy or press Cmd+J (Mac)/Ctrl+J (PC). There’s no obvious effect but if we temporarily hide the background layer by clicking its eyeball icon, we can see the hole and the soft transition to the rest of the image.
4. Now to create the blur effect. Make sure you’re working on the cutout. Go to Filter > Blur > Gaussian Blur. We don’t want the effect to be too harsh; a radius setting of between 4-6 pixels is a good value here. Again, this will change depending on the size of your image. We can see how the blur gradually lessens towards the centre of the focal area.
5. We’ll create another layer for the distortion around the edge of the image. Make sure you still have the Elliptical Marquee selected. Click in the middle of the focus area and use the modifier keys to draw it out from the centre, this time making it much larger than the first; even extending it outside of the frame in part. Inverse the selection and create a new layer as before.
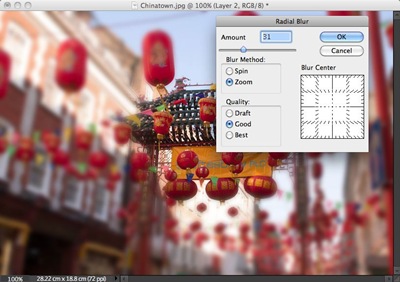
6. Go to Filter > Blur > Radial blur. We’ll start by setting the amount. Again, we don’t want the effect to be too strong; a value of around 30 should be fine. Set the Blur Method to Zoom. We’ll leave the Quality at Good. We’ll also leave the Blur Center at its default setting, although we could reposition it to match the slightly off-centre focal point. Click OK to apply the filter.
And here’s our finished image. Now have fun creating your own!
Notes: Using the Feather command can be a little hit and miss, as there is no preview to go by. Its effect also varies depending on the size of the image you’re working on. We can create our own preview, however:
Create a new layer. Use one of the marquee tools, the Elliptical marquee in this instance, to mark out a selection. Fill this with any contrasting colour. Now apply the Gaussian blur filter. As we adjust the amount of blur, we can see how the edges are affected. The pixel value can then be used in the feather dialog to create the same effect on the selection.


Leave a comment