Creating a Faux Lomo/Plastic Camera Effect with Photoshop Elements
There has recently been an explosion of smartphone apps that create all kinds of faux vintage camera effects; particularly those of the somewhat unpredictable Lomo and other poorly constructed cameras. Their easily recognizable characteristics include vignetting, heavy contrasting, colour shifts and light leaks; all issues that would usually ruin a photo but given the right image, can be even more striking than a standard well exposed shot!
For this tutorial we’ll be using this image of an old roman forum from Stock Exchange – a great free stock image site. We’ll be building the effects up using normal layers, adjustment layers, blend modes and filters. This gives us total control over the final image, allowing us to be selective as to how degraded the result ends up.
1. We’ll begin by duplicating the background layer. Do this by clicking and dragging its thumbnail onto the New Layer icon in the Layers panel, or by pressing Cmd+J (Mac)/Ctrl+J (PC). The copy will form part of the effect in this case but it’s always good practice to work on a duplicate in any editing project.
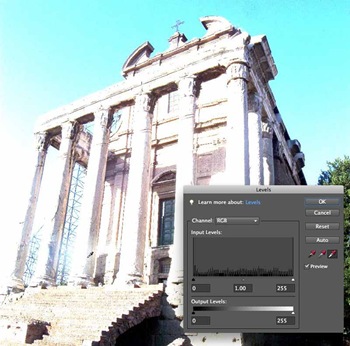
2. Now we’ll create a high-key effect; we need to take this to extremes, more so than we would ever do on a normal image. Open the Levels dialog by going to Enhance > Adjust Lighting > Levels, or by pressing Cmd+L (Mac)/Ctrl+L (PC). Select the White point eye-dropper. Now find an area of neutral grey – the slight shadow on the pillar is a good place – and click the cursor on that point. The result is far from pretty!
3. Now we’ll mix the blown out tones with the original image. Go to the Layers panel and select Overlay from the Blend mode pick list. The effect is still a little harsh so we’ll adjust the layer’s opacity to tone it down slightly. An amount of around 75% gives us a good result. This will vary from image to image and also the strength of the effect you’re after.
4. Now we’ll create the colour shift. For this we’ll use a Gradient Map Adjustment layer. This is a really powerful feature but one that’s often overlooked due to its tendency to give bizarre results when applied to an image. Go to Layer > New Adjustment Layer > Gradient Map. The effect works by using the left end of the gradient to alter the colour of the shadow areas of the image and the right end to alter the highlights; the mid-tones are taken from the centre of the gradient. Initially it is set to a Black/White gradient; this actually gives us a great monochrome effect straight off and we could stop here if we wished!
5. For our purposes we need a colour gradient so we’ll edit it. In Elements 8 and above we have a separate adjustment panel, if you are using an earlier version you’ll need to double-click the adjustment layer’s thumbnail. Click the mouse on the gradient itself to bring up the gradient editor dialog. We’ll start by setting the left-hand colour: double-click the left colour stop marker to bring up the colour picker. Here we’ll set a darkish green hue. We can see the effect immediately; the darker areas of the image have now turned green and progress to white as they become lighter. Click OK to set the colour.
6. Double-click the right-hand colour stop. This time set the colour to a shade of deep blue, roughly equivalent to the tone of the green we just applied. Again, we see how this affects the image; the areas of mid-tones to highlights have now taken on the blue hue. This obviously doesn’t give us the effect we’re after so we’ll use change the adustment layer’s blend mode to merge the colours with the original image. Now there’s no secret formula to this, it’s really trial and error until you find something you like. In this instance the Exclusion blend mode does a really good job. It was a little too strong so we’ve lowered the opacity to 65%.
7. We have our colour shift but the image is a little washed out. We’ll correct this by boosting the overall tonal levels. Go to Layer > New Adjustment Layer > Levels. Click and drag the Shadow slider to the right, here we’ve gone around a quarter of the way across. We’ve also adjusted the highlights by a small amount by dragging the Highlights slider to the left so it meets the edge of the histogram. As with all the adjustments, if it’s too harsh we can always use the opacity slider to ease off the effect. This looks fine as it is.
8. Now we’ll add a slight vignette to the edge of our image. Make sure the Levels adjustment layer is the currently active layer (by clicking its thumbnail in the Layers panel). Select the Elliptical Marquee tool (keyboard shortcut: M). Click the cursor in the top-left corner. Now click and drag to the bottom-right corner. This creates a circle that goes from edge to edge. Go to Select > Inverse. This reverses the selection so now only area outside the circle is selected. Go to Edit > Copy Merged, or press Cmd+Shift+C (Mac)/Ctrl+Shift+C (PC). This creates a composite copy (all the layers and their effects) and stores it in the clipboard.
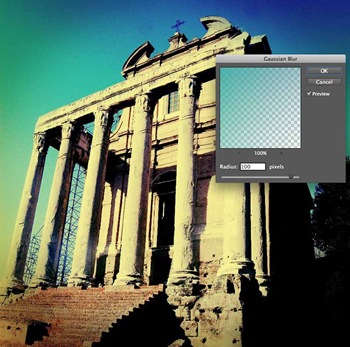
9. Go to Edit > Paste, or press Cmd+V (Mac)/Ctrl+V (PC). We don’t see any immediate difference, of course. If, however, we change the layer’s blend mode to Multiply we get a dark ring around the image border. It’s much too sharp to be a vignette so go to Filter > Blur > Gaussian Blur. We want to make the effect really soft so push the amount right up; around 100 pixels works well for this full-size image. Now we have a much more subtle but darker edge. If we wanted to make it darker still, we could simply duplicate the layer as many times as we want, until we achieve the desired result. We’ll leave it as it is for this image.
10. Finally, we’ll add a narrow black frame border. Go to Layer > New > Layer, or click the new layer icon in the Layers panel. Go to Select > All, or press Cmd+A (Mac)/Ctrl+A (PC). This selects the entire image. Now go to Edit > Stroke (Outline) Selection. For this full size image, a width of 40 pixels gives us a good size. Set the colour to black and the location to Inside. Click OK to create the stroke and complete the image.
And here’s our finished image. Remember, with effects of this kind, working through the steps exactly as they’re laid out here will work better with some images than on others. However, because we have built it up a piece at a time, we can experiment with the component effects more easily to suit a wider range of pictures. I hope you enjoyed this tutorial and have fun with your own photos!


How do you save final image so it appears in Lightroom? Do you go to File and select Save or Save As? Then go with name Elements gives it (ex. Building.edit) or do you need to add a number ( ex Building.edit.1) since Elements says a “file with this name already exists. Do you want to replace it?” I am having trouble editing in Elements 9 (updated from 5) and saving the image with the edits to LR. Thx.
Hi Barb,
Is the photo you are using coming from Lightroom in the first place? You can set LR up to make a copy and send it to Elements for editing (Preferences > External editing). When you have finished, simply save and close it and the changes will appear back in LR.
If you are opening the image outside of LR, you will need to save it with a different name, otherwise you will overwrite the original.
Great walk through, thanks!