Brush Stroke a Path
Here’s where I’m going to end up today using the easy stroke path command. 
So first off I need a path, now I could use the pen tool and the what-not, but I’m not going to. Instead I’m going to work from text. If you don’t know how to get a path from text then take a look here.
So I have my path now I want to brush along it, well that’s easy.
I’ll make a new layer to work on. (Shift+Ctrl+N)
I click on the Path tab, or if it isn’t there I could choose ‘paths’ from the ‘Window’ menu.
Now there’s my path, called Work Path. I may want to keep this for later so I’ll name it by double clicking it and typing in the dialogue box.
Next I’ll go to the bottom of the palette and choose the second icon from the left, which has the tool-tip; stroke path with brush. As this is exactly what I want to do, I’ll click it
Now the thing is this, this function used the last brush that was used, in my case this was a round soft brush. Thus, the result really wasn’t what I was after. Ctrl+z to go back
So, I’m going to load a new brush, for this example I’d like a leaf and Photoshop comes with quite a nice one.
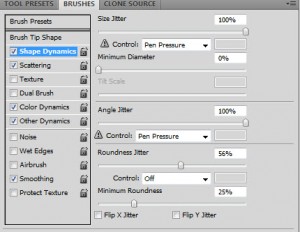
Now I’m going to alter a few bits and bobs in the brush palette.
Size of the brush always catches me out, so I’ll do that first. I have to remember that, in this case at least, the path curves around and goes back. So I need to make sure there will be a gap between the two stroked paths.
Now on the shape dynamics I want it to be quite random so Size and Angle Jitter up to 100
Next up, the Scattering. Again I have to bear in mind that the path runs parallel to itself, so I have to keep the scatter pretty minimal.
Finally in this palette I’ll do a 100% jitter between the foreground and background color. In my case I’ve set each to a shade of green.
Now when I strole the path again I get a far more pleasing, and for squirrels at least, a homely look.
The path still shows, but thats ok, it isn’t really there. Just clicking off of the path layer will hide it.
I could of course add more leaves just by stroking the path again, or maybe a few times.
Here I’ve done just that, but changed the Foreground and Background colours to shades of brown and added a touch of Drop Shadow to each layer.


Any ideas as to why when using a path in CS3, I cannot get the shape dynamics to create the bi-tapered line?
Hi Thanks,
Never mind! Figured it out.