
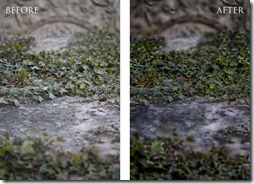
Adding Lens Blur in Photoshop
Most people spend a lot of time trying to keep their digital photos tack sharp. This quest for sharpness however overlooks that blurring can be an excellent tool for guiding the viewer’s focus when looking at a photo.
The following tutorial is adapted from my new Photoshop books.

Understanding Adobe Photoshop combines training videos and book to teach users core features and advanced techniques with an emphasis on fast learning.
Photoshop for Video covers Adobe Photoshop for video editors, motion graphics artists, and DSLR filmmakers.
Selectively blurring an image can help your viewer find a focal point. Photoshop offers a realistic lens blur that also produces depth-of-field blurring. This allows some objects to remain in focus while others fall gently out of focus.
You can be very specific in regard to the blurring if you make an accurate alpha channel to serve as a depth matte. The depth matte defines how far away things are from the camera.
• Black areas in the alpha channel are seen as being in the foreground of the photo.
• White areas are seen as being in the distance.
• You can invert the channel to swap the relationship between in and out of focus areas.
- Open any file or download our sample image here.
- An alpha channel has already been added to the image. It was created using the Calculations command and Quick Mask mode.

3. Make sure the RGB composite channel is selected in the Channels panel. Be sure to disable the visibility of the alpha channel.

4. Choose Filter > Blur > Lens Blur to run the Lens Blur filter.
5. Choose the alpha channel from the Source menu. You can click the Invert box if you need to reverse the blur. For faster previews, choose Faster. When you’re ready to see the final appearance, select More Accurate.

6. Adjust the Iris shape to curve or rotate the iris. Photoshop mimics how a traditional lens operates. Even if you are not an experienced photographer, you can twiddle and adjust as desired.
7. Move the Blur Focal Distance slider until the desired pixels are in focus. Additionally, you can click inside the preview image to set the Blur Focus Distance.
8. You can add Specular Highlights by adjusting the Threshold slider. You must set the cutoff point for where highlights occur. Then increase the highlights with the Brightness slider.

9. Finally, it’s a good idea to add a little noise/grain back into the image. Normally, the blur obscures this, but putting it back in makes the photo seem more natural as opposed to processed.
10. Click OK to apply the effect. If you no longer need it, you can trash the alpha channel.
Leave a comment