A quick look at colour correction in Lightroom 4 Beta
Exciting news yesterday as Adobe released the first public beta for Lightroom 4. Lots of people have been asking me what has changed since LR3? is it worth upgrading? etc. Based on my first impressions there are some big name changes such as the Map & Book modules, and then there are the incremental changes in the Develop module.
I’m sure in time that both the Map & Book modules will become an important part of our workflow, but for me, I am more excited by the changes to the Basic panel and the Adjustment Brushes.
As you can see from the screenshot above.. Fill Light, Recovery & Brightness have been replaced with Highlights, Shadows and Whites. This is not just a change of titles but how each slider works.. for example, even the Exposure slider now functions differently. I must say that although there is a small learning curve associated with these changes I am really pleased with the results they produce.
Anyway, on to the meat of this post..
one of most annoying things to deal with in post production is trying to colour correct an image with mixed light sources. In LR3, there was a workaround where you could paint the contrasting colour to warm or cool a part of the image but this was based on colour knowledge and guesswork.
Lightroom 4 Beta has a better solution..
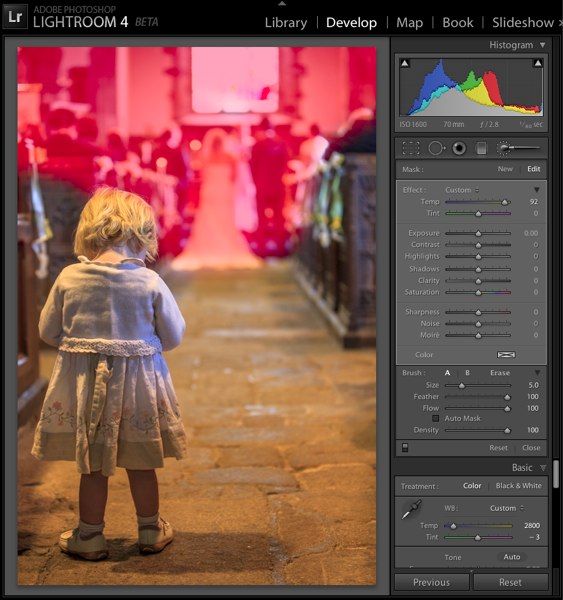
As you can see in the image above, there are 2 sources of light in the image. The church is lit by warm lights while the cooler light from the windows can be seen in the background.
Changing the White balance sliders would never produce a ‘correct’ white balance so we need to look at another solution.
Clicking on the Adjustment Brush (as indicated by the blue arrow) brings up the new and improved local adjustment panel. The big changes here are the Noise slider and the White Balance sliders. With these changes it is now possible to paint on colour correction.
Paint on the image with the Adjustment Brush, using the keyboard shortcut ‘O’ to display the mask. I have painted the mask where I want the colour correction to take place. Make sure at this point that all of the sliders are set to zero, press the ‘O’ shortcut to hide the mask.
Now change the Temp and Tint sliders to colour correct the image..
As you can see I have warmed up the background of the photo using the Temp slider to a value of 92 in this instance. It is as simple as that!
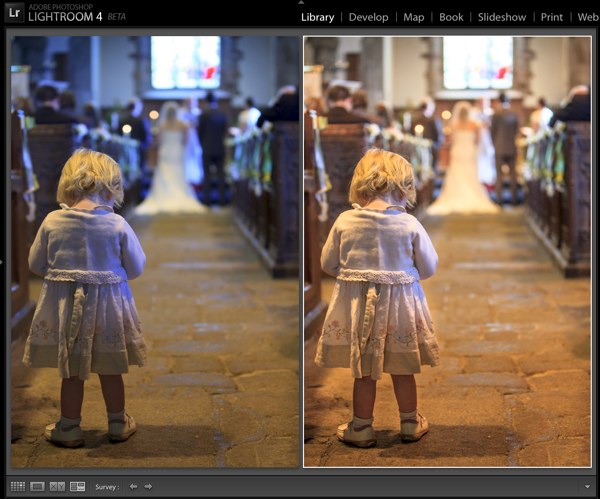
I went on to increase the colour temperature of the little girl and boost the highlight values to help her stand out a little from the background..
The final before and after image is below
I hope you have found this little look into the Lightroom 4 Beta helpful and if you have any questions please ask them in the comment section below.
The Lightroom 4 Beta is available to download from the Adobe Labs web site. It is worth understanding that this is not the final version of the software and therefore subject to change. I would also advise that if you want to try the LR4 Beta, that you use copies of your images rather than your original files.
Till next time..


Nice demonstration Scot, looks like LR4 is going to be even more useful than ever, for what I do in editing I can see I’ll be doing less in PS, although I find cleaning up the junk on some of my shoots much easier in CS5 because of the healing brush & patch tool but now LR is much more controllable which I love & is most of the reason why I’ll pop over to PS to do some editing. LR is becoming much more grown up & I can see it being all many people will need.
Thank you Jonathan,
I think there will always be a reason to go into Photoshop from Lightroom, but the less often it needs to happen the better in my opinion. Being able to make all/most changes in Lightroom really does speed up my workflow.. and time is money!
Cheers
Scot
So much potential, these improvements will really make dropping into PS from LR even less regular.
Nice run through.
Thank you Terry,
I can see lightroom being the core application for most photographers, but I think Photoshop will always be where the heavy lifting is done
Great explanation of the new local adjustments Scot!
Thank you Victoria,
so simple now isn’t it? and plenty of opportunities for creative white balance solutions for adding emotion to an image.
Good demo and great to see some new LR features at last. But I must say I far preferred your “before” photo to the corrected one!
Funny you should say that Simon, I was talking to my friend Jonathan this morning that some people might prefer the original..
My purpose is to show how to correct the white balance, it is a matter of personal taste where and when you use it.
wow… looks good, gonna wait for the proper release though…
Very interesting – I have LR 1.1 and CS3, and never really see the point of LR. But now I see that it is worth investigating 🙂
Jonathan, I have lots of photographer friends that have never seen the point of Lightroom.. until they started using it as part of their workflow. It is often hard to explain how much time LR saves in the editing process, especially when 80-90% of the images can be edited without opening up the beast that is Photoshop
Nice explanation Scot, I find that LR does just about all I need for 85% of my workflow so I am very interested in LR4 and what it may bring.
Thank you Gordon,
Always nice to know that people understand my mind waffle..
You might be able to guess but I’m a big fan of Lightroom
Oh, didn’t know they have a public beta. It’ll be awesome to give it a test run.
I hope you enjoy it Przemek, be sure to check out my other LR4 Beta tutorial on the differences in the Develop module
https://www.tipsquirrel.com/index.php/2012/01/changes-to-the-basics-tab-in-lr4-beta/
I just upgraded to Lr4. I am not able to make colour corrections to the mask – it applies to the whole image. Any suggestions on what I am doing wrong?
Hi Jo,
There maybe a few reasons why the colour corrections are not working and I can only make a best guess from here..
I would suggest that you email me a screenshot of you applying the colour correction using the mask. I suspect that either the adjustment pin is not selected or that the adjustment brush is not being used.
Send me the email and I’ll help if I can
Cheers
Scot