Using 3D Objects in Photoshop
Using 3D Objects in Photoshop
Photoshop’s 3D Engine is very flexible. It allows you to transform layers three dimensionally. More importantly, it lets you create new 3D elements including primitive shapes (such as cones or spheres). You can also make complex elements can be created using grayscale meshes. To make 3D tasks easier in Photoshop, choose Window > Workspace > 3D. This rearranges panels so that all the 3D tools are easy to access.
Creating 3D Layers
Photoshop offers several tools that allow you to create 3D primitives or shapes. These objects can be positioned, lit, and surfaced. Photoshop offers:
• 3D Postcards – These layers are virtually identical to promoting a layer to 3D in After Effects.
• 3D Shapes – Photoshop gives access to 12 shapes including several useful primitives that can be stretched or modified.
• Grayscale Meshes – You can create very elaborate, custom 3D models from grayscale textures.
3D Postcard
Any layer in Photoshop can be converted into a 3D Postcard (Figure 1) by choosing a layer and selecting 3D > New 3D Postcard From Layer. A 3D Postcard works well to add a floor or wall used to catch reflections or shadows. Typically however, we choose to perform this task in After Effects with a new solid.
3D postcards can be rotated and positioned in 3D space inside of Photoshop Extended.
What we find more useful is the ability to gain After Effects-style transformation controls when using 3D Postcards inside of Photoshop (Figure 8.14). When we are storyboarding animations, these controls are much more flexible than trying to fake transformations using Free Transform and Perspective commands.
3D Shapes
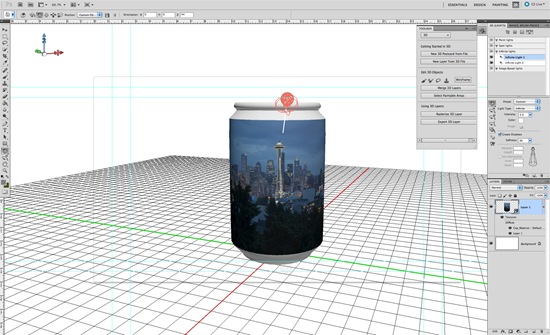
If you’re looking to create basic 3D objects, Photoshop has a flexible 3D engine with preset shapes. There are 12 shapes to choose from, including single-mesh objects like a donut or sphere, as well as multiple mesh objects such as a cone, cube, cylinder, soda can (Figure 2), or wine bottle.
New textures can be wrapped to the surface of objects. This includes both photos and video layers.
To create a new 3D object, simply select the texture, photo, or video layer you want to use and choose 3D > New Shape From Layer, and select a shape from the menu. Several of the 3D models contain multiple meshes (such as the Cube). You can decide to open a model’s surfaces independently by double-clicking a mesh in the 3D panel. Once open, you can assign new textures to your model.
You can put your own custom shapes into the shape menu. Each shape is merely a Collada (.dae) 3D model files. To add more, place the Collada model file in the Presets\Meshes folder inside the Photoshop application folder.
Mesh
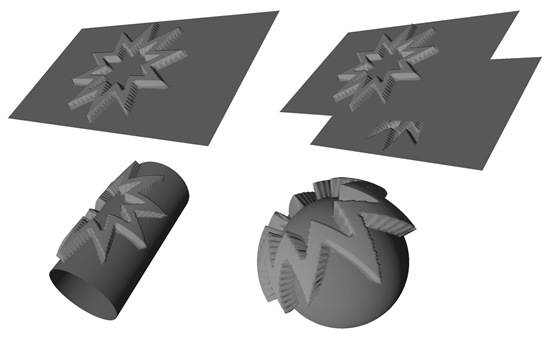
An interesting way to create custom 3D models is to use grayscale meshes (Figure 3). By starting with a layer filled with 50% gray (Figure 4), you can define what happens. Using darker colors will create a recessed area. Using brighter colors with create higher areas. The command is invoked by selecting a grayscale layer and choosing 3D > New Mesh from Grayscale. If you use a colored image, the green channel will be used for the mesh. If using a grayscale file, be sure to preprocess the layer with a Levels adjustment.
Using darker or lighter shades will influence the direction of the extrusion.
A quick way to access 50% gray is the press Shift+Delete to open the Fill dialog.
This mesh can then be applied to a shape inside of Photoshop (Figure 8.19):
Photoshop offers four different 3D shapes based on meshes
• Plane: Applies the depth map data to a planar surface.
• Two-Sided Plane: Creates two planes mirrored along a central axis. The depth map data applies to both planes.
• Cylinder: Applies depth map data outward from the center of a vertical axis.
• Sphere: Applies depth map data radially outward from a center point.
To produce curves, blur the texture first to create a softer gray area. If you want harder angles, use a high-contrast mesh.
The grayscale layer that created the depth map remains editable. You can double-click it in the 3D panel to open it and edit.
Book excerpt from the new Adobe Press book – Motion Graphics with Adobe Creative Suite 5 Studio Techniques.


Thnx for the great tutorial i will try to use it!
Very informative tutorial! A big thanks!
Thanks for the tutorial, I have a question; you say that 3D Shapes contains 12 presets, but I mis the cube and have only 11 presets. Can you tell me where to find the cube?
I Was More Than Happy To Search Out This Web-site.I Needed To Thanks To Your
Time For This Glorious Learn!! I Positively Enjoying Every Little Bit Of It And
I Have You Bookmarked To Take A Look At New Stuff You Blog Post. taruhanbolaterbaik