
Photoshop’s Image Size Resampling Options
When you resize images in Photoshop, you are adding or deleting pixels to your image. As the pixels are created or destroyed, how do you control the way Photoshop decides how to color the new pixels, or what to throw away? Photoshop has several methods (techies call them “algorithms”) that allow us to affect the image resize process in different ways. The way that the “in between” pixels are assigned colors is by a variety of different estimating or averaging processes that take into consideration the surrounding pixels (techies call this process “resampling,” and estimate the colors using a process called “interpolation.”) We’ll take a brief look at each of these and discuss how and when to use them.
To begin, we should investigate Photoshop’s preferences, in which the default image size methods are set. Choose Edit > Preferences > General… and look at the options for Image Interpolation:
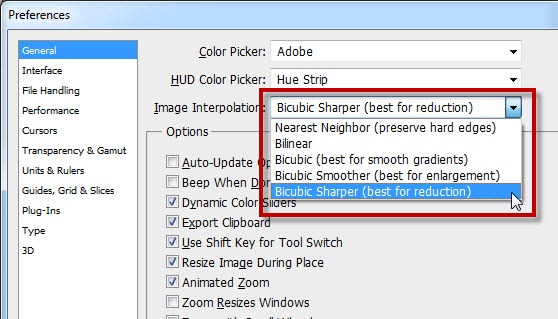
As you can see, there are 5 methods of estimating how the pixels are created or destroyed, and most of the methods have a brief description indicating how they might be used. However, we’ll take some artistic liberty and I’ll give you the “Mike Hoffman” view of each of these:
Nearest Neighbor – Preserve hard edges. This method is usually bad, but has its uses. In my opinion, this method is the best for enlarging screen captures, such as you see in this tutorial. We’ll take a look at this in a moment.
Bilinear – This is one of the older methods available. The help file indicates that this method produces “medium-quality” results, which you can interpret to mean, “don’t ever use it.”
Bicubic – Best for smooth gradients – This method, according to the help file, produces smoother results than Nearest Neighbor or Bilinear. What the help file doesn’t tell you is that it isn’t as good as the next two. Read on.
Bicubic Smoother – Best for enlargement. This one is adequately described. It is better than any of the above for enlarging your typical photographic images. As mentioned above, it doesn’t work as well for screen captures or hard-edged illustrations.
Bicubic Sharper – Best for reduction. Also adequately described. However, not only is this method great for reducing the size of your photographic images, my personal experience is that it is also really good for enlargement. Your mileage may vary.
So, based on the above assessments, which include my personal opinions, I have my interpolation set to the default of Bicubic Sharper. Setting this is important, because this interpolation method appears as a default in some dialog boxes, but is used silently in other cases. For example:
Image > Image Size – includes a drop-down box for interpolation, and the default value is taken directly from the preferences:

File > Save For Web and Devices – includes a drop-down box for interpolation, but the default value is NOT carried over. Be careful here:

Edit > Transform > Scale and Edit > Free Transform – doesn’t prompt for the method, it simply uses the default method from the preferences.
So, the bottom line is – set your preferences, but be aware of when these methods are used – and change them if necessary for the best results!
Let’s look at a special use case. As mentioned, I normally use Bicubic Sharper, but when I want to enlarge screen captures (especially for print) the Bicubic methods don’t provide the best results. This is largely due to the fact that bicubic (whether smoother or sharper) does its work by blurring and averaging adjacent pixels. In the case of screen captures, where we have icons, fonts and many rectangular features, this has its disadvantages.
This is when I resort to Nearest Neighbor. Consider this screen snapshot of some Photoshop panels:

At full size, this is quite small. Furthermore, being a screen shot, the image appears at around 72ppi, give or take depending on the monitor. If we wanted to print this in a document, we’d need at least twice that resolution or more.
So, what if we used Image > Image Size to enlarge it? We have the ability to select the interpolation method within the image size dialog box. If we compare the results of Bicubic Smoother (on the left) to Nearest Neighbor (on the right) we can see the problem right away (you may need to click the image to see the 100% size version):

Notice the artifacts in the result from Bicubic Smoother? The colored squares have almost a grid pattern, and all the straight lines have blurry haloes. The fonts are also blurry, and if you look at the double arrows at the top, you can see the pixel edges (jagged squares) on the right while the arrows are blurry on the left. In the case of the arrows, you could almost make a case for Bicubic Smoother, but in general for an image that we want to print, we’re better off with the image on the right, created with Nearest Neighbor. It’s much more crisp and will transfer better to print, especially if we’re going to an offset process.
The key message here is: know that these options exist. Experiment. Look closely at the results, examining at 100% or 200% and evaluate what you see. Don’t ever assume that “default” behavior is best for your application.
Happy Photoshopping, and I’ll see you next week!


nice tutorial thanks
Hi
I would be very grateful if you could send me the best settings to send a file from LR to CS5 to be extra enlarged (the final print to be 200cm X 120cm). The photo was taken with a Nikon D700 using RAW.
DNG, original, PSD or TIFF, enlarged or not enlarged (from LR to CS), with what resolution?
Would I loose quality by transferring from LR to CS5 and then resizing with a better resolution?
I will need to do a bit of retouching and save it JPEG to send to the printing company.
After the retouching which one is the best way possible to resize and preserve as much quality as possible? I am sorry I am so useless at this…. I look forward to hearing from you.
I’ve been always expanding to select “Bicubic (best for gradients)” instead setting as default on the main tab in Preferences!?
The darkest place is under the candlestick 🙂 Thanks!