
Blur Gallery and Liquify Smart Objects
Creative Cloud – Photoshop CS6 Update
I thought today would be a good time to post an update on Photoshop CS6, and the new Photoshop features Creative Cloud members received this week. Chief among them is Smart Object layer support for the Blur Gallery, and the Liquify Filter. This tutorial provides a quick overview of how the features in Blur Gallery and Liquify can be combined for an interesting creative effect. Sure, it’s fall colors but I bet some of you are already tired of the barren winter trees! 🙂
Step 1 – Create Your Smart Object Layer
First thing’s first: make sure to duplicate your background layer, then right-click on it and choose “Convert to Smart Object”. Alternatively, you can choose Layer > Smart Objects > Convert to Smart Object. This should only take a couple seconds unless you’re working on a very large file.

(Click through on the inline images to view their original attachments / images at their original size.)
Step 2 – Open the Blur Gallery
Once your Smart Object Layer has been created and is selected, choose Filter > Blur > Tilt-Shift. The Blur Gallery as Adobe calls it, comprises the first three filters listed in the Blur section — Field Blur, Iris Blur, and Tilt-Shift. They all use the same (brand new) filter interview, which provides you with a full-sized preview!

Step 3 – Set up Your Focus Effect
For this demo, we’ll use the Tilt-Shift controls to selectively focus in on the most important region of the photo, and blur everything else that is in front of or in back of that region. This can sometimes create an interest “miniaturization” illusion, where it looks like you may have photographed a diorama instead of an actual place. Note you can use more than one “widget” in order to have more control over where the blur effects occur. Just click anywhere on the preview with the thumbtack icon and you’ll see a duplicate set of controls appear on-document.
As you look at the screenshot above, everything from the dashed lines to their nearest, outer edge of the frame, will be blurred to the full extent define by the Blur control (right). Everything between the dashed and solid lines will define a “blur transition zone” (it’s analogous to feathering a selection), and everything between the solid lines and the central “anchor point” will be 100% in focus. These lines can be dragged and rotated — go ahead and give it a shot on one of your own images!
For this shot I’m going to leave the widgets level, but will make the transition zones smaller and drag the solid lines to the areas I want to be in focus. Finally I reduced the default blur amount slightly. You should experiment with the High Quality option (in the Options Bar) as well, to see if it improves the look of your preview. When you’re ready to apply your smart filter, click OK!

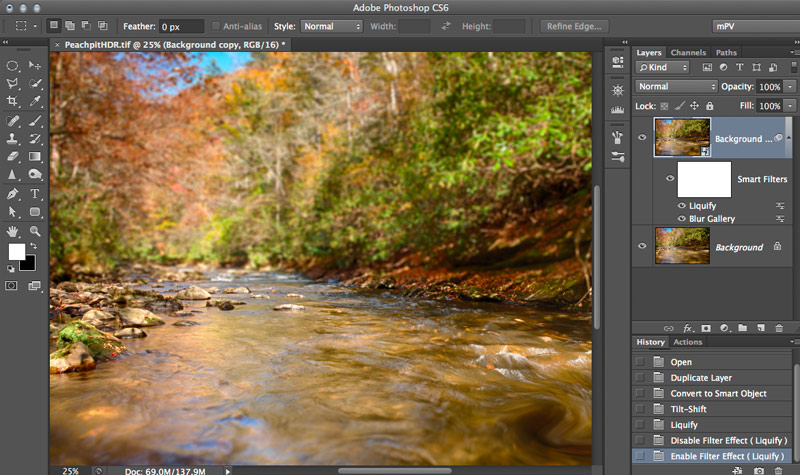
The result of this process is you will be greeted with a new Smart Object / Smart Filter layer (below). To change your settings non-destructively, just double-click on the name of the filter and Photoshop will bring you back into the filter, so you can modify things. Above you can see the focus effect helping draw our eyes into the frame and removing small distracting details in the background.

Liquify!
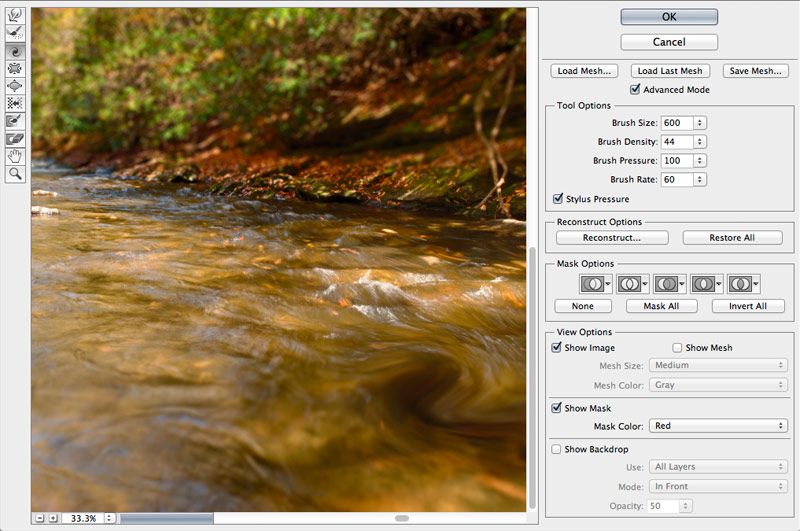
With your Smart Object layer again selected (or you can create a second one by duplicating the background again and following Step 1), choose Filter > Liquify. Once the filter opens click the “Advanced Mode” button to provide more opportunities to customize your brush and the other settings related to the Liquify tools (left side of window). For this demo I’m going to create a “flow wave” (as if water is flowing over a rock near the bottom right corner) using the Clockwise Rotate tool.
Press C to access the tool, then turn on the “Stylus Pressure” option by clicking it, and reduce the Brush Density and Brush rate to “scale back” the appearance of the effect (otherwise it will look like we’ve added a harsh “2D Twirl” to a depiction of a 3D scene). From there I boosted the brush size up so the wave would match the surrounding flows in the water. Then to create the effect, click and drag a short distance; you may need to undo and re-try a few times with different settings to get the look you want. Note that Liquify is almost always used to create a special effect rather than a realistic one, but it’s still fun to experiment with so give it a shot!
When you’re done, just click OK and Photoshop will rapidly process the changes (Liquify is now “GPU enhanced” meaning it can use your graphics processor to speed up the process), and the Liquify step will be added to your Smart Object layer!
Happy Holidays everyone!
If you’d like to learn more about the new Blur Gallery filter, as well as important image adjustments, and new retouching tools like Content-Aware Move, you may be interested in my 3 hour Photoshop CS6 training course (in HD, straight to your computer or mobile device), designed to benefit photographers of all levels. 🙂


Leave a comment