
Healing Acne With Photoshop
For more amazing photoshop tips and tricks check out Janine’s series’ on Lynda.com! Here’s a link to 7 days FREE too!
Unfortunately, acne’s a normal part of adolescence (and, more often than not, adulthood), one that can be quite embarrassing for the person sporting it. Sometimes, it’s just as painful looking back at photographs and seeing the cursed red spots. My son, Jason, had terrible acne when he was in junior high, until he went to a dermatologist to take care of it. To this day, he’s still embarrassed to see those old pictures. So, even amongst all the discussion out there over whether using Photoshop to manipulate a photograph is good or bad, or ethical or not, maybe it’s not such a bad thing to do a little Photoshop magic on a senior photograph, or clean up a social media profile shot.
Regardless of your personal opinion on that matter, I’m going to show you one way to erase a little acne in someone’s life. By the way, the photo I’ll be using for this tutorial is not my son, it’s a stock photo provided by our friends at Fotolia.

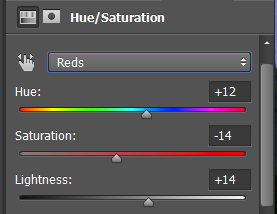
The first thing you’ll want to do is to take as much of the red out from the acne and surrounding areas. That will make the actual removal of the blemishes very much easier. To do this, make a Hue / Saturation Adjustment layer. Since it is the red we’re trying to get rid of, set the drop down menu to Red. Now move the Hue slider to the left and then the right – the goal is to find the color that makes the acne stand out the most.
It’s not going to be a set direction, or color or setting; it will be different with each image.

In the image, above, you can see that the acne stands out purple. With the other colors on the slider, it nearly disappeared. You want it to stand out. Once you have the acne standing out, loud and proud, go back to the Hue/Saturation adjustment panel and move the slider at the bottom of the panel until the redness, now purple is isolated from the skin surrounding it. Keep an eye on the channel drop down because if you go too far, the red channel can turn into magenta. You don’t want that; got to keep it in the red.

Once the redness / purple is isolated, go back to the Hue / Saturation sliders and zero them out.

Now move the Hue, Saturation and Lightness sliders until the acne becomes as close to the color of the surrounding skin as possible. It will more than likely make the skin on the yellow side, but that’s ok. We’ll add some red back in shortly.

Now that the redness is gone, we can start removing the acne; but first, let’s put the color back in the lips. With the mask active on the Hue/Saturation layer and the foreground color set to black, take the brush tool and draw in the lip area. Next pick a healing tool. Most people would automatically reach for the Spot Healing Brush Tool, but in this case, for me, it was too uneven. That’s how this Photoshop thing works, different tools work at different times on different images. If you don’t like the result with one tool, try another!

I liked the result of the Healing Brush Tool (the second down in the Healing Tool menu). I simply sampled a clear area of the skin and used a brush size that was roughly the size of the blemish I was working on. If you use this brush, remember to pick the brush up often so you stay in the sampled area.

Once the acne has been banished to your liking (and you can always go back and take care of any you missed later. I did…can you find it?), you can add some redness back into the skin. Not a lot, just a hint to take the sallowness out. Begin by using the eyedropper tool to sample the lips. That will give you your red color. Make a new, blank layer and use the brush tool to color over the skin.
Set the Layer Blend Mode to Soft Light and take the opacity down to around the 50-60% range.

And that should pretty much take care of clearing up the acne. Keep in mind, you don’t want the skin to look too smooth, try to keep the original texture intact, especially working on male skin.

For more amazing photoshop tips and tricks check out Janine’s series’ on Lynda.com! Here’s a link to 7 days FREE too, so what are you waiting for?
Great! Easy to do and understand.