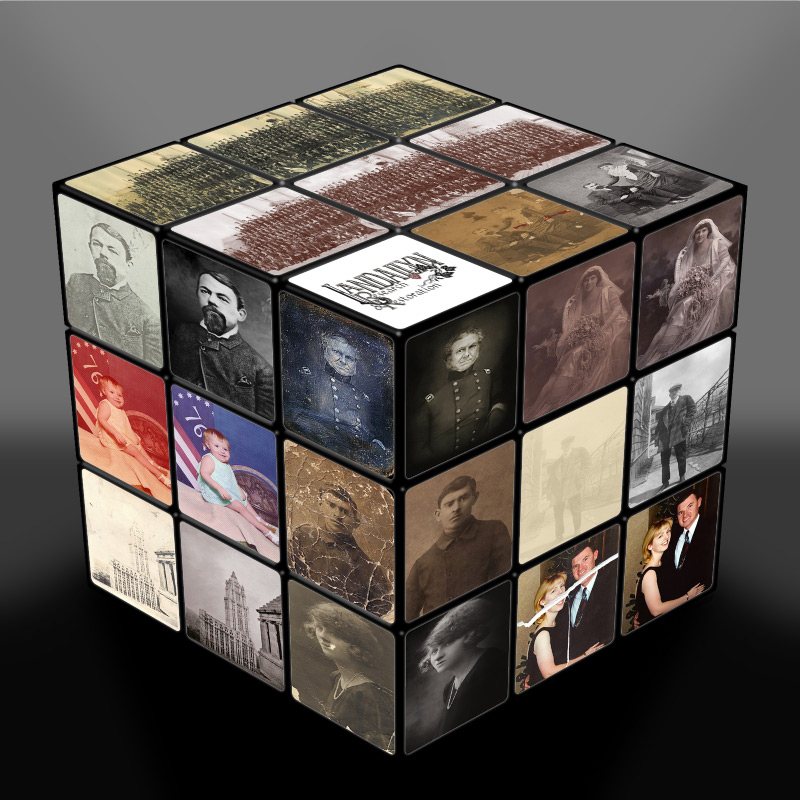
Cube-ism
Have you ever wanted to put a photo into a (virtual) picture frame and just had a heck of a time doing it? No? Am I the only moron on board? I actually spent untold hours trimming around edges of pictures to make them fit into shapes…it makes my head ache just thinking about it!
Ok, in my defense, it was a long time ago, but I obviously wasn’t savvy enough to know about a wonderful little bit of magic in Photoshop called the Paste Into command. Once I discovered it, life became a whole lot easier! Today I’m taking a break from photo restoration to show you a fun little project using the Paste Into command.
First a bit of background. I decided it was time to do something (finally) with Landailyn Research & Restoration’s fan page on Facebook. The old one, aside from my not having actually posted anything on it, looked pretty trite, and just tired. Tired of being neglected! So I got to thinking, trying to come up with a different way to show some of my before / after work.
I don’t know how the idea popped into my, but pop it did: a take on a Rubik’s cube! Nifty! So I enlisted my good friend, Google, and we went looking for a cube to use as a template. At first, of course, I made the whole thing way to complicated, trying to actually use the photo of the cube itself as the base. Waaayyyy too complicated! I finally snapped back to reality and said “Hey, Brain Trust! You’re supposed to be an good at this Photoshop thing! So use your skills, woman!” And so, I did. Let me tell you, making the whole thing from the ground up was so much simpler!
Once I put the finished product on Facebook, I started getting a lot of comments and requests. Seems others might find ways to make use of my little cube, at least I hope so! To that end, I’m going to go over how to put your images on a Landy Cube, and provide you with the .psd file to get you started!
Unzip your file and open in Photoshop. You’ll notice that it’s just made up of two little layers, the cube base and the squares. I actually could have had it all one layer, I just wanted to be difficult. While working, you can have the base on, or not. It’s the squares we’ll be working with. The object of the exercise is to get your photo to fit in the square and actually look like it’s pasted on the cube.
Open the image you’d like to use. Select the area, or the entire image, and copy (Ctrl or Cmd +C or Edit > Copy). Using the Magic Wand tool, select the square you want your image to reside in.
Now, go to Edit > Paste Special > Paste Into.
Your image will appear inside the area you selected and in the layer stack as a shape layer.
Once your image is in the selection, it’s time to transform it by using keyboard short cut Ctrl (or Cmd) + T, or by going to the Edit > Transform menu. Then, either in the Transform menu or by right clicking inside the transform area, select Distort.
We’re doing this because in this particular case all of the shapes are at different angles. Grabbing the corner handles, move them to the edges around the white shape on all four corners.
Repeat for all the squares and that’s pretty much how easy that is! To give the image a little depth and make it look more like it’s pasted on instead of inside the shape, just give it a bit of a Layer Style in the form of an Outer glow. All standard settings except you’ll change the Elements Size to 5 px and the actual glow color from the lovely yellow default to hex value #7F7F7F.
But what if you want one photo to cover an entire side of the cube? Easy! Just select every square you want the image to show up in before you use the Paste Into command!
Okay, it’s a pretty nifty cube, right? So what can you do with it, exactly? Well, the first thing you’ll want, probably, is a place to show off your cube. If you have a blog or Facebook for instance, show your friends, family and customers your cube-ness! Cube your family history! Cube your old photo collection! Old baseball card collection? Cube it!
Just for grins, I cubed five of my favorite artists, my Facebook, Twitter and NAPP fellows. These are really talented people; do yourself a favor and give their portfolios a look!
Show me your cube-ness! I’d love to see what you come up with! Post your cubes on Landailyn Research & Restoration’s wall on Facebook! Happy Cube-ing!
Landy Cube .psd:
http://landailyn.com/TS/Landy_cube.zip
Artist links:
Patrick LaMontagne, Cartoon Ink
Christine Pentecost, Bridger Mountain Photo
Pat Wendt, NAPP Portfolio
Giesla Hoelscher, Inkblots
Sharron Benn, ShazNYC
Thanks to you all for letting me cube you!


Awesome, awesome info here. I’ll just have to try this one and post it on my web site. This would make a great intro page.
On the Outer Glow part, do I select the cube layer or the photo layers?
I selected the Cube layer then add the Outer Glow, and I do not see a visual difference.
Very cool project; thank you so much!